1. Introduction
Thank you for choosing the Airpher Cordless Vacuum Cleaner. This manual provides essential information for the safe and efficient operation, maintenance, and troubleshooting of your new vacuum cleaner. Please read it thoroughly before first use and keep it for future reference.
The Airpher Cordless Vacuum Cleaner is designed for versatile cleaning across various floor types, including carpets and hard floors. Its lightweight design, powerful suction, and long-lasting battery make it an ideal solution for everyday cleaning tasks, including pet hair removal.
2. Product Overview
Familiarize yourself with the components of your Airpher Cordless Vacuum Cleaner.
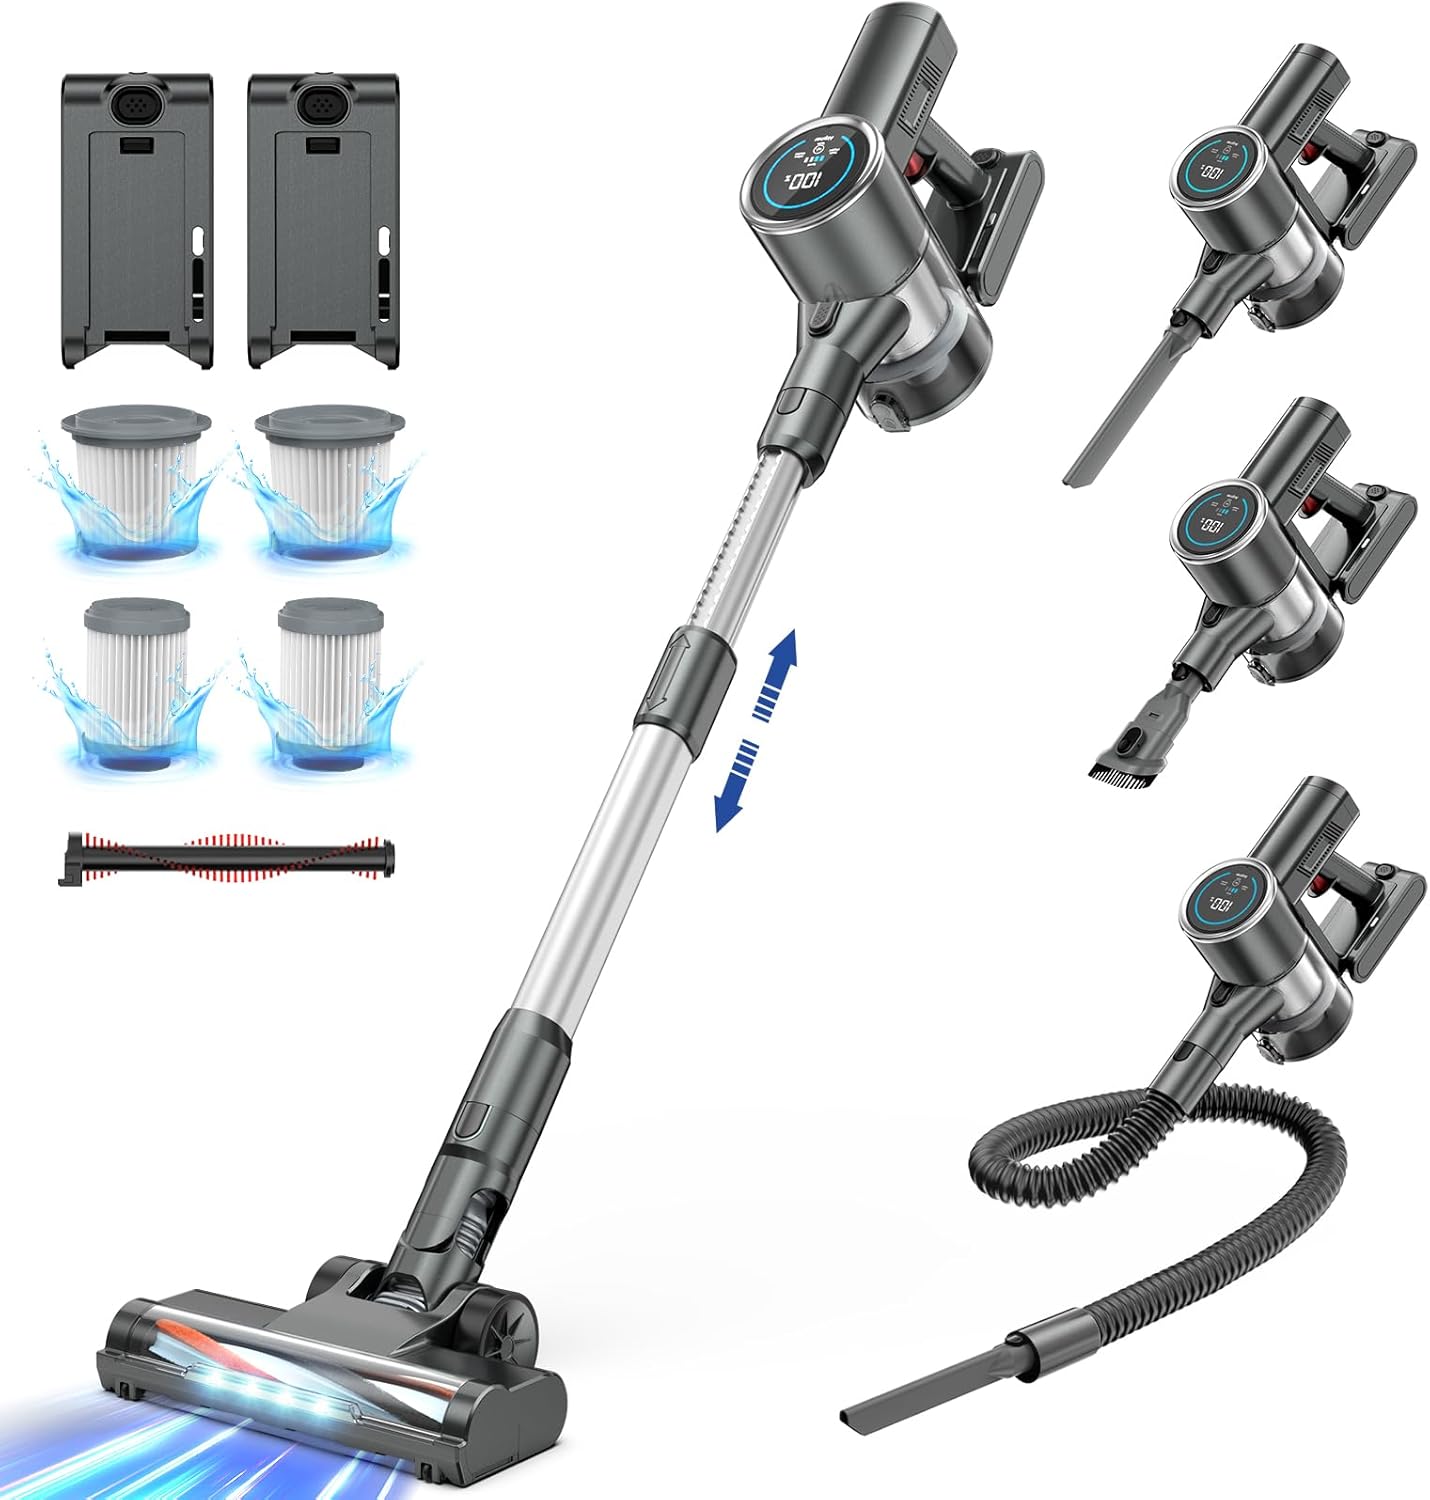
Figure 2.1: The Airpher Cordless Vacuum Cleaner shown with its main body, extension wand, floor brush, and various accessories including extra batteries and filters.

Figure 2.2: A detailed view of all included components: main motor unit, extension wand, floor brush, two batteries, charging adapter, wall mount, crevice tool, 2-in-1 dusting brush, flexible hose, and spare filters.
Included Components:
- Main Motor Unit with Dustbin
- Extension Wand
- Motorized Floor Brush
- Two (2) Rechargeable Batteries
- Power Adapter/Charger
- Wall Mount Bracket
- Crevice Tool
- 2-in-1 Dusting Brush
- Flexible Hose
- Spare HEPA Filters (2)
- Spare Roller Brush (1)
3. Setup
3.1 Assembly
- Attach the Extension Wand: Align the extension wand with the main motor unit and push until it clicks into place.
- Attach the Floor Brush: Connect the motorized floor brush to the other end of the extension wand, ensuring it clicks securely. For handheld use, attach accessories directly to the main motor unit.
- Insert Battery: Slide one of the rechargeable batteries into the battery slot on the main motor unit until it locks.
3.2 Charging the Battery
Before first use, fully charge both batteries. Each battery provides up to 50 minutes of runtime, totaling 100 minutes with two batteries.

Figure 3.1: The two high-capacity batteries included with the vacuum cleaner, providing extended runtime.
- Connect the power adapter to a wall outlet.
- Plug the charging cable into the charging port on the battery. The battery can be charged while attached to the vacuum or separately.
- The battery indicator on the LCD display will show charging progress. A full charge is indicated by 100% on the display.
3.3 Wall Mount Installation (Optional)
The included wall mount allows for convenient storage and charging.

Figure 3.2: The wall mount provides a convenient storage solution for the vacuum and its accessories.
- Choose a suitable location near a power outlet.
- Mark the drilling points using the wall mount as a template.
- Drill holes and insert wall anchors (if necessary).
- Secure the wall mount to the wall with screws.
- Hang the vacuum cleaner on the mount for storage and charging.
4. Operating Instructions
4.1 Powering On/Off and Suction Adjustment

Figure 4.1: The Airpher vacuum effectively cleans various debris, including dust, debris, and pet hair, from carpets.
- Power On: Press the power button on the handle to start the vacuum.
- Adjust Suction: Use the '+' and '-' touch buttons on the LCD display to cycle through suction modes (Min: 15Kpa, Mid: 25Kpa, Max: 33Kpa).
- Power Off: Press the power button again to turn off the vacuum.

Figure 4.2: The vacuum offers three adjustable suction levels: Min (15Kpa for 50 min runtime), Mid (25Kpa for 30 min runtime), and Max (33Kpa for 20 min runtime).
4.2 Using Different Brush Heads
The vacuum comes with two specialized brush heads for optimal cleaning on different surfaces.

Figure 4.3: The vacuum includes a universal brush head for various surfaces and a specialized blankets brush head for delicate fabrics.
- Universal Brush Head: Ideal for both hard floors and low-pile carpets.
- Blankets Brush Head: Designed for delicate surfaces like blankets and upholstery.
4.3 Understanding the LCD Display
The built-in LCD display provides real-time information about your vacuum's status.
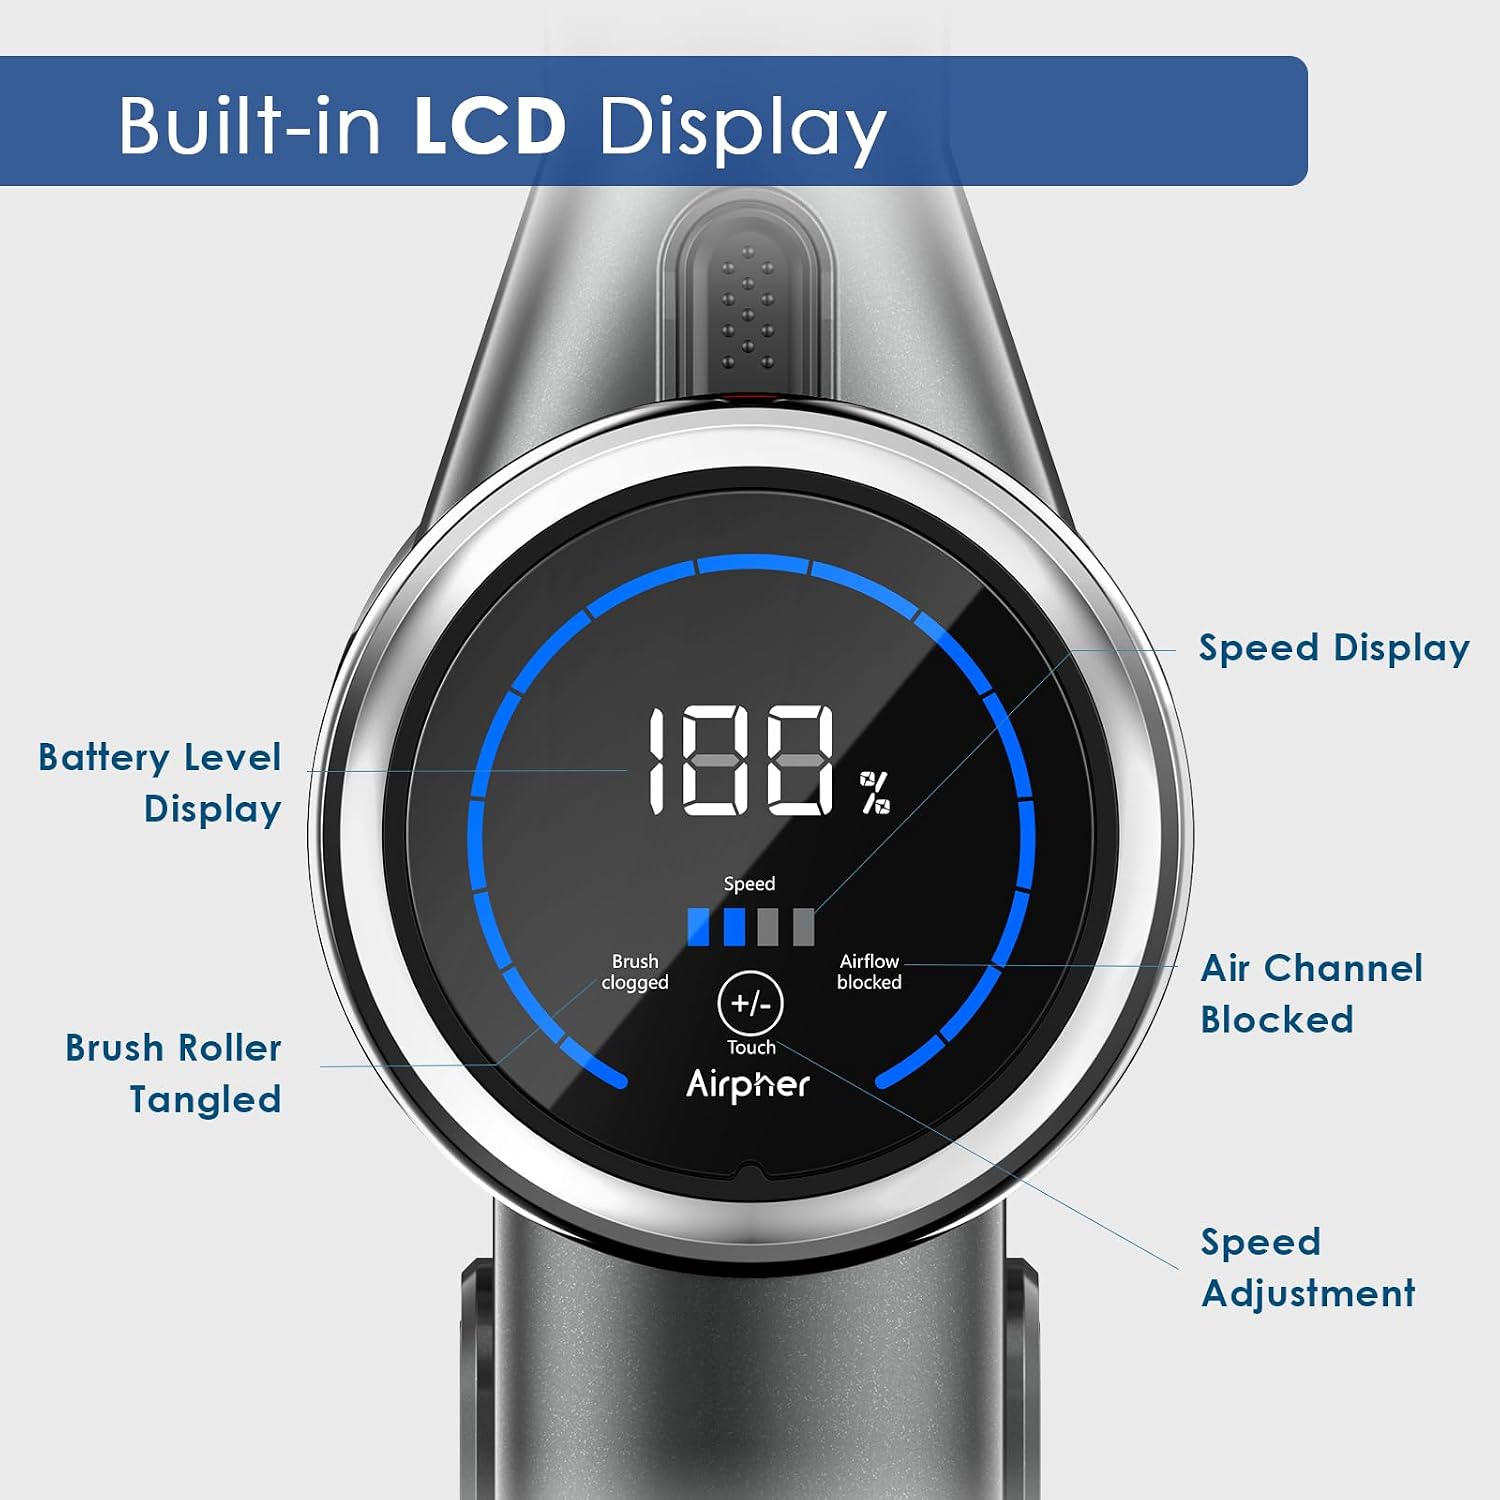
Figure 4.4: The LCD display shows battery level, current speed, and indicators for brush roller tangles or blocked air channels.
- Battery Level Display: Shows remaining battery percentage.
- Speed Display: Indicates the current suction mode (Min, Mid, Max).
- Brush Roller Tangled Indicator: Illuminates if the brush roller is obstructed.
- Air Channel Blocked Indicator: Illuminates if the air channel is blocked, indicating a need to check for clogs.
4.4 Using Accessories
The Airpher vacuum comes with various accessories for specialized cleaning tasks.

Figure 4.5: Examples of accessory usage: the crevice tool for tight spaces, the 2-in-1 dusting brush for surfaces, and the flexible hose for reaching awkward areas like car interiors.
- Crevice Tool: Perfect for narrow gaps, corners, and edges.
- 2-in-1 Dusting Brush: Use the brush for delicate surfaces like keyboards or curtains, and the nozzle for upholstery.
- Flexible Hose: Extends reach for cleaning car interiors, high shelves, or intricate areas.
4.5 Maneuverability and Lightweight Design

Figure 4.6: The ultra-lightweight design (4 lbs net weight) allows for easy overhead cleaning, such as curtains.

Figure 4.7: The flexible head design allows for deep cleaning under furniture, reaching hidden dust with 180-degree horizontal and 90-degree vertical rotation.
The Airpher vacuum is designed to be lightweight and highly maneuverable, allowing you to clean hard-to-reach areas with ease.
5. Maintenance
Regular maintenance ensures optimal performance and extends the lifespan of your vacuum cleaner.
5.1 Emptying the Dustbin
Empty the dustbin regularly, ideally after each use, to maintain strong suction.

Figure 5.1: The dustbin can be easily detached and emptied by pressing the release button and opening the bottom flap.
- Hold the main motor unit over a trash can.
- Press the dustbin release button to open the bottom flap and empty the contents.
- Close the flap securely until it clicks.
5.2 Cleaning Filters
The vacuum features a five-stage filtration system. Clean the filters regularly to prevent loss of suction.

Figure 5.2: The five-stage filtration system includes a cyclone system, stainless steel strainer, pre-HEPA filter, HEPA filter, and grid filter for comprehensive air purification.

Figure 5.3: The dustbin and filters are washable. Ensure all components are completely dry before reassembling.
- Twist and pull to remove the filter assembly from the dustbin.
- Separate the pre-HEPA filter, HEPA filter, and stainless steel strainer.
- Rinse all washable filter components under running water until clean. Do not use detergent.
- Allow all parts to air dry completely for at least 24 hours before reassembling and placing back into the vacuum. Ensure they are completely dry to prevent mold or damage.
5.3 Cleaning the Brush Roll
Periodically check the brush roll for tangled hair or debris.
- Turn off the vacuum and detach the floor brush.
- Locate the brush roll release tab/button and remove the brush roll.
- Use scissors or a cleaning tool to cut and remove any tangled hair or fibers.
- Rinse the brush roll if necessary and allow it to air dry completely.
- Reinsert the clean brush roll until it clicks into place.
6. Troubleshooting
Refer to this section for common issues and their solutions.
| Problem | Possible Cause | Solution |
|---|---|---|
| Vacuum does not turn on | Battery not charged or not inserted correctly. | Ensure battery is fully charged and securely inserted. |
| Low suction power | Dustbin full; Filters clogged; Air channel blocked; Brush roll tangled. | Empty dustbin. Clean or replace filters. Check for and clear blockages in the wand or hose. Clean brush roll. |
| Brush roll stops spinning | Brush roll tangled with hair/debris; Obstruction in floor brush. | Turn off vacuum, remove brush roll and clear any tangles. Check for foreign objects. |
| Short battery runtime | Battery not fully charged; Using Max suction mode; Battery degradation. | Ensure battery is fully charged. Use lower suction modes for longer runtime. Consider replacing battery if old. |
| Unusual noise | Blockage in air path; Damaged component. | Check for and clear any blockages. If noise persists, contact customer support. |
7. Specifications
Key technical specifications for the Airpher Cordless Vacuum Cleaner.
| Feature | Specification |
|---|---|
| Brand | Airpher |
| Model Name | Airpher Cordless Vacuum Cleaner |
| Item Model Number | 1 |
| Special Feature | Bagless |
| Filter Type | Cyclonic Filter |
| Included Components | 2 Batteries |
| Is Cordless? | Yes |
| Runtime | Up to 1 hour and 40 minutes (100 minutes with 2 batteries) |
| Recommended Uses For Product | Carpet, Hard Floor |
| Form Factor | Stick |
| Color | Gray |
| Battery Description | High Capacity |
| Noise Level | 63 dB |
| Controller Type | Push Button |
| Motor Horsepower | 6.034549 horsepower |
| Control Method | Touch |
| Portable | Yes |
| Number of Power Levels | 3 (Min, Mid, Max) |
| Indoor/Outdoor Usage | Indoor |
| UPC | 762716115637 |
| Product Dimensions | 17.44 x 13.7 x 7.76 inches |
| Item Weight | 9.57 pounds |
8. Warranty & Support
8.1 Warranty Information
Please refer to the warranty card included in your product packaging for detailed warranty terms and conditions. Typically, Airpher products come with a limited warranty covering manufacturing defects from the date of purchase.
8.2 Customer Support
If you encounter any issues or have questions not covered in this manual, please contact Airpher customer support. Have your model number and purchase information ready for faster service.
For the most up-to-date contact information, please visit the official Airpher website or refer to your product packaging.


