1. Introduction
This manual provides detailed instructions for the setup, operation, and maintenance of your MT-VIKI Gaming Audio Mixer, Model MT-LHY1. This device is designed to enhance audio for live streaming, recording, podcasting, and gaming on various platforms and devices, including PCs and mobile phones. Please read this manual thoroughly before use to ensure optimal performance and safety.
2. Safety Information
- Power Supply: Use only the specified power adapter (5V/1A) to prevent damage to the device.
- Water and Moisture: Do not expose the mixer to water or excessive moisture. Avoid using it in damp environments.
- Ventilation: Ensure proper ventilation around the device. Do not block ventilation openings.
- Cleaning: Disconnect power before cleaning. Use a soft, dry cloth. Do not use liquid cleaners or aerosols.
- Repairs: Do not attempt to repair the device yourself. Refer all servicing to qualified personnel.
- Placement: Place the mixer on a stable, flat surface away from direct sunlight, heat sources, and strong electromagnetic fields.
3. Package Contents
Verify that all items are present in the package:
- MT-VIKI Gaming Audio Mixer (Model MT-LHY1)
- USB-C to USB-C Charging Cable
- USB-A to USB-C Charging Cable
- 3.5mm Audio Cable

4. Product Overview: Controls and Interfaces
4.1. Front Panel Controls
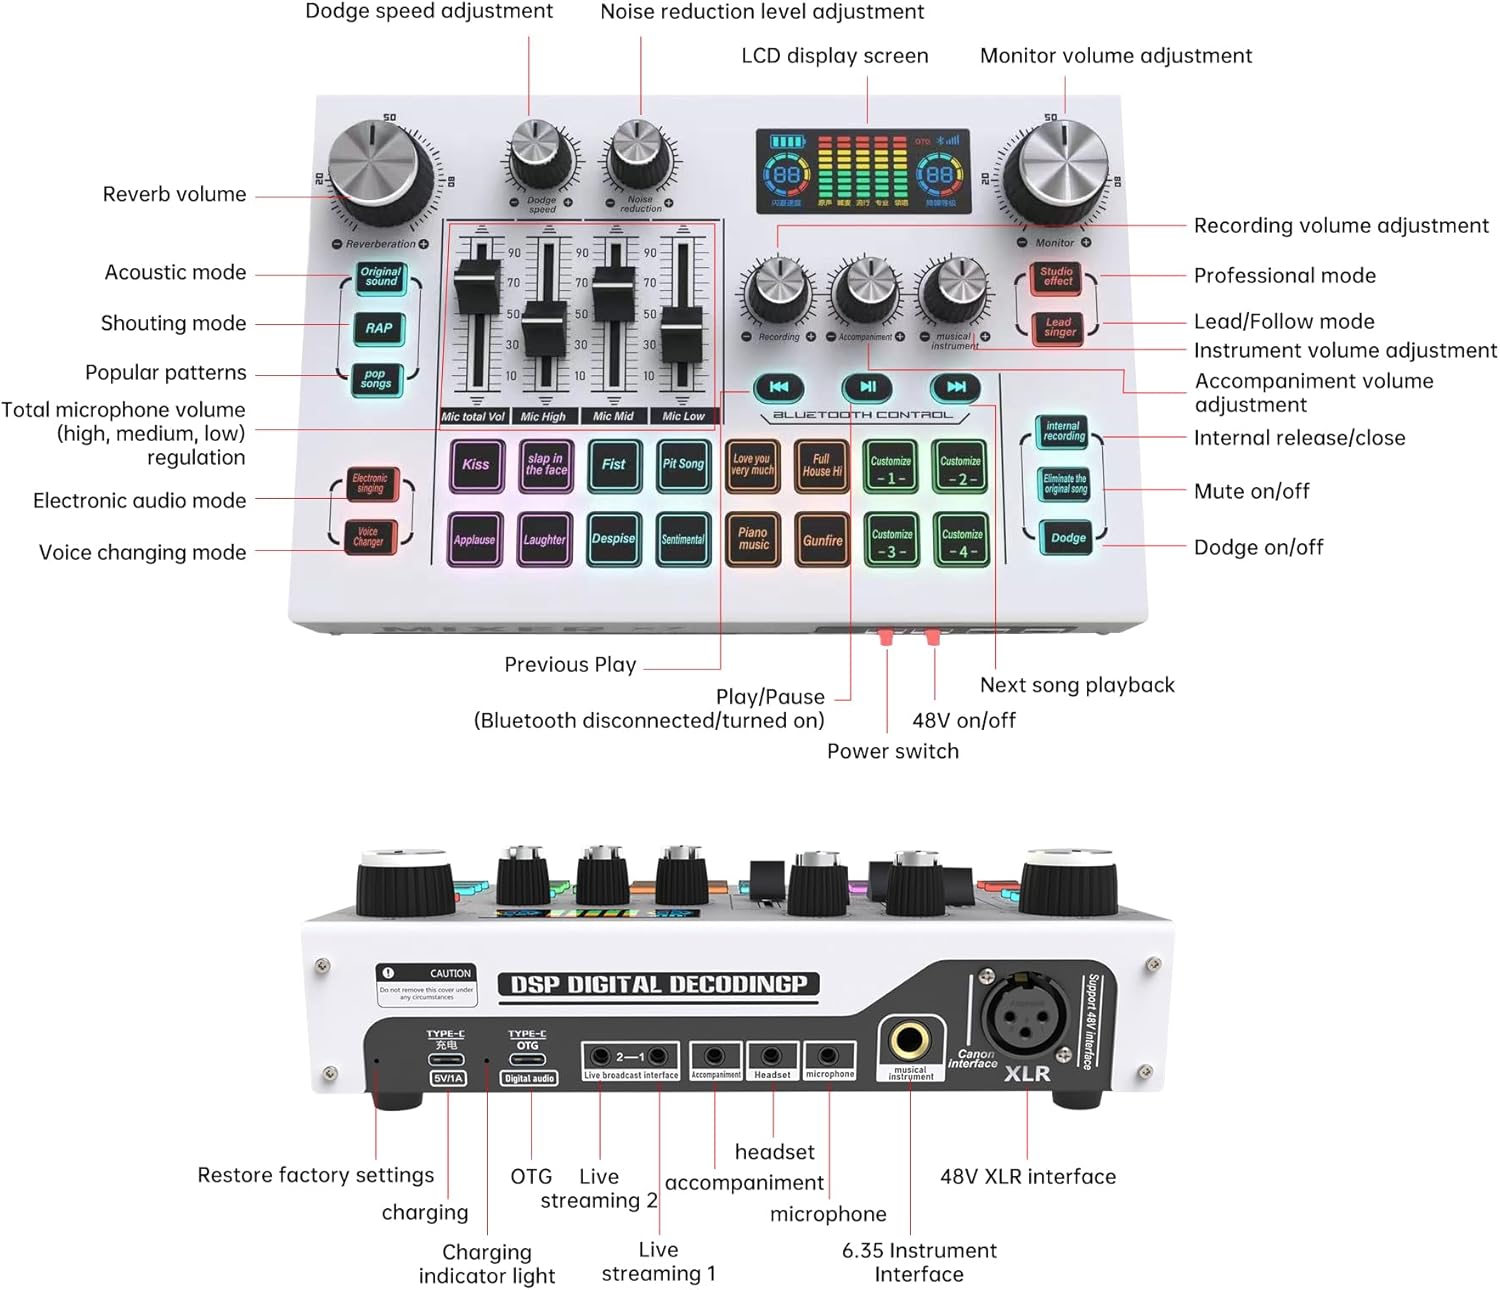
- Reverb Volume Knob: Adjusts the intensity of the reverb effect.
- Dodge Speed Adjustment Knob: Controls the speed of the 'Dodge' effect.
- Noise Reduction Level Adjustment Knob: Adjusts the level of ambient noise reduction.
- LCD Display Screen: Shows dynamic music spectrum, pitch adjustment, and real-time power storage.
- Monitor Volume Adjustment Knob: Controls the volume of the monitoring output (headphones).
- Recording Volume Adjustment Knob: Adjusts the output volume for recording.
- Instrument Volume Adjustment Knob: Controls the volume of connected musical instruments.
- Accompaniment Volume Adjustment Knob: Adjusts the volume of background music.
- Microphone Volume Faders (High, Mid, Low): Individual sliders for precise control over microphone equalization.
- Mode Buttons (Original Sound, Acoustic, Shouting, Popular Patterns, Electronic Audio, Voice Changing): Selects different audio modes and effects.
- Sound Effect Buttons (e.g., Kiss, Fist, Laughter, Gunfire): Triggers various pre-set sound effects.
- Custom Effect Buttons (1-4): Allows users to record and trigger custom sound effects.
- Control Buttons (Previous Play, Play/Pause, Next Song Playback): For media playback control.
- 48V On/Off Button: Activates/deactivates 48V phantom power for XLR microphones.
- Power Switch: Turns the device on or off.
- Mute On/Off Button: Mutes or unmutes the audio output.
- Dodge On/Off Button: Activates/deactivates the 'Dodge' effect, which lowers background audio when speaking.
4.2. Rear Panel Interfaces

- Type-C Power (5V/1A): USB-C port for charging the device.
- Type-C OTG (Digital Audio): USB-C port for digital audio connection to computers or mobile devices.
- Live Broadcast Interface (1 & 2): 3.5mm ports for connecting to mobile phones for live streaming.
- Accompaniment Input: 3.5mm port for connecting an external audio source for background music.
- Headset Vocal Input & Monitoring: 3.5mm port for connecting a headset with a microphone.
- Microphone Input: 3.5mm port for connecting a 3.5mm condenser microphone.
- Musical Instrument Interface: 6.35mm port for connecting dynamic microphones or musical instruments.
- XLR Interface (Canon Interface): XLR port for connecting professional XLR microphones, supporting 48V phantom power.
5. Setup Instructions
5.1. Powering On and Charging
- Connect the provided USB-C charging cable to the Type-C Power (5V/1A) port on the rear of the mixer.
- Connect the other end of the USB cable to a 5V/1A USB power adapter (not included) or a computer USB port.
- Press the Power Switch on the front panel to turn on the mixer. The LCD screen will illuminate.
5.2. Connecting Microphones
- XLR Microphone: Connect an XLR microphone to the XLR Interface. If your microphone requires phantom power, press the 48V On/Off button.
- 6.35mm Dynamic Microphone/Instrument: Connect to the Musical Instrument Interface.
- 3.5mm Condenser Microphone: Connect to the dedicated Microphone Input.
- Headset Microphone: Connect your headset (with microphone) to the Headset Vocal Input & Monitoring port.
5.3. Connecting to Devices (PC/Phone)
- For PC/Computer (Digital Audio): Connect the Type-C OTG (Digital Audio) port on the mixer to your computer using a USB-C cable. The computer should recognize the mixer as an audio device.
- For Mobile Phone Live Streaming: Use the provided 3.5mm audio cable to connect the Live Broadcast Interface (1 or 2) on the mixer to the 3.5mm audio jack of your mobile phone. For phones without a 3.5mm jack, an appropriate adapter (not included) may be required.
- Bluetooth Accompaniment: Activate Bluetooth on your mobile device and search for the mixer. Pair the devices to stream background music wirelessly.
6. Operating Instructions
6.1. Basic Audio Adjustment
- Microphone Volume: Use the individual Mic High, Mic Mid, Mic Low faders to adjust the equalization of your microphone input.
- Input Volumes: Adjust the Instrument Volume and Accompaniment Volume knobs to balance your audio sources.
- Monitor Volume: Use the Monitor Volume Adjustment knob to control the volume heard through your headphones.
- Recording Volume: Adjust the Recording Volume Adjustment knob to set the output level for your recording or stream.
6.2. Special Effects and Modes
- Reverb: Turn the Reverb Volume Knob to add or reduce reverberation to your voice.
- Noise Reduction: Adjust the Noise Reduction Level Adjustment Knob to minimize background noise.
- Dodge Effect: Press the Dodge On/Off button to activate this feature, which automatically lowers background music when you speak. Adjust the Dodge Speed Adjustment Knob for desired response.
- Voice Changing Modes: Press the Voice Changing Mode button to cycle through different vocal effects.
- Sound Effects: Press any of the pre-set Sound Effect Buttons (e.g., Kiss, Laughter) to trigger corresponding audio clips.
- Custom Sound Effects: To record a custom sound effect, press and hold one of the Custom Effect Buttons (1-4) until it blinks, then speak into the microphone. Press the button again to stop recording. Press briefly to play the recorded effect.
6.3. Bluetooth Control
Once paired, you can control music playback from your Bluetooth-connected device using the Previous Play, Play/Pause, and Next Song Playback buttons on the mixer.
7. Maintenance
- Cleaning: Use a soft, dry, lint-free cloth to clean the surface of the mixer. Do not use abrasive cleaners or solvents.
- Storage: When not in use, store the mixer in a cool, dry place away from direct sunlight and extreme temperatures.
- Cable Care: Avoid bending or crimping cables excessively. Disconnect cables by pulling the plug, not the cable itself.
8. Troubleshooting
| Problem | Possible Cause | Solution |
|---|---|---|
| No sound output | Volume levels too low; incorrect connections; muted output. | Check all volume knobs and faders. Ensure cables are securely connected. Verify the Mute On/Off button is not active. Check device audio settings on your computer/phone. |
| Microphone not working | Incorrect microphone input; 48V phantom power off (for XLR); microphone volume too low. | Ensure the microphone is connected to the correct input. If using an XLR condenser mic, activate 48V On/Off. Adjust microphone volume faders. Test with another microphone if possible. |
| Bluetooth connection issues | Mixer not in pairing mode; device too far; interference. | Ensure Bluetooth is enabled on both devices. Move devices closer. Restart both the mixer and the Bluetooth device. |
| Device not charging or powering on | Faulty cable; insufficient power source; battery depleted. | Ensure the charging cable is properly connected to the Type-C Power port. Use a reliable 5V/1A power source. Allow the device to charge for a period before attempting to power on. Try a different USB-C cable. |
| Sound quality is poor or distorted | Input levels too high; incorrect EQ settings; cable issues. | Reduce input volume levels to prevent clipping. Adjust microphone EQ faders. Ensure all cables are in good condition and properly connected. |
9. Specifications
| Feature | Detail |
|---|---|
| Model Number | MT-LHY1 |
| Brand | MT-VIKI |
| Connectivity Technology | USB, Bluetooth |
| Number of Channels | 4 |
| Power Source | Corded Electric (USB 5V/1A) |
| Item Weight | 14.1 ounces (0.4 Kilograms) |
| Package Dimensions | 10.83 x 6.69 x 3.03 inches |
| Display | 2.25-inch LCD Screen |
| Microphone Inputs | XLR (with 48V Phantom Power), 6.35mm, 3.5mm, Headset Mic |
| Compatibility | Mac OS, Windows, Mobile Devices |
10. Warranty and Support
MT-VIKI products are designed for reliability and performance. For warranty information, please refer to the warranty card included with your product or visit the official MT-VIKI website. If you encounter any issues or require technical assistance, please contact MT-VIKI customer support through the contact information provided on their official website or through your retailer.


