1. Product Overview
This manual provides instructions for the Hamilton Beach Sure-Crisp Toaster Oven Air Fryer Combo (Model 31403) and the Hamilton Beach 2-Way 12 Cup Programmable Drip Coffee Maker & Single Serve Machine (Model 49980R). These appliances are designed to enhance your kitchen experience with versatile cooking and brewing options.

Figure 1: Hamilton Beach Sure-Crisp Toaster Oven Air Fryer Combo and 2-Way Coffee Maker.
1.1. Sure-Crisp Toaster Oven Air Fryer Combo (Model 31403)
The Sure-Crisp Air Fryer Toaster Oven offers powerful air circulation for evenly browned, crispy foods with little to no oil. It features 4 versatile cooking options: Air Fry, Toast, Bake, and Broil. Its generous capacity accommodates 4 slices of toast, a 9-inch pizza, or a 3 lb. chicken in an 8" x 8" pan.
1.2. 2-Way 12 Cup Programmable Drip Coffee Maker (Model 49980R)
This programmable coffee maker provides two brewing options: a single-serve cup or a full 12-cup pot using your favorite ground coffee. It includes a mesh scoop for easy coffee addition and features an auto pause and pour function, along with a 2-hour automatic shutoff for convenience and safety. Please note, this coffee maker is not compatible with K-Cup® pods.
2. Setup
2.1. Unpacking and Initial Cleaning
- Carefully remove all packaging materials, including any internal packing and protective films.
- Wash the air fry basket, bake pan, broil rack, glass carafe, and mesh scoop in warm, soapy water. Rinse thoroughly and dry.
- Wipe the exterior of both appliances with a damp cloth.
- Ensure both appliances are placed on a stable, heat-resistant surface with adequate ventilation.
2.2. Component Identification (Toaster Oven)

Figure 2: Internal view of the Hamilton Beach Sure-Crisp Toaster Oven, showing the air fry basket, rack, and crumb tray.
- Air Fry Basket: Used for air frying foods, allowing hot air to circulate for crisping.
- Bake Pan: For baking and collecting drips during broiling or air frying.
- Broil Rack: Used for broiling foods.
- Crumb Tray: Located at the bottom, slides out for easy cleaning of crumbs.
3. Operating the Sure-Crisp Toaster Oven Air Fryer (Model 31403)
The toaster oven features three control knobs for temperature, function, and timer.

Figure 3: Control panel of the Sure-Crisp Toaster Oven, showing temperature, function, and timer dials.
3.1. Functions and Temperature Settings
- Temperature Dial (Top): Adjusts temperature from Warm (200°F/95°C) up to 450°F/230°C.
- Function Dial (Middle): Selects cooking mode:
- Air Fry: For crispy results with minimal oil. Use the air fry basket.
- Bake: Standard oven baking.
- Broil: For browning and crisping the top of foods. Use the broil rack.
- Toast: For toasting bread and bagels.
- Timer Dial (Bottom): Sets cooking time up to 30 minutes or 'Stay On' for longer cooking. Rotate past 10 minutes then set time.
3.2. Using the Air Fry Function

Figure 4: The Sure-Crisp air fry convection function ensures even browning.
- Place food in the air fry basket, ensuring not to overcrowd for optimal air circulation.
- Insert the air fry basket onto the rack in the middle position.
- Set the Function Dial to 'Air Fry'.
- Adjust the Temperature Dial to the desired setting (e.g., 400°F for most air frying).
- Set the Timer Dial to the recommended cooking time. The oven will begin preheating and cooking.
- Monitor food for desired crispness and doneness.
4. Operating the 2-Way Programmable Drip Coffee Maker (Model 49980R)
This coffee maker offers flexibility for brewing a single cup or a full carafe.
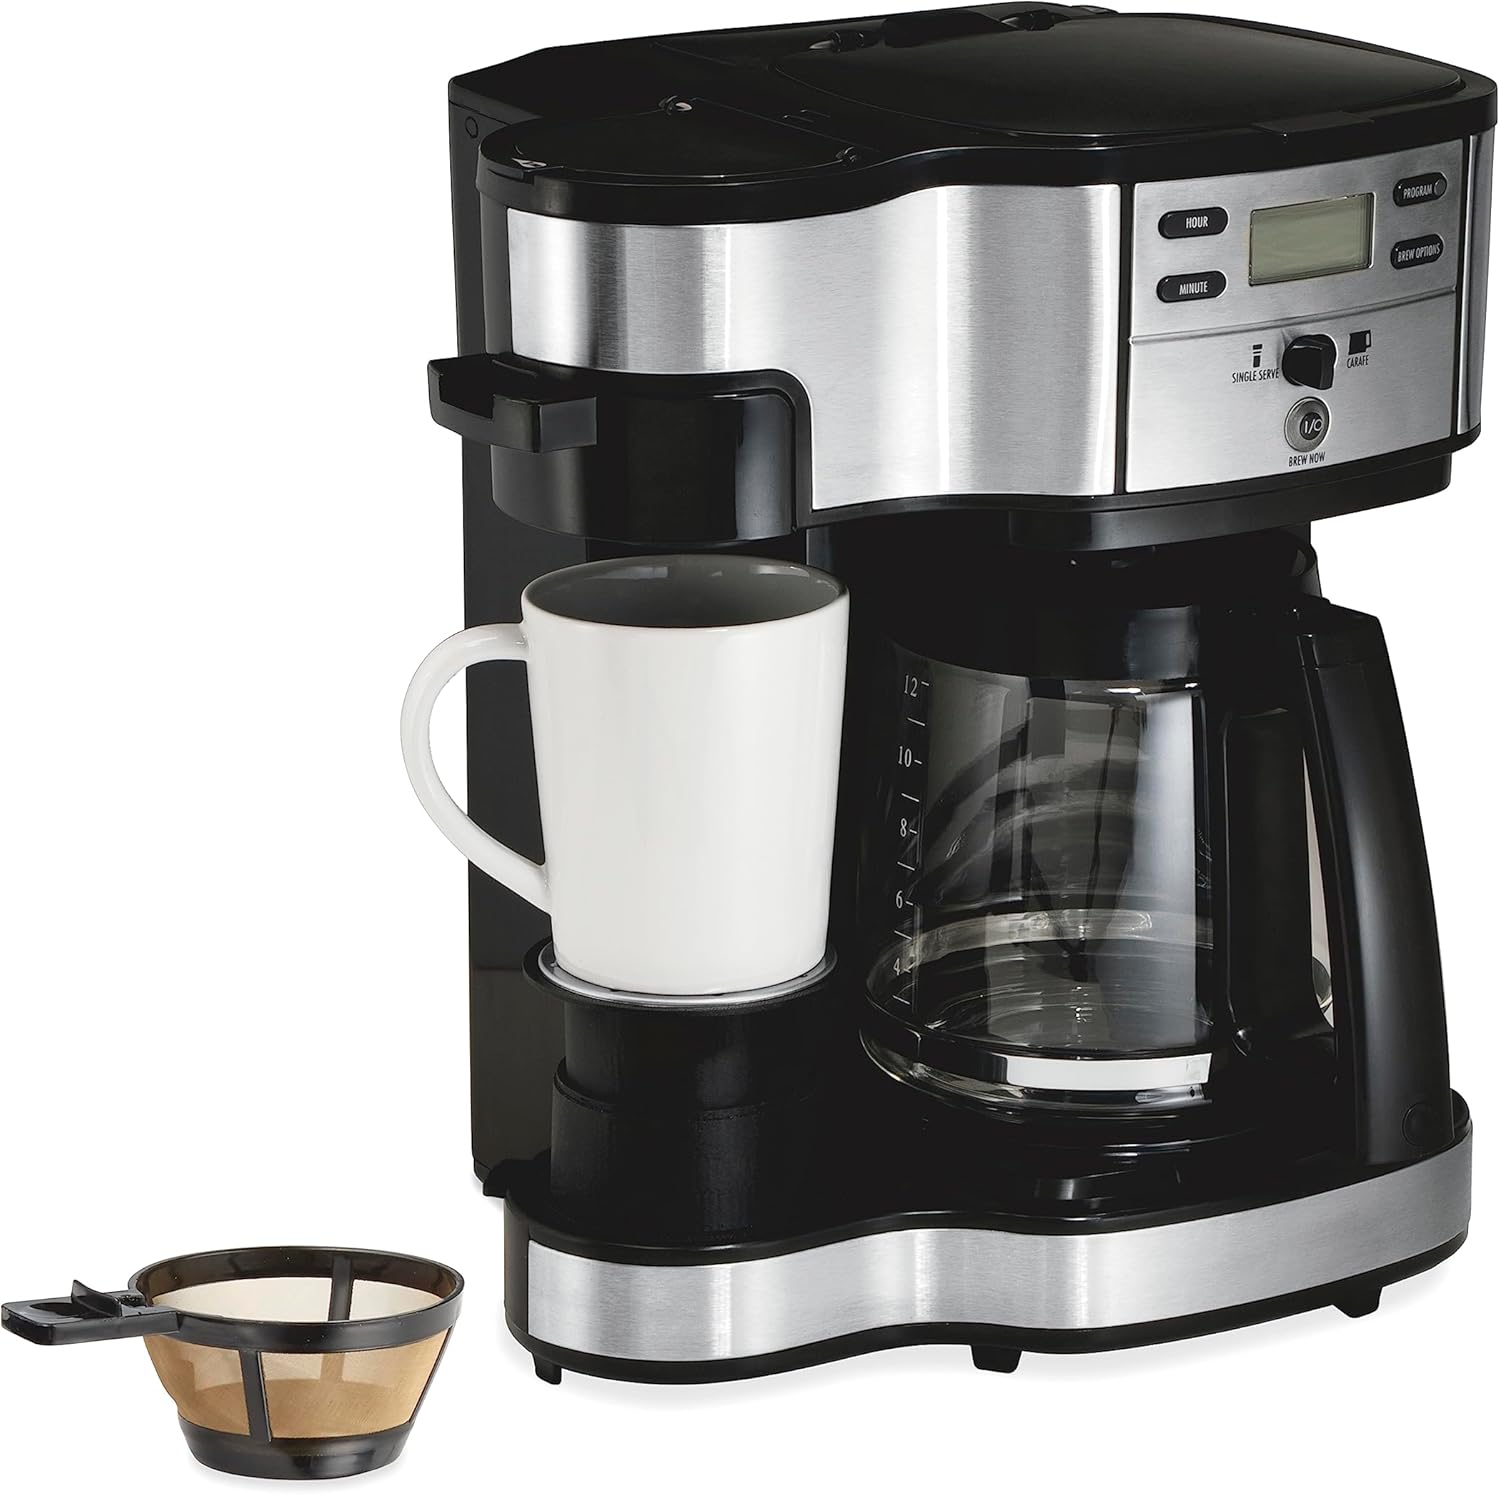
Figure 5: The 2-Way Coffee Maker allows brewing into a single mug or a full carafe.
4.1. Brewing a Full Pot (12 Cups)
- Fill the water reservoir with the desired amount of water for 2-12 cups.
- Place a standard basket-style paper filter or the reusable mesh filter (if included) into the filter basket.
- Add ground coffee using the included mesh scoop (approximately 1 scoop per cup, adjust to taste).
- Place the glass carafe on the warming plate.
- Select the 'Carafe' brew option.
- Press the 'Brew' button to start. The 'Auto Pause and Pour' feature allows you to temporarily remove the carafe during brewing.
4.2. Brewing a Single Serve
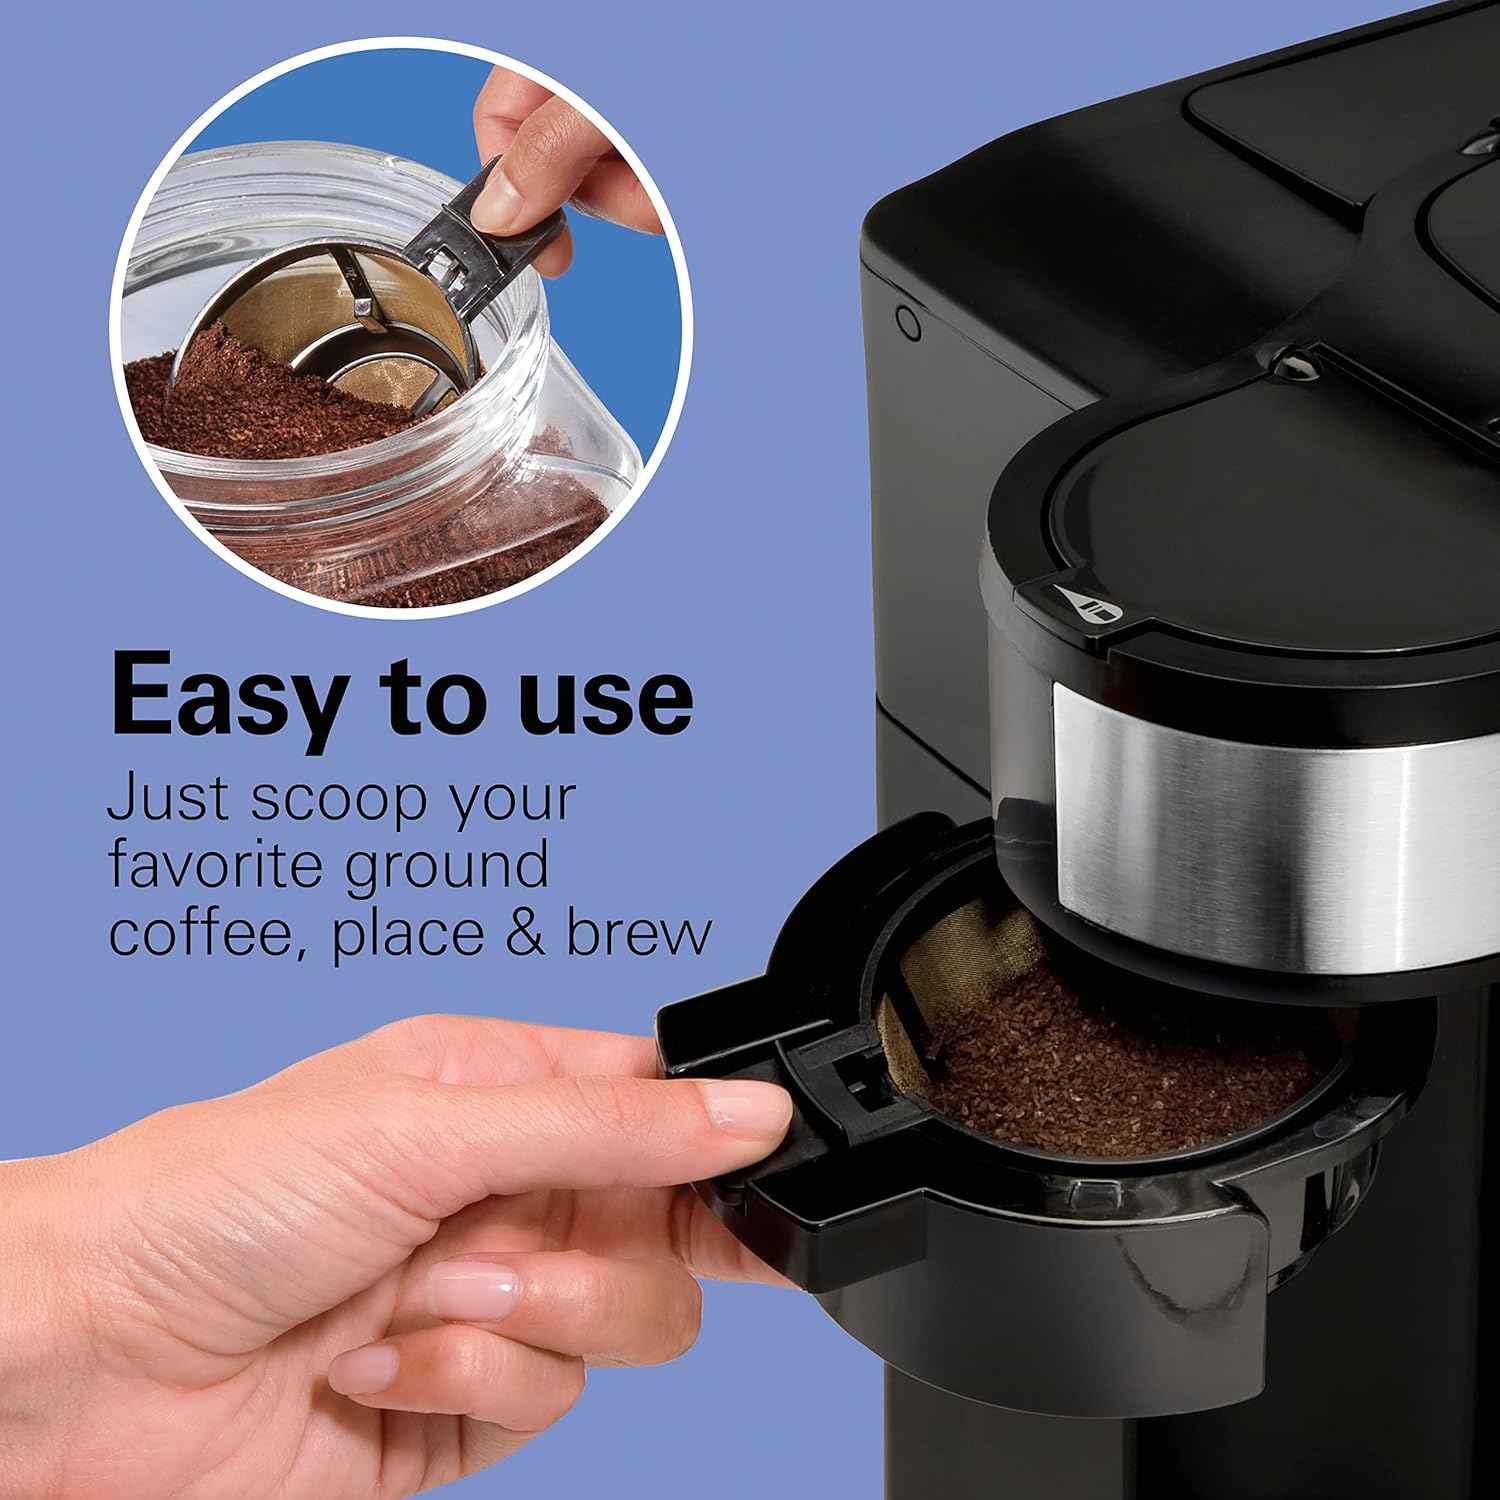
Figure 6: Easily add ground coffee to the single-serve filter using the mesh scoop.
- Fill the single-serve water reservoir with the desired amount of water (up to 14 oz).
- Place the single-serve mesh filter into the single-serve brew basket.
- Add ground coffee using the included mesh scoop (typically 1-2 scoops, adjust to taste).
- Place your mug or travel mug on the single-serve drip tray.
- Select the 'Single Serve' brew option.
- Press the 'Brew' button to start.
4.3. Programming Brew Time
The coffee maker can be programmed up to 24 hours in advance.
- Set the current time using the 'Hour' and 'Minute' buttons.
- Press the 'Program' button. The program indicator light will illuminate.
- Use the 'Hour' and 'Minute' buttons to set the desired brew time.
- Ensure the correct brew option (Carafe or Single Serve) is selected.
- The coffee maker will automatically start brewing at the programmed time.
4.4. Automatic Shutoff
The coffee maker automatically shuts off after 2 hours of inactivity, providing peace of mind and energy savings.
5. Maintenance and Cleaning
5.1. Toaster Oven Air Fryer
- Always unplug the appliance and allow it to cool completely before cleaning.
- Crumb Tray: Slide out the crumb tray from the bottom. Discard crumbs and wash the tray in warm, soapy water. Rinse and dry thoroughly.
- Air Fry Basket, Bake Pan, Broil Rack: These accessories are dishwasher safe. For stubborn food residue, soak in warm, soapy water before washing.
- Interior: Wipe the interior with a damp cloth and mild detergent. Avoid abrasive cleaners or scouring pads.
- Exterior: Wipe the exterior with a damp cloth. For stainless steel surfaces, use a stainless steel cleaner for best results.
5.2. Coffee Maker
- Always unplug the appliance and allow it to cool completely before cleaning.
- Glass Carafe and Lid: Wash in warm, soapy water or place on the top rack of a dishwasher.
- Mesh Scoop and Filter Basket: Wash in warm, soapy water or place on the top rack of a dishwasher.
- Exterior: Wipe the exterior with a damp cloth. Do not immerse the coffee maker in water.
- Descaling: Periodically descale the coffee maker to remove mineral deposits. Refer to the full product manual for detailed descaling instructions, typically involving a vinegar solution.
6. Troubleshooting
If you encounter issues with your appliances, try these basic troubleshooting steps:
- Appliance not turning on: Ensure the power cord is securely plugged into a working electrical outlet. Check your circuit breaker.
- Toaster Oven not heating: Verify that the temperature and timer dials are set correctly for the desired function.
- Coffee Maker not brewing: Check that the water reservoir is filled, the filter basket is correctly inserted, and the brew option is selected.
- Food not crisping (Toaster Oven): Ensure the air fry basket is not overcrowded, allowing proper air circulation.
For more detailed troubleshooting, please refer to the complete product manual or contact Hamilton Beach customer support.
7. Specifications
| Feature | Hamilton Beach Sure-Crisp Toaster Oven Air Fryer (Model 31403) | Hamilton Beach 2-Way Coffee Maker (Model 49980R) |
|---|---|---|
| Brand | Hamilton Beach | Hamilton Beach |
| Special Feature | Air Fryer Functionality | 2-Way Brewing (Single Serve & Carafe), Programmable, Auto Pause & Pour, 2-Hour Auto Shutoff |
| Control Type | Knob | Buttons, Digital Display |
| Door Style | Dropdown Door | N/A |
| Included Components | Air Fry Basket, Bake Pan, Broil Rack, Crumb Tray | Glass Carafe, Mesh Scoop, Single-Serve Filter Basket |
| Finish Type | Painted (Stainless Steel appearance) | Black with Stainless Steel Accents |
| Power Source | Electric | Electric |
| Capacity | 4 Slices Toast, 9" Pizza, 3 lb. Chicken | 12 Cups (Carafe), Up to 14 oz (Single Serve) |
8. Warranty and Support
Hamilton Beach products are manufactured to the highest quality standards. For specific warranty information, please refer to the warranty card included with your purchase or visit the official Hamilton Beach website.
For technical assistance, troubleshooting, or to order replacement parts, please contact Hamilton Beach Customer Service:
- Website: www.hamiltonbeach.com
- Phone: Refer to your product documentation for regional support numbers.