1. Introduction
This manual provides detailed instructions for the installation, operation, and maintenance of your CAMECHO Android 13 Car Radio. Please read this manual thoroughly before using the product to ensure proper function and safety. Keep this manual for future reference.
2. Product Overview
The CAMECHO Android 13 Car Radio is an advanced multimedia system designed for select Volkswagen Polo models. It features an 8-core processor, Android 13 operating system, and a 9-inch IPS capacitive touchscreen with 1024x600 resolution. Key functionalities include wireless Apple CarPlay, Android Auto, Mirror Link, GPS navigation, 4G/WiFi connectivity, Bluetooth 5.0, FM/AM/RDS radio, and DSP sound processing.
2.1. Key Features
- Operating System: Android 13
- Processor: 8 Cores 2.0 GHz
- Memory: 2GB RAM + 32GB ROM
- Display: 9-inch IPS Capacitive Screen, 1024x600 Resolution
- Connectivity: 4G/SIM, WiFi, Bluetooth 5.0, USB
- Integration: Wireless Apple CarPlay, Android Auto, Mirror Link
- Audio: DSP (Digital Sound Processor), FM/AM/RDS Radio
- Navigation: Built-in GPS
- Additional Features: Steering Wheel Control (SWC) support, Reversing camera input, Split Screen function
2.2. Applicable Vehicle Models
This car radio is compatible with the following Volkswagen Polo models:
- VW Polo (6C1, 6R1) 2009-2014
- VW Polo (6R, 6C) 2014-2017
- VW Polo Vivo Hatchback 2010-2017
- VW Polo (9N) 2001-2009
- VW Polo (9N-) 2008-2009
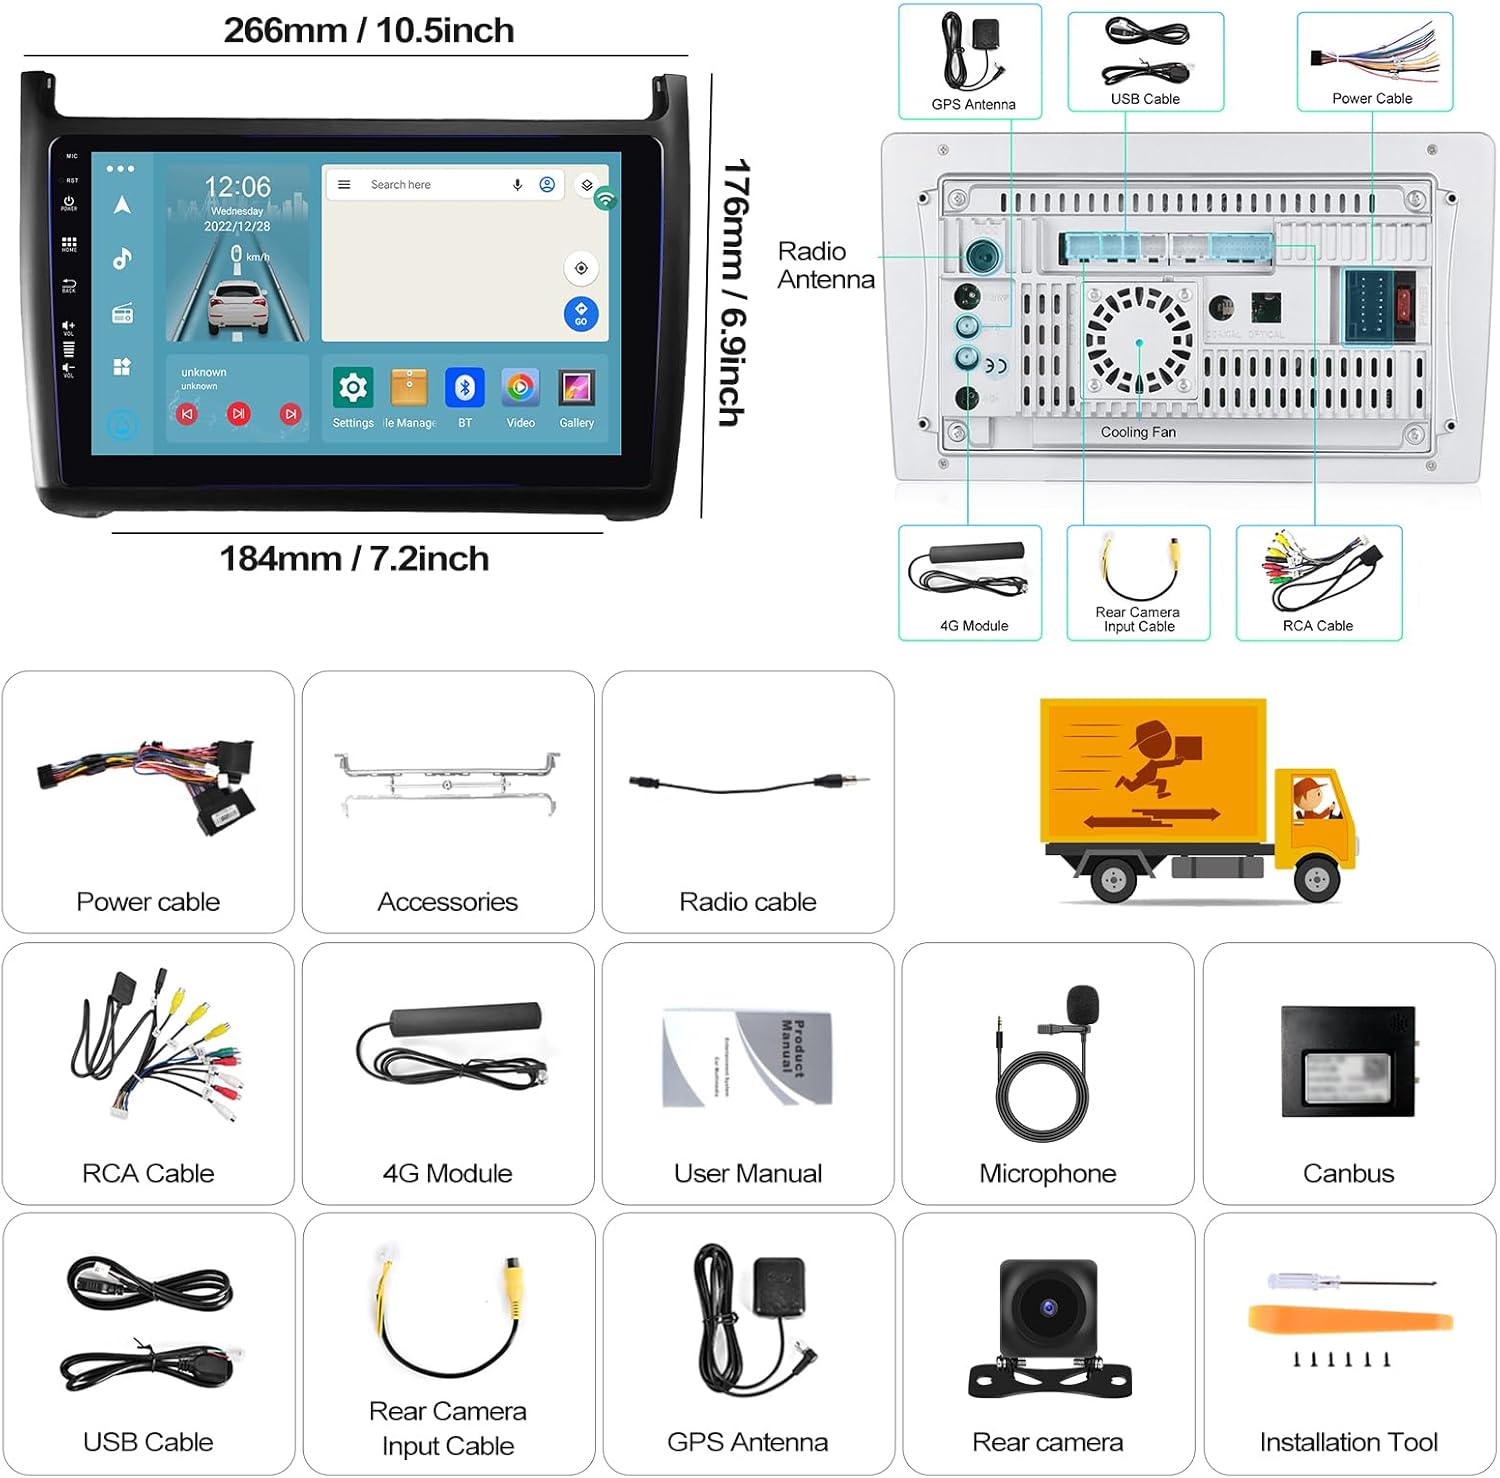
Image: Applicable Volkswagen Polo models and a visual comparison of the dashboard before and after the car radio installation.
3. Setup
3.1. Package Contents
Verify that all items listed below are included in your package:
- Main Car Radio Unit
- Power Cable
- Accessories (Mounting Brackets)
- Radio Antenna Cable
- RCA Cable
- 4G Module (if applicable)
- User Manual
- Microphone
- Canbus Decoder (if applicable)
- USB Cables
- Rear Camera Input Cable
- GPS Antenna
- Rear Camera (if included)
- Installation Tool (if included)

Image: Car radio unit dimensions and a visual representation of the packing list contents.
3.2. Installation
Installation of the car radio requires technical knowledge and experience with car electronics. It is highly recommended to have the unit installed by a qualified professional to avoid damage to the product or your vehicle.
- Preparation: Disconnect the vehicle's battery before starting the installation.
- Remove Old Unit: Carefully remove the existing car radio or dashboard panel.
- Connect Wiring: Connect the power cable, RCA cables, USB cables, GPS antenna, radio antenna, and any other necessary cables to the corresponding ports on the new car radio and the vehicle's wiring harness. Ensure all connections are secure.
- Mounting: Secure the car radio into the dashboard using the provided mounting brackets.
- Test: Reconnect the vehicle's battery and perform a basic function test before fully reassembling the dashboard.
- Reassemble: Carefully reassemble the dashboard components.

Image: Visual comparison of the car dashboard before and after installation.
3.3. Initial Configuration (WiFi/4G)
To access online features, connect the unit to the internet:
- WiFi Connection: Go to Settings > Network & Internet > Wi-Fi. Select your desired network and enter the password.
- 4G/SIM Connection: Insert a compatible SIM card into the designated slot (if your model includes a 4G module). Ensure mobile data is enabled in the settings.

Image: WiFi and 4G/SIM card connection options.
4. Operating Instructions
4.1. Wireless Apple CarPlay and Android Auto
Connect your smartphone for seamless integration of navigation, calls, messages, and music.
- For Apple CarPlay: Activate Bluetooth on your iPhone and pair it with the car radio. Open the CarPlay application on the car radio. If connection fails, connect your phone to the car's hotspot and then reopen the CarPlay application. Maintain Bluetooth and hotspot connection.
- For Android Auto: Ensure the Android Auto application is installed on your phone. Activate Bluetooth on your phone and pair it with the car radio. Open the Android Auto application on the car radio.

Image: Apple CarPlay interface.

Image: Android Auto interface.
4.2. Mirror Link Function
Mirror Link allows you to display your smartphone's screen content directly on the car radio's larger display.
- For iPhone (iOS): Turn on your iPhone's hotspot. Connect the car radio to your iPhone's hotspot via Wi-Fi. Open the "PhoneLink" app on the device and follow the instructions. Alternatively, use the AirPlay function on your iPhone, select the car radio, and mirror the screen.
- For Android Phones: Click on "PhoneLink" and scan the QR code to download the app. Follow the prompts to connect via USB cable or Wi-Fi. For USB connection, ensure "USB Debugging" is enabled in your phone's developer options and set USB configuration to "Data Transfer."

Image: Mirror Link function for iOS and Android devices.
4.3. GPS Navigation
The unit supports both online and offline navigation. Online maps require an internet connection (WiFi or 4G). Offline maps can be downloaded directly from the Play Store for use without internet access.

Image: GPS Navigation interface with online/offline options.
4.4. FM/AM/RDS Radio
Access radio stations with clear reception and RDS functionality for station information.
- Tuning: Use the touchscreen controls to scan for stations or manually tune to a specific frequency.
- Presets: Save your favorite stations to the 30 available preset slots.
- RDS: Radio Data System displays station name, song title, and other information where available.

Image: FM/AM/RDS Radio interface.
4.5. DSP (Digital Sound Processor)
The integrated DSP allows for advanced audio customization, including a 36-band or 10-band equalizer, sound field adjustment, and sound type selection for enhanced audio quality.

Image: DSP 32EQ sound adjustment interface.
4.6. Bluetooth Hands-Free
Connect your phone via Bluetooth for hands-free calling and audio streaming.
- Pairing: Enable Bluetooth on your phone and search for the car radio. Select the device and confirm pairing.
- Calls: Make and receive calls directly from the car radio interface.
- Audio Streaming: Play music from your phone through the car's speakers.

Image: Bluetooth hands-free calling interface.
4.7. Split Screen
The split-screen function allows you to run two applications simultaneously on the display, such as navigation and music playback.

Image: Split-screen function displaying navigation and music.
4.8. Optional Functions (Accessories Sold Separately)
The car radio supports various optional accessories to enhance its functionality:
- Backup Camera: Connect an external HD backup camera for clear rear view when reversing. Supports AHD 1080P, waterproof, day/night vision, and wide-angle features.
- OBD2: Connect an OBD2 scanner to monitor vehicle diagnostics and performance data.
- DAB+: Connect a DAB+ module for digital audio broadcasting, offering higher quality radio and more stations.
- DVR: Connect an external DVR (Dash Cam) for recording driving footage.
- Video Output: Connect external monitors (e.g., headrest screens) to display video content from the car radio.

Image: Backup camera features.
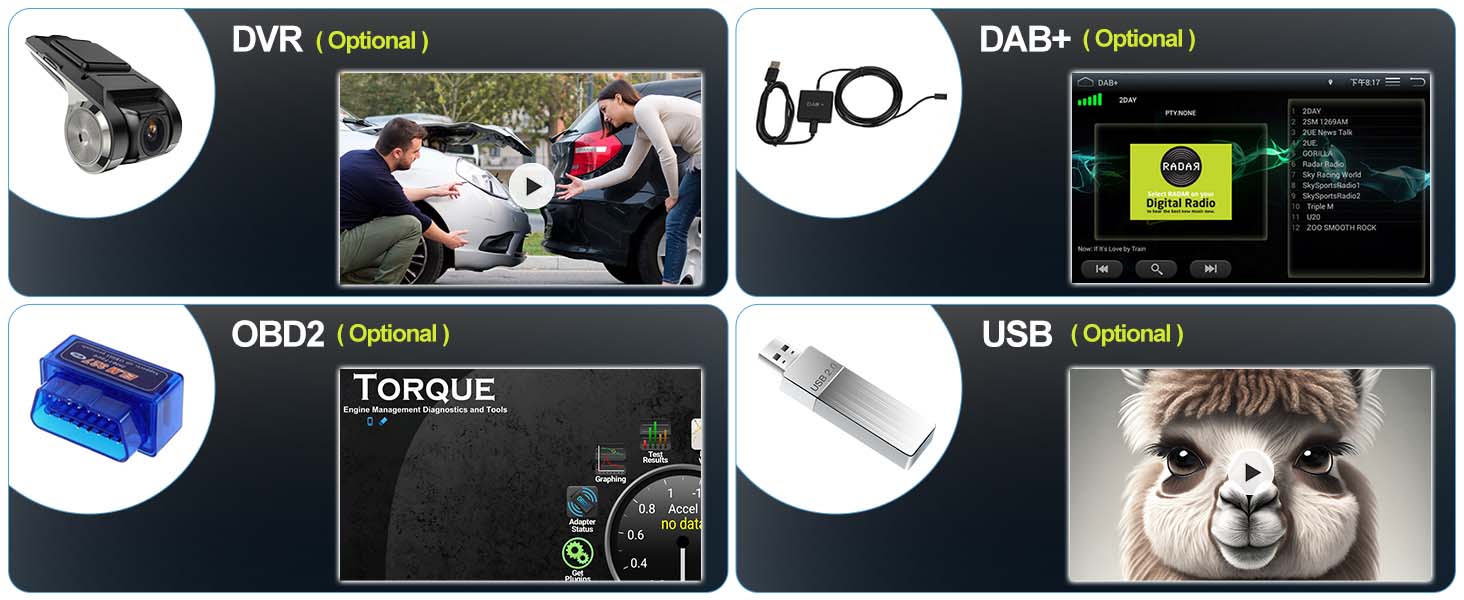
Image: Optional accessories including DVR, DAB+, OBD2, and USB.
5. Maintenance
To ensure the longevity and optimal performance of your CAMECHO Android 13 Car Radio, follow these maintenance guidelines:
- Cleaning the Screen: Use a soft, lint-free cloth to gently wipe the touchscreen. For stubborn smudges, slightly dampen the cloth with water or a screen-safe cleaner. Avoid harsh chemicals or abrasive materials.
- General Cleaning: Keep the unit free from dust and debris. Use a soft brush or compressed air to clean vents and buttons.
- Software Updates: Periodically check for available software updates through the unit's settings to ensure you have the latest features and bug fixes.
- Avoid Extreme Temperatures: Do not expose the unit to extreme heat or cold, as this can affect its performance and lifespan.
- Power Off Properly: Always turn off your vehicle's ignition properly to allow the unit to shut down correctly.
6. Troubleshooting
If you encounter issues with your car radio, refer to the following common problems and solutions:
| Problem | Possible Cause | Solution |
|---|---|---|
| Unit does not power on | Incorrect wiring, blown fuse, vehicle battery issue | Check power connections, inspect vehicle fuses, ensure battery is charged. Consult a professional if necessary. |
| No sound | Volume too low, speaker wiring issue, audio settings | Increase volume, check speaker connections, verify audio output settings in DSP. |
| GPS not working | GPS antenna not connected, poor signal, software issue | Ensure GPS antenna is properly connected and has a clear view of the sky. Check GPS settings and update map software. |
| Bluetooth connection issues | Incorrect pairing, device compatibility, interference | Ensure Bluetooth is enabled on both devices. Delete previous pairings and re-pair. Try with a different device. |
| CarPlay/Android Auto not connecting | Incorrect settings, cable issue, app version | Verify phone settings (Bluetooth, Wi-Fi, USB debugging). Try a different USB cable. Ensure apps are updated. |
| Touchscreen unresponsive | Software glitch, physical damage | Restart the unit. If the problem persists, contact customer support. |
7. Specifications
| Feature | Detail |
|---|---|
| Brand | CAMECHO |
| Model Number | 77d6b9b8-4673-49af-b3aa-fea90888d4ef |
| Color | Black |
| Screen Size | 9 inches |
| Connectivity Technology | Bluetooth, USB, Wi-Fi |
| Special Features | 4G, Android Auto, Apple CarPlay, DSP, AM/FM Tuner |
| Controller Type | Push Button |
| Total HDMI Ports | 1 |
| Connector Type | RCA, USB, HDMI |
| Surround Sound Channel Configuration | 5.1 |
| Video Encoding | H.264, H.265/HEVC, VP9, AV1, MPEG-4 |
| Number of Channels | 8 |
| Package Dimensions | 29 x 20 x 7 cm; 800 grams |
8. Warranty and Support
For technical assistance, troubleshooting, or warranty inquiries, please contact CAMECHO customer support.
- Customer Support Email: CAMECHOVIP@126.com
Please have your model number (77d6b9b8-4673-49af-b3aa-fea90888d4ef) and purchase information ready when contacting support.
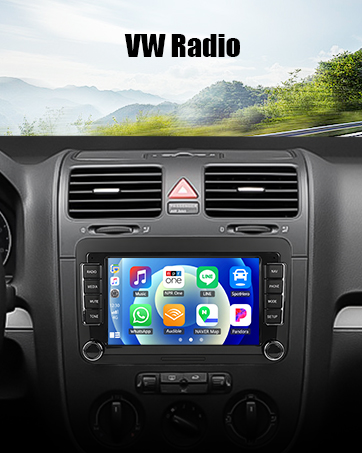
Image: Customer service contact information.