1. Introduction
Thank you for choosing the pxton PX-10R Dual Band Handheld Two-Way Radio. This manual provides essential information for the safe and efficient operation of your device. Please read this manual thoroughly before using the radio and retain it for future reference.
2. Safety Information
To ensure safe operation and optimal performance, please observe the following precautions:
- FCC Compliance: This device complies with Part 15 of the FCC Rules. Operation is subject to the condition that this device does not cause harmful interference. FCC ID: 2AX68PX-10R.
- Battery Safety: Use only the specified battery pack. Do not disassemble, crush, or expose the battery to extreme temperatures or fire. Dispose of batteries properly.
- Antenna Care: Do not hold the antenna directly during transmission. Avoid touching the antenna with bare skin when the radio is transmitting.
- Water Resistance: The PX-10R is rated IP54 for water resistance, meaning it is protected from dust and splashing water. It is not designed for submersion. Ensure all ports are sealed when exposed to moisture.
- Hearing Protection: Do not operate the radio at high volume levels for extended periods to prevent hearing damage.
3. Package Contents
Upon unpacking, please verify that all items listed below are present and in good condition:
- 1 x pxton PX-10R Ham Radio
- 1 x 1800mAh Li-ion Battery
- 1 x Fast Charger Dock
- 1 x Belt Clip
- 1 x Lanyard
- 1 x User Manual
4. Product Overview
Familiarize yourself with the components of your pxton PX-10R radio.
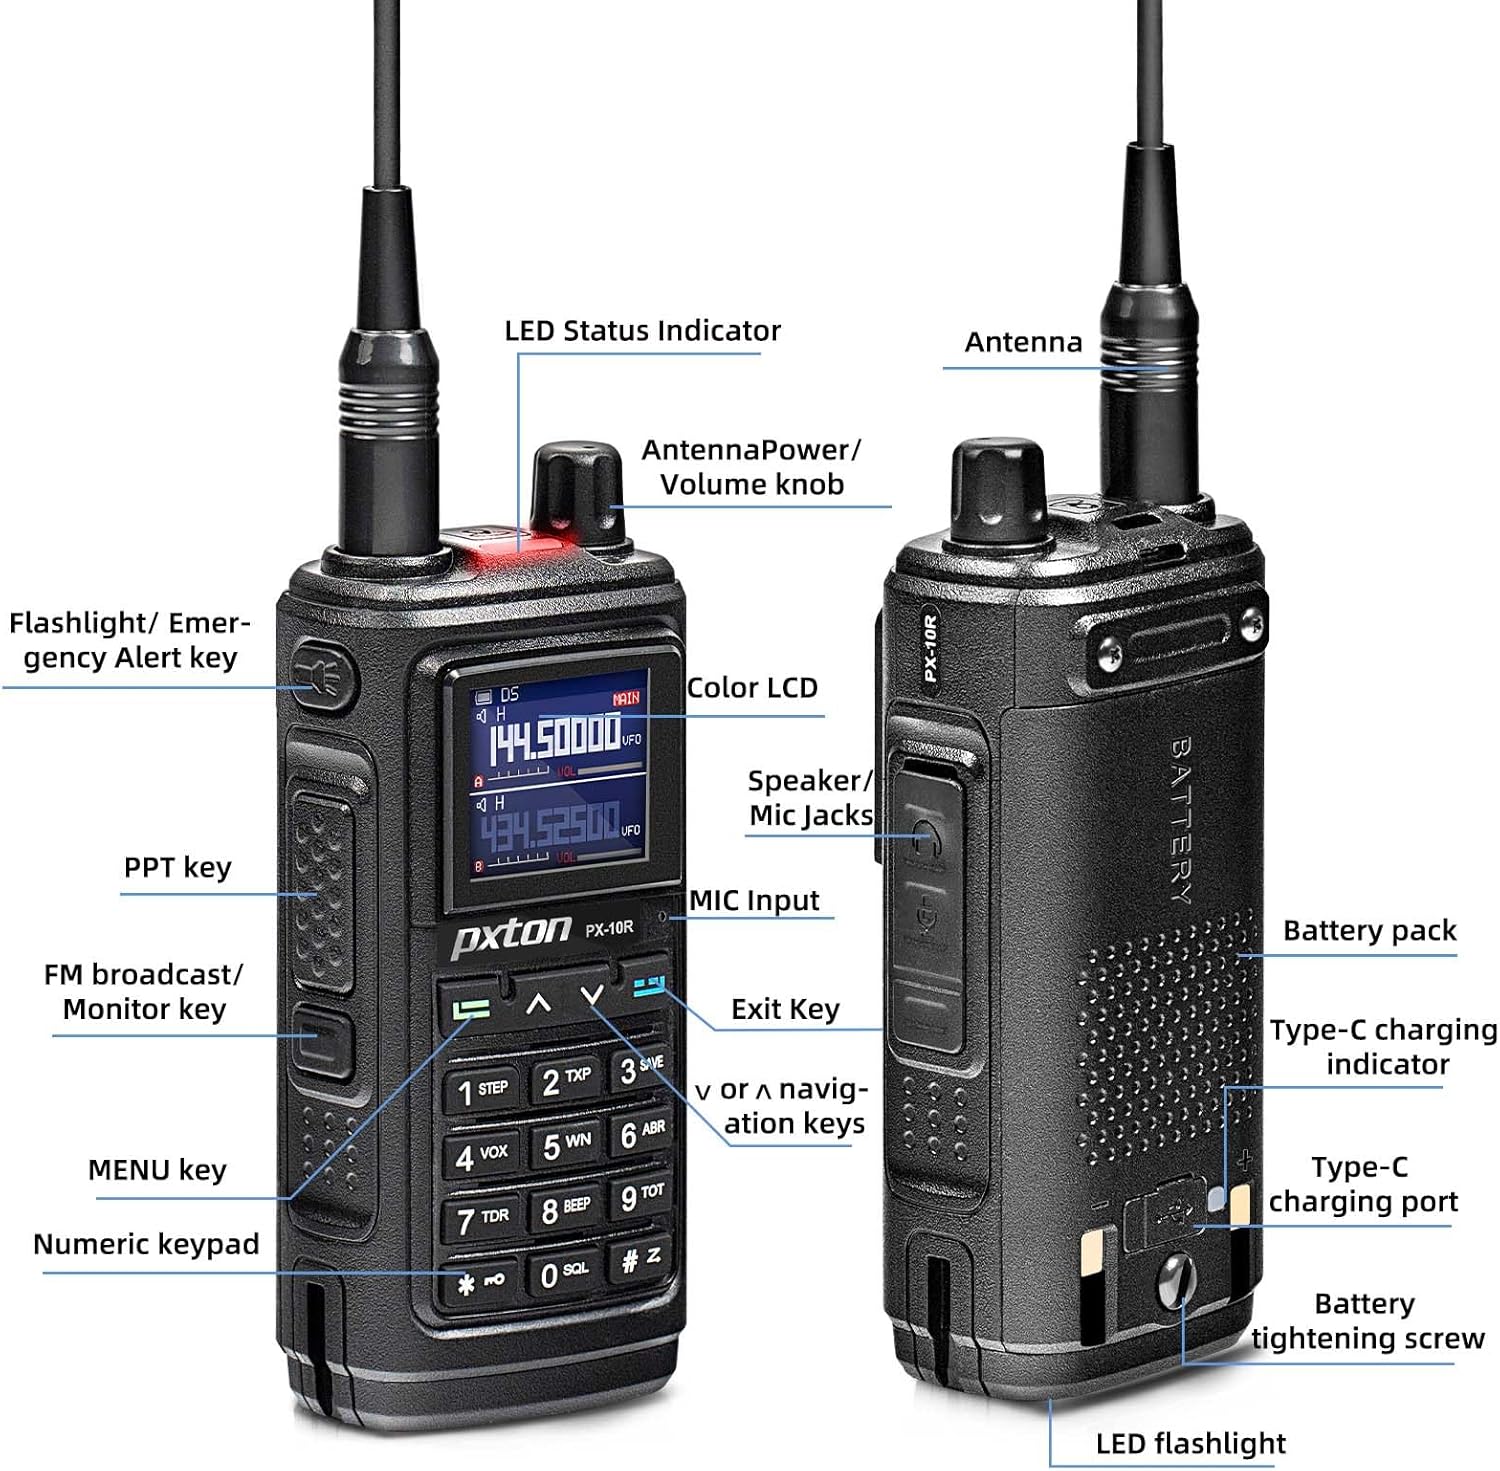
Figure 4.1: PX-10R Component Diagram
This diagram illustrates the various parts of the radio, including the antenna, LED status indicator, power/volume knob, flashlight/emergency alert key, PTT key, FM broadcast/monitor key, MENU key, numeric keypad, color LCD, speaker/mic jacks, MIC input, exit key, navigation keys, battery pack, Type-C charging indicator, Type-C charging port, battery tightening screw, and LED flashlight.

Figure 4.2: PX-10R in Charging Dock
The pxton PX-10R radio is shown seated in its dedicated charging dock, indicating its charging status with an illuminated LED.
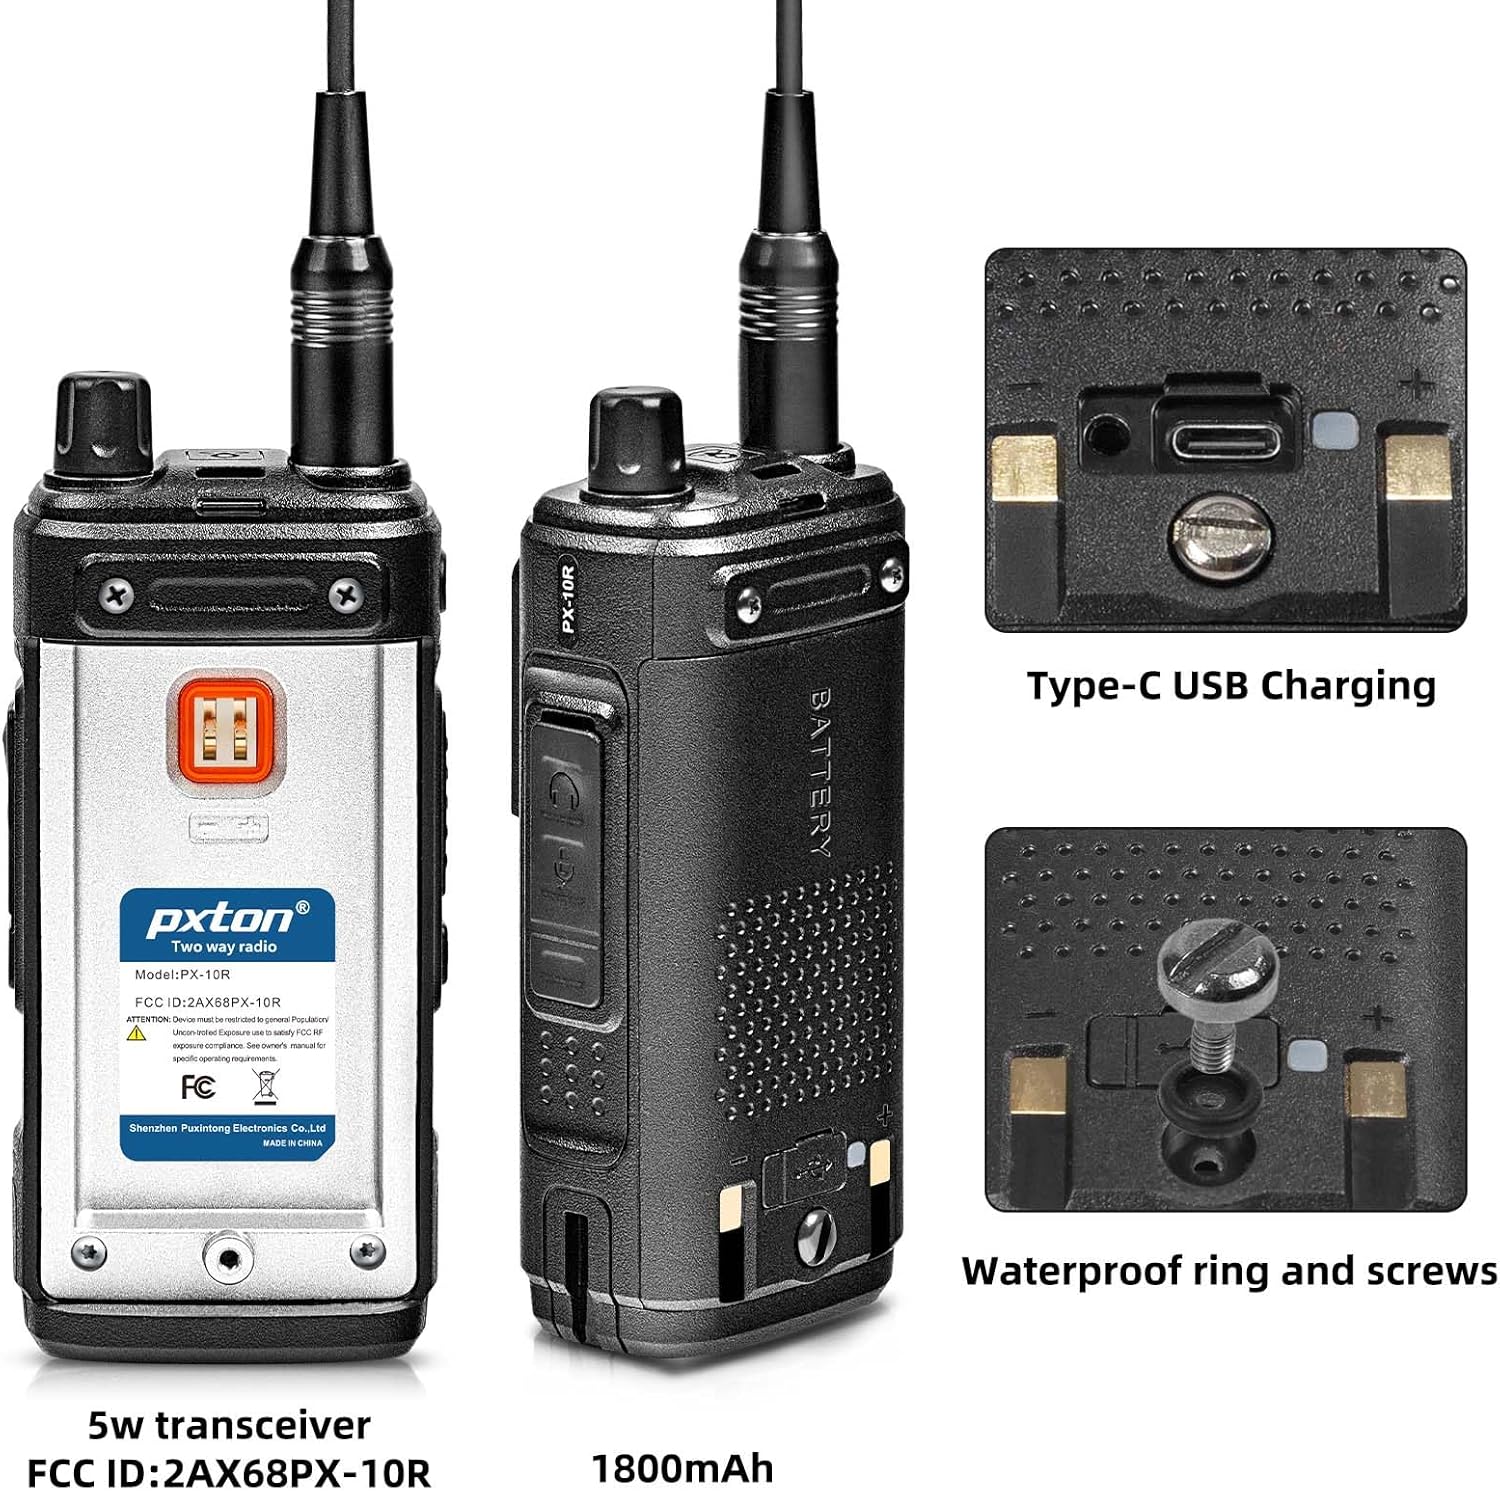
Figure 4.3: PX-10R Rear View and Charging Port
This image highlights the rear of the radio, showcasing the Type-C USB charging port and the waterproof ring and screws designed for enhanced durability and protection against elements.
5. Setup
5.1 Battery Installation
- Align the battery pack with the grooves on the back of the radio.
- Slide the battery pack upwards until it clicks into place.
- Secure the battery with the tightening screw if applicable.
5.2 Charging the Battery
The PX-10R offers two charging methods:

Figure 5.1: Charging Options
The radio can be charged using the included fast charger dock or directly via its USB Type-C port, allowing for versatile charging from power banks, computers, or car chargers.
- Using the Charging Dock: Place the radio into the charging dock. Ensure the charging contacts align. The indicator light on the dock will show charging status.
- Using USB Type-C: Connect a USB Type-C cable to the radio's charging port and to a compatible USB power source (e.g., power bank, computer, car charger).
5.3 Antenna Attachment
Screw the antenna clockwise into the connector on top of the radio until it is finger-tight. Do not overtighten.
5.4 Belt Clip and Lanyard Attachment
Attach the belt clip to the designated slot on the back of the radio. The lanyard can be attached to the loop on the radio for secure carrying.
6. Operating Instructions
6.1 Basic Operation
- Power On/Off: Rotate the Power/Volume knob clockwise to turn on the radio. Rotate counter-clockwise until it clicks to turn off.
- Volume Adjustment: Rotate the Power/Volume knob to adjust the listening volume.
- Channel Selection: Use the Up/Down navigation keys to select desired channels. The PX-10R supports 999 channels.
- Push-to-Talk (PTT) Key: Press and hold the PTT key on the side of the radio to transmit. Release to receive.
- Menu Navigation: Press the MENU key to access the radio's settings. Use the Up/Down keys to navigate and the MENU key again to confirm selections. The Exit key can be used to return to the previous screen or exit the menu.
6.2 Advanced Features
- Wireless Frequency Copy:

Figure 6.1: Wireless Frequency Copy Function
To use, activate the Wireless Frequency Copy function via the menu. Position the PX-10R near the transmitting radio and follow the on-screen prompts to copy its frequency.
This feature allows the PX-10R to copy the frequency of another walkie-talkie with a single button press, enabling seamless communication across different brands and models without computer programming. - 10 NOAA Weather Channels:

Figure 6.2: NOAA Weather Channels
Access the NOAA weather channels through the radio's menu. The radio can scan these channels to provide weather alerts.
The radio supports NOAA weather forecast service, scanning 10 NOAA channels to provide real-time weather alerts, enhancing safety during outdoor activities. - VOX Mode (Voice Operated Transmission): Activate VOX mode in the menu for hands-free operation. The radio will transmit automatically when it detects your voice. Adjust VOX sensitivity (9 levels available) for optimal performance.
- Dual Band / Dual Watch: The PX-10R operates on both UHF and VHF bands. Dual Watch allows you to monitor two different frequencies simultaneously.
- Super Flashlight:

Figure 6.3: Super Flashlight in Use
Press the dedicated Flashlight/Emergency Alert key to turn the flashlight on or off.
The integrated dual LED flashlight provides powerful illumination, useful in low-light conditions or emergencies. - CTCSS/DCS: Use Continuous Tone-Coded Squelch System (CTCSS) or Digital Coded Squelch (DCS) to filter out unwanted conversations on a channel.
- DTMF: Dual-Tone Multi-Frequency signaling is supported for various control functions.
- High/Low Power Selection: Adjust the transmit power output (high or low) to conserve battery life or extend range as needed.
- Auto Keypad Lock: Enable this feature in the settings to automatically lock the keypad after a period of inactivity, preventing accidental key presses.
- Channel Scan Monitoring: Scan through programmed channels to find active transmissions.
- Busy Channel Lockout (BCLO): Prevents transmission on a channel that is already in use.
- 10-Level Squelch Adjustment: Adjust the squelch level to suppress background noise and receive only strong signals.
- Alarm Clock: The radio includes an alarm clock function.
- Same-Frequency Calling: Allows direct communication on the same frequency.
7. Maintenance
- Cleaning: Wipe the radio surface with a soft, damp cloth. Do not use harsh chemicals or abrasive cleaners.
- Battery Care: Fully charge the battery before first use. For long-term storage, charge the battery to about 50% and store in a cool, dry place. Avoid fully discharging the battery.
- Storage: Store the radio in a dry, dust-free environment away from direct sunlight and extreme temperatures.
8. Troubleshooting
If you encounter issues with your PX-10R, refer to the following common problems and solutions:
| Problem | Possible Cause | Solution |
|---|---|---|
| Radio does not power on. | Battery is low or not installed correctly. | Charge the battery or re-install it correctly. |
| Cannot transmit or receive. | Incorrect frequency/channel, antenna loose, or busy channel lockout active. | Verify frequency/channel, check antenna connection, or disable busy channel lockout. |
| Poor audio quality. | Low battery, squelch level too high, or out of range. | Charge battery, adjust squelch level, or move closer to the other radio. |
| Keypad is unresponsive. | Keypad lock is active. | Disable keypad lock (refer to specific key combination in full manual if available). |
9. Specifications
| Feature | Specification |
|---|---|
| Model Number | PX-10R |
| Brand | pxton |
| Number of Channels | 999 |
| Frequency Range | UHF VHF Dual Band |
| Battery Type | 1800mAh Lithium Ion (included) |
| Voltage | 7.4 Volts |
| Water Resistance Level | IP54 (Waterproof) |
| Item Weight | 1.26 pounds |
| Product Dimensions | 8.07 x 4.33 x 4.72 inches |
| Special Features | Call Alert, Dual Band, Voice Operated Transmission (VOX), Weather Alert (NOAA), Wireless Frequency Copy, Super Flashlight |
| Manufacturer | Shenzhen Puxintong Electronics Co.Ltd |
| Date First Available | March 2, 2024 |
10. Warranty and Support
The pxton PX-10R comes with a 60-day unconditional return policy and lifetime after-sales service. For any issues, questions, or technical support, please contact pxton customer service through the platform where you purchased the product or refer to the contact information provided in your product packaging.


