Introduction
Welcome to the user manual for your HICSHON 4K Waterproof Video Camera. This camera is designed for capturing high-quality photos and videos both on land and underwater, featuring 4K Ultra HD video recording, 48MP still image capture, dual screens for easy selfies, and a waterproof design up to 11 feet (3.3 meters). Please read this manual carefully to ensure proper operation and maintenance of your device.

Figure 1: HICSHON 4K Waterproof Video Camera and included accessories: 64GB memory card and two lithium-ion batteries.
Package Contents
Please check the package to ensure all items are present:
- HICSHON 4K Waterproof Video Camera (Model: WDC901)
- 64GB Micro SD Card
- Lithium-Ion Batteries (x2)
- USB Charging Cable
- Wrist Strap
- User Manual
Setup
1. Battery Installation
The camera requires two Lithium-Ion batteries. Ensure correct polarity when inserting.
- Locate the battery compartment door on the bottom of the camera.
- Slide the lock mechanism to open the door.
- Insert the two Lithium-Ion batteries according to the polarity indicators (+/-) inside the compartment.
- Close the battery compartment door firmly until it clicks into place, ensuring a waterproof seal.
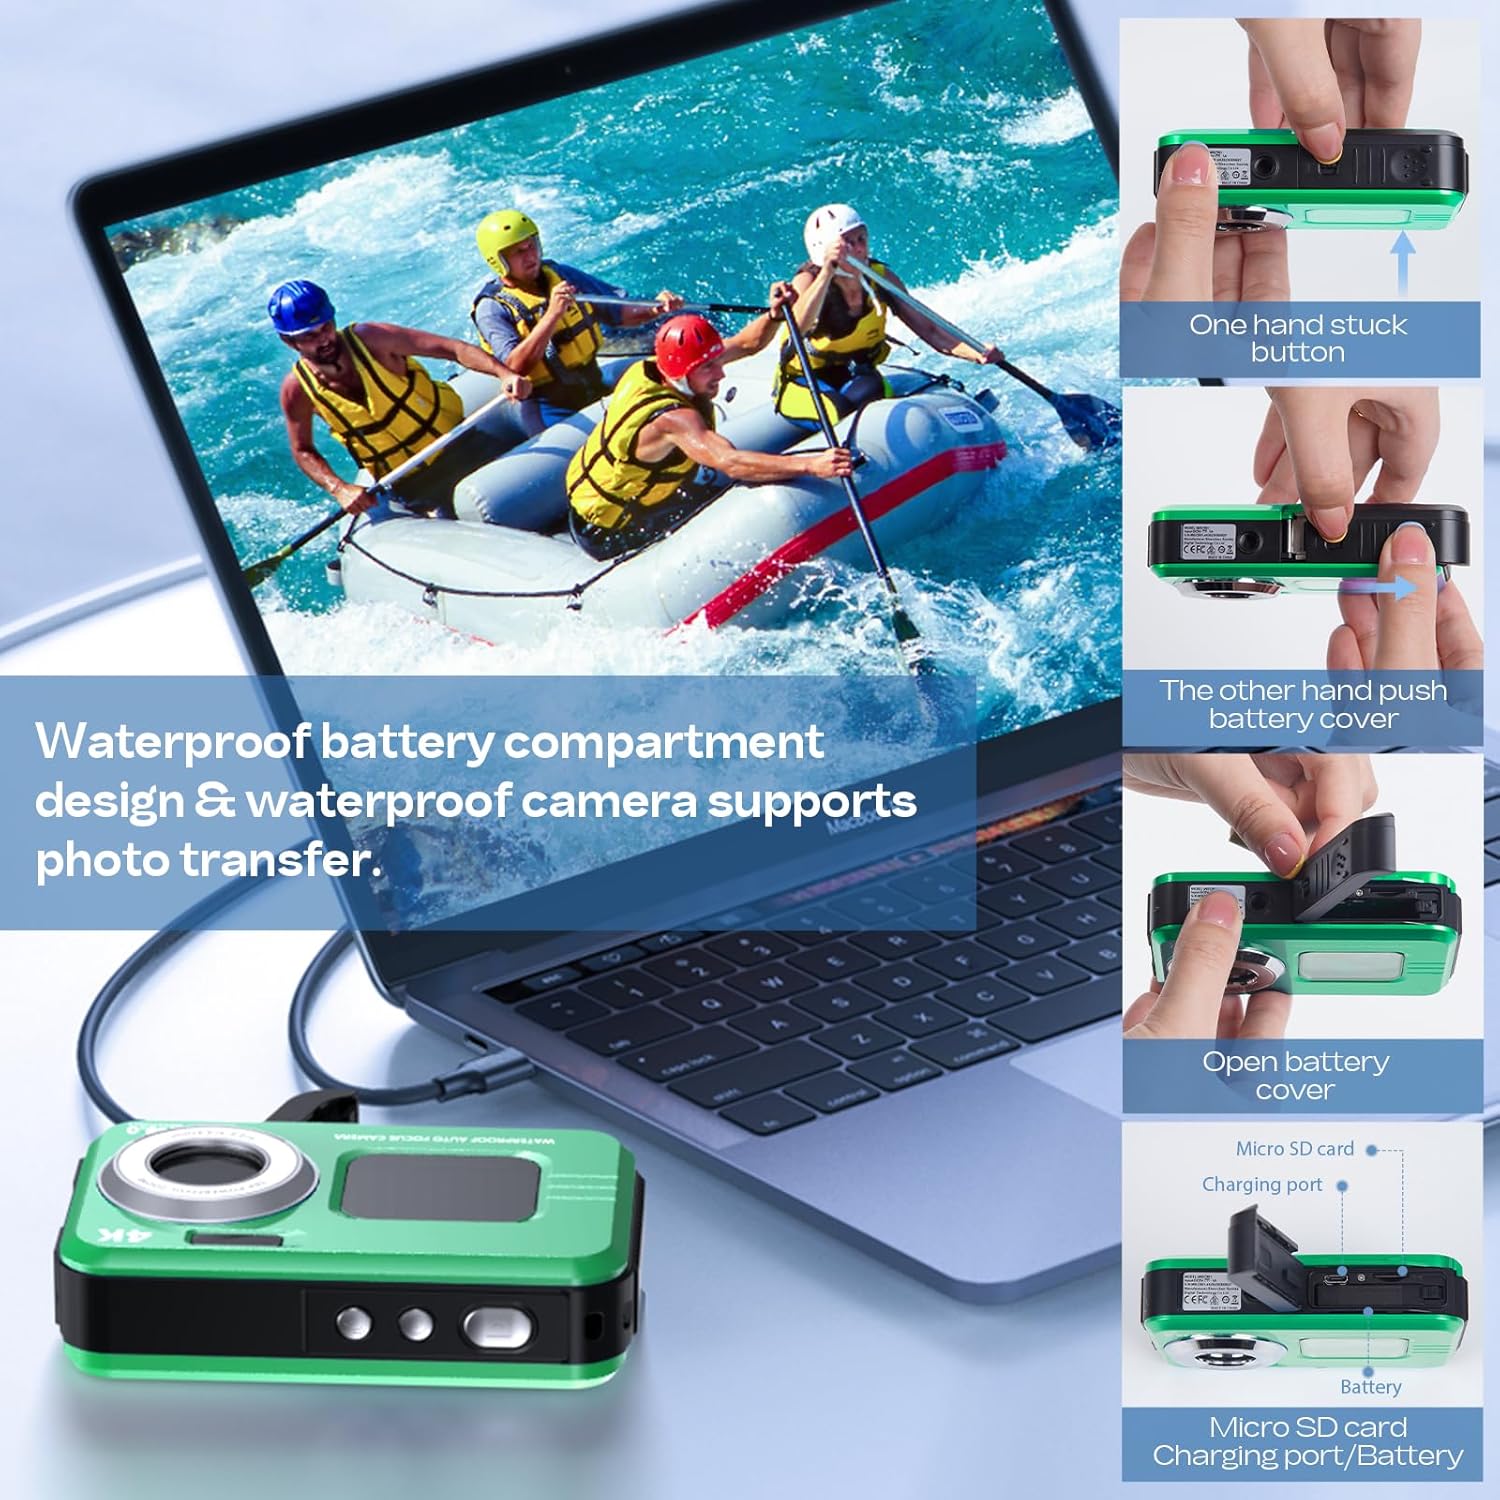
Figure 2: Battery and Micro SD card compartment location.
2. Memory Card Installation
A 64GB Micro SD card is included. The camera supports Micro SD cards up to 128GB (Class 10 or higher recommended).
- Open the battery compartment door as described above.
- Locate the Micro SD card slot next to the battery compartment.
- Insert the Micro SD card with the gold contacts facing down until it clicks into place.
- Close the battery compartment door securely.
3. Initial Charging
Before first use, fully charge the batteries.
- Connect the USB charging cable to the camera's charging port (located within the battery compartment).
- Connect the other end of the USB cable to a USB power adapter (not included) or a computer's USB port.
- The charging indicator light will illuminate. It will turn off or change color when charging is complete.
Operating the Camera
1. Powering On/Off
Press and hold the Power button (usually located on the top or side) for a few seconds to turn the camera on or off.
2. Basic Controls
Familiarize yourself with the camera's buttons:
- Shutter Button: Press to take a photo or start/stop video recording.
- Mode Button: Cycles through different modes (Photo, Video, Playback, Settings).
- Zoom Buttons (W/T): Adjusts digital zoom (Wide/Telephoto).
- Menu Button: Accesses camera settings.
- OK/Confirm Button: Confirms selections in menus.

Figure 3: Camera interface and button layout.
3. Switching Screens (Dual Screen Feature)
The HICSHON camera features dual screens (front and rear) for versatile shooting, especially for selfies and vlogging.
- To switch between the front and rear screens, locate the dedicated screen switch button (often labeled with a screen icon or "M").
- Press this button to toggle the active display.
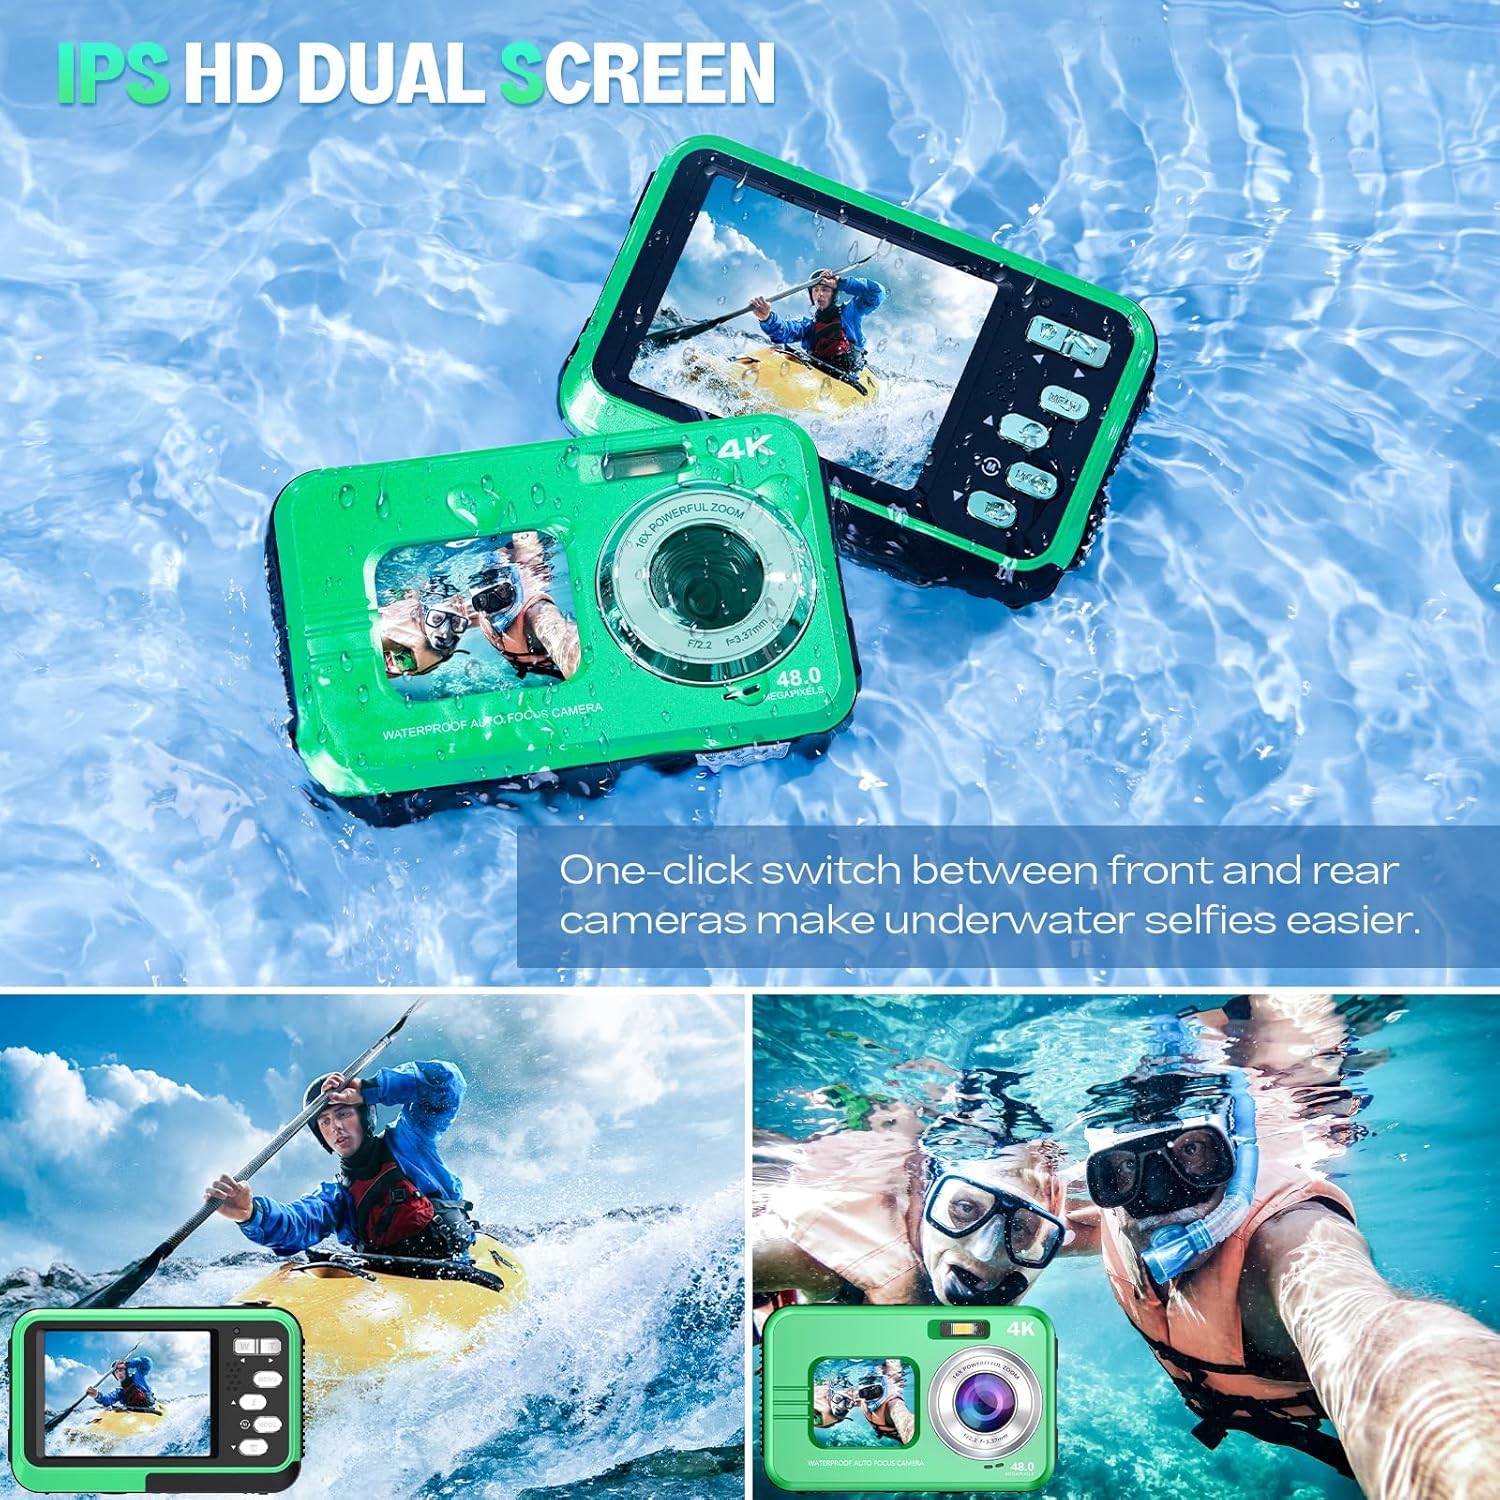
Figure 4: Dual screen functionality for easy selfies and vlogging.
4. Taking Photos
- Turn on the camera and ensure it is in Photo mode (check the display icon).
- Frame your shot using the screen.
- Press the Shutter button halfway down to activate autofocus. The focus frame will turn green when focus is achieved.
- Press the Shutter button fully down to capture the image.
5. Recording Videos
- Turn on the camera and switch to Video mode using the Mode button.
- Frame your scene.
- Press the Shutter button once to start recording. A recording indicator (e.g., red dot or timer) will appear on the screen.
- Press the Shutter button again to stop recording.

Figure 5: Capturing high-resolution underwater video.
6. Zoom Function
The camera features 16X digital zoom.
- In Photo or Video mode, press the T (Telephoto) button to zoom in.
- Press the W (Wide) button to zoom out.
7. Underwater Use
The HICSHON camera is waterproof up to 11 feet (3.3 meters) and meets IP68 international waterproof standards. Follow these guidelines for underwater operation:
- Before submerging, ensure the battery and memory card compartment door is securely closed and locked.
- Check the rubber seal around the compartment for any debris or damage. A clean, intact seal is crucial for waterproofing.
- Do not open the compartment underwater.
- After use in saltwater, rinse the camera with fresh water and dry thoroughly before opening any compartments.

Figure 6: Camera's waterproof depth capability.
8. Special Features
Fill Light & Anti-Shake
The built-in fill light assists in capturing quality pictures in low-light conditions, especially underwater. The anti-shake feature helps stabilize images and videos, reducing blur caused by camera movement.
- Access these features through the camera's menu settings.
- Enable the fill light for darker environments.
- Ensure anti-shake is enabled for smoother footage.

Figure 7: Benefits of Fill Light and Anti-Shake features.
Time Lapse, Continuous Shooting, Self-Timer, and Effects
Explore various creative shooting modes:
- Time Lapse: Capture a series of photos over time to create a time-lapse video.
- 3-Continuous Shooting: Take multiple photos in quick succession.
- Self-Timer: Set a delay (e.g., 2s, 5s, 10s) before the photo is taken, useful for group shots.
- 16 Effects: Apply various filters or effects to your photos directly from the camera.

Figure 8: Creative shooting modes available.
Data Transfer
Transferring Photos and Videos
You can transfer your captured media to a computer or other device.
- Connect the camera to your computer using the provided USB cable.
- Turn on the camera. It should appear as a removable disk or mass storage device on your computer.
- Navigate to the camera's storage (usually a DCIM folder) to access your photos and videos.
- Copy the desired files to your computer.
- Safely eject the camera from your computer before disconnecting the USB cable.
Maintenance
1. Cleaning the Camera
- Use a soft, lint-free cloth to clean the camera body and screens.
- For the lens, use a specialized lens cleaning cloth and solution. Avoid touching the lens with fingers.
- After underwater use, rinse the camera with fresh water and allow it to air dry completely before opening any compartments.
2. Battery Care
- Store batteries in a cool, dry place when not in use.
- Avoid fully discharging batteries frequently to prolong their lifespan.
- If storing for extended periods, charge batteries to about 50% capacity.
3. Waterproof Seal Care
- Regularly inspect the rubber seal around the battery/memory card compartment for dirt, sand, hair, or any damage.
- Clean the seal gently with a soft, damp cloth. Do not use sharp objects.
- Ensure the seal is properly seated and free of obstructions before closing the compartment for waterproof use.
Troubleshooting
If you encounter issues with your HICSHON camera, refer to the following common problems and solutions:
| Problem | Possible Cause / Solution |
|---|---|
| Camera does not turn on. |
|
| Images are blurry or out of focus. |
|
| Lens fogs up (especially underwater). |
|
| Memory card error. |
|
| Cannot transfer files to computer. |
|
Specifications
| Feature | Detail |
|---|---|
| Model Name | WDC901 |
| Brand | HICSHON |
| Maximum Image Resolution | 48 MP |
| Photo Sensor Technology | CMOS |
| Photo Sensor Size | 1/3.2-inch |
| Image Stabilization | Digital |
| Supported File Format | JPEG |
| Minimum Shutter Speed | 1/60 seconds |
| Metering Description | Center Weighted |
| Compatible Mountings | Micro Four Thirds |
| Batteries | 2 Lithium Ion batteries (included) |
| Package Dimensions | 12.19 x 9.3 x 8.71 cm |
| Weight | 340 g |
| Waterproof Depth | Up to 11 feet (3.3 meters) |
Warranty and Support
HICSHON products are manufactured to high quality standards. For information regarding warranty coverage, please refer to the warranty card included with your product or visit the official HICSHON website.
If you require technical assistance or have questions not covered in this manual, please contact HICSHON customer support through their official channels. Please have your model number (WDC901) and purchase details ready when contacting support.