
Introduction
This manual provides detailed instructions for assembling your JEKCA Panda Mini 01S building block set. JEKCA building blocks utilize a unique patented locking technology, ensuring sturdy construction without the need for glue. The assembly process is designed to be straightforward, offering an engaging experience for users aged 14 and above.
The JEKCA Panda Mini 01S set consists of over 370 pieces, allowing you to construct a detailed 3D animal sculpture. Follow the step-by-step guide to experience the satisfaction of building your own model.
Safety Information
- Small Parts: This product contains small parts. Keep out of reach of young children to prevent choking hazards.
- Recommended Age: This product is recommended for individuals aged 14 years and up.
Package Contents
Before beginning assembly, please verify that all components are present in your package:
- Instruction Manual
- Building Bricks (over 370 pieces)
- Locking Pins
- Pin Driver Tool
- Quick Guide
Assembly Instructions
The JEKCA building system utilizes a special interlocking brick-through system for robust construction. Follow the included detailed step-by-step manual for specific model assembly. The general principle involves inserting locking pins to secure bricks together.
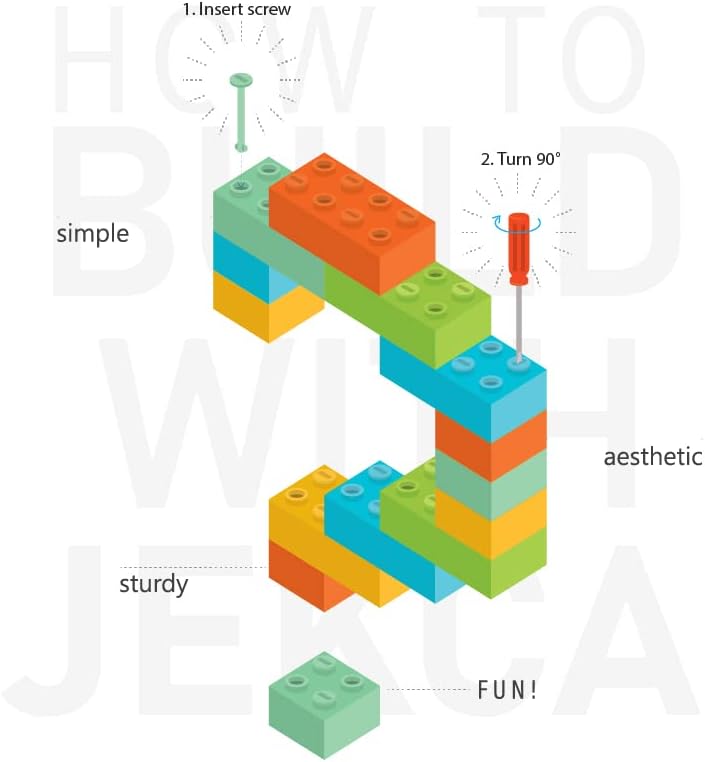
Figure 1: Interlocking Mechanism. This diagram illustrates the fundamental steps of the JEKCA interlocking system. First, insert a locking pin through the designated holes in the bricks. Second, turn the pin 90 degrees using the provided pin driver tool to secure the connection, ensuring a sturdy and stable structure.
- Review the Manual: Carefully read through the entire instruction manual provided in the package before starting assembly. Familiarize yourself with the brick types and the overall construction sequence.
- Organize Components: Sort the building bricks by color and type to facilitate easier assembly.
- Follow Step-by-Step: Assemble the model by following the numbered steps in the instruction manual. Each step will indicate which bricks to use and where to place them.
- Utilize Locking Pins: For each connection point indicated in the manual, insert a locking pin through the aligned holes of the bricks.
- Secure Connections: Use the provided pin driver tool to turn the inserted locking pin 90 degrees. This action expands the pin within the bricks, creating a secure and permanent bond.
- Verify Stability: After completing each section, gently test the stability of the assembled part before proceeding to the next step.
- Final Assembly: Continue until all sections are assembled and joined according to the manual, forming the complete Panda Mini 01S model.

Figure 2: Completed Panda Model (Front View). This image displays the fully assembled JEKCA Panda Mini 01S model from the front, showcasing its black and white brick construction and detailed features.

Figure 3: Completed Panda Model (Side View). This image provides a side perspective of the assembled JEKCA Panda Mini 01S, highlighting its three-dimensional form and the texture of the interlocking bricks.

Figure 4: Completed Panda Model (Rear View). This image shows the rear view of the assembled JEKCA Panda Mini 01S, demonstrating the continuous brick pattern and overall structural integrity.
Maintenance
To ensure the longevity and appearance of your JEKCA Panda Mini 01S model, consider the following maintenance tips:
- Cleaning: Dust the model regularly with a soft, dry cloth or a soft brush. For deeper cleaning, gently wipe with a damp cloth and mild soap, then dry thoroughly. Avoid harsh chemicals or abrasive materials.
- Storage: Store the assembled model in a stable location away from direct sunlight and extreme temperatures to prevent material degradation or discoloration.
- Disassembly: While JEKCA models are designed for sturdiness, disassembly is possible by carefully reversing the pin-locking process. However, frequent disassembly and reassembly may wear down the pins or brick connections.
Troubleshooting
If you encounter any issues during assembly, refer to these common troubleshooting tips:
- Missing Pieces: Double-check the packaging and your workspace. If pieces are genuinely missing, contact JEKCA customer support with your product details.
- Difficulty Connecting Bricks: Ensure the bricks are correctly aligned before inserting the pin. Apply firm, even pressure when inserting and turning the pin. Do not force connections.
- Unstable Sections: Re-examine the connections in the unstable area. Ensure all locking pins are fully inserted and turned 90 degrees as instructed.
- Pin Driver Issues: If the pin driver is not effectively turning the pins, ensure it is correctly seated in the pin's slot.
Specifications
| Product Name | JEKCA Panda Mini 01S Building Blocks |
| Model Number | ST19AM01 |
| Brand | JEKCA |
| Product Dimensions | 3.46 x 3.46 x 4.25 inches (8.8 x 8.8 x 10.8 cm) |
| Item Weight | 13.4 ounces |
| Number of Pieces | Over 370 |
| Recommended Age | 14 years and up |
| Manufacturer | JEKCA Limited |

Figure 5: Product Dimensions. This image visually represents the dimensions of the assembled JEKCA Panda Mini 01S model, indicating a length of 8.8cm, width of 8.8cm, and height of 10.8cm.
Warranty and Support
JEKCA products are designed for quality and durability. For any inquiries regarding missing parts, assembly challenges, or product defects, please contact JEKCA customer support directly. Please retain your purchase receipt as proof of purchase.
For further assistance, visit the official JEKCA website or refer to the contact information provided in your product packaging.

