
1. Introduction
Thank you for choosing the Mr. Dj PRO-SUB18BT Powered Subwoofer. This 18-inch active subwoofer is designed to deliver powerful low-frequency sound for PA, DJ, club, and bar applications. Featuring Bluetooth, USB, and line input connectivity, it offers versatile audio playback options. This manual provides essential information for safe operation, setup, and maintenance of your subwoofer.
2. Important Safety Instructions
- Read Instructions: Read all safety and operating instructions before using this product.
- Retain Instructions: Keep these instructions for future reference.
- Heed Warnings: Observe all warnings on the product and in the operating instructions.
- Follow Instructions: Follow all operating and usage instructions.
- Water and Moisture: Do not use this apparatus near water.
- Cleaning: Clean only with a dry cloth.
- Ventilation: Do not block any ventilation openings. Install in accordance with the manufacturer's instructions. Ensure proper airflow to prevent overheating.
- Heat: Do not install near any heat sources such as radiators, heat registers, stoves, or other apparatus (including amplifiers) that produce heat.
- Power Cord Protection: Protect the power cord from being walked on or pinched, particularly at plugs, convenience receptacles, and the point where they exit from the apparatus.
- Attachments/Accessories: Use only attachments/accessories specified by the manufacturer.
- Power Source: Refer all servicing to qualified service personnel. Servicing is required when the apparatus has been damaged in any way, such as power-supply cord or plug is damaged, liquid has been spilled or objects have fallen into the apparatus, the apparatus has been exposed to rain or moisture, does not operate normally, or has been dropped.
3. Package Contents
Ensure all items are present in the package:
- Mr. Dj PRO-SUB18BT Powered Subwoofer (1 unit)
- Power Cord
- User Manual (this document)
4. Product Overview
Familiarize yourself with the various components and controls of your PRO-SUB18BT subwoofer.
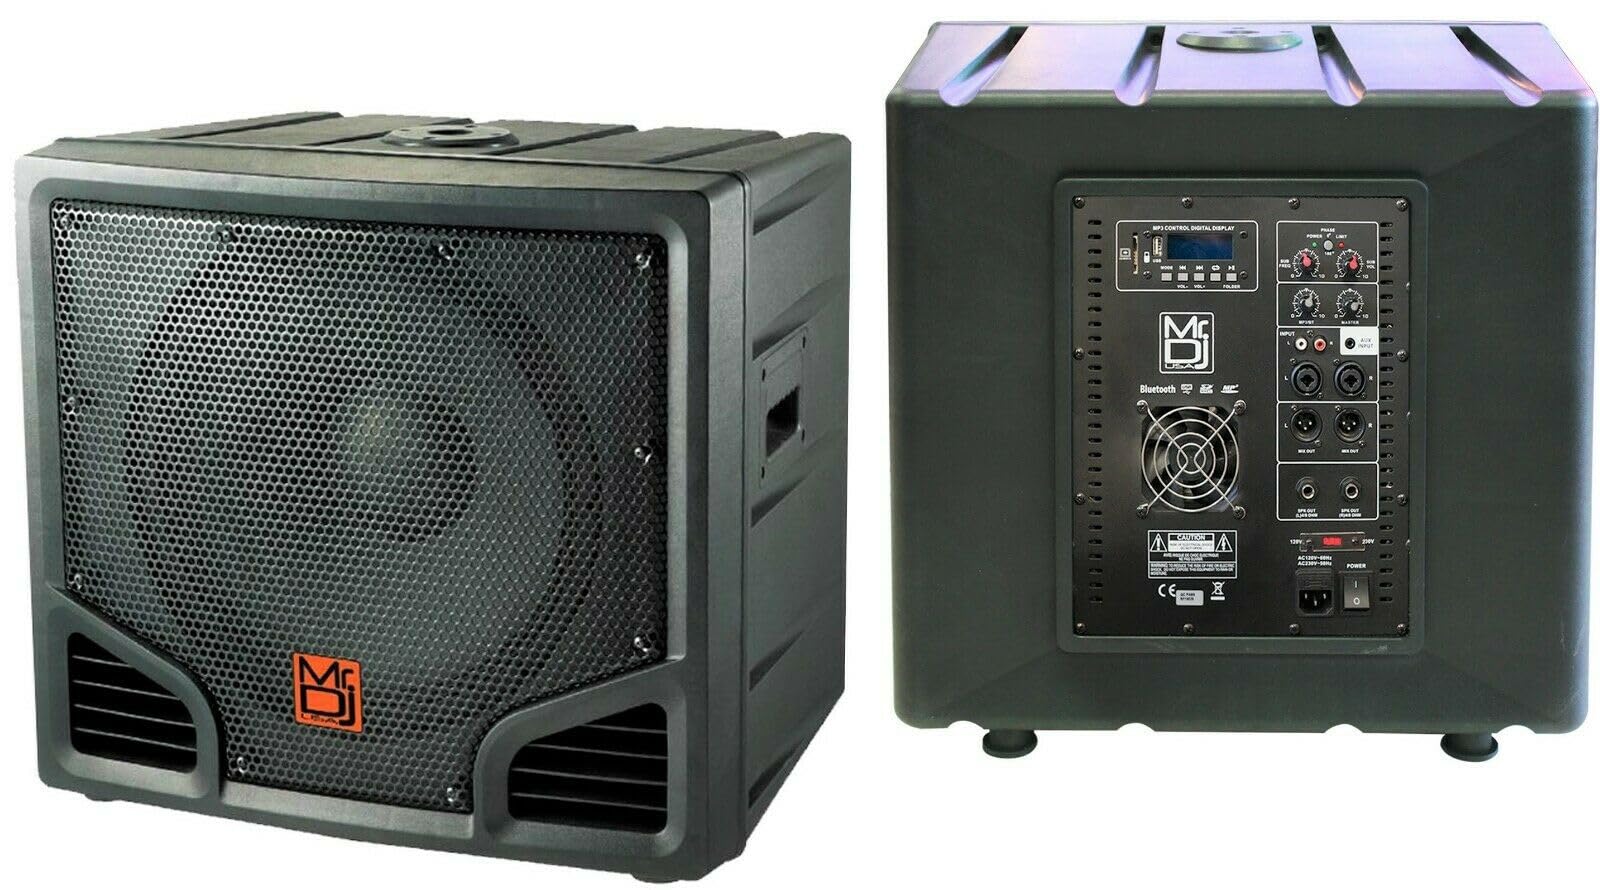
Figure 4.1: Rear Control Panel of the PRO-SUB18BT Subwoofer. This image displays the full rear panel, including the MP3 control digital display, phase and power limit controls, input section (XLR, RCA, AUX), output section (XLR, Speaker Out), and power input with switch.
4.1 Control Panel Features
- MP3 Control Digital Display: Shows current mode (Bluetooth, USB, Line), track information, and volume level.
- USB/SD Card Slot: For playing audio files directly from USB drives or SD cards.
- Control Buttons: Play/Pause, Stop, Repeat, Track Skip (Next/Previous), Folder navigation.
- Volume Control: Adjusts the overall output volume.
- Phase Switch: Adjusts the phase of the subwoofer output (0° or 180°).
- Power Limit Indicator: Lights up to indicate when the subwoofer is reaching its power limit.
- Input Section: Includes XLR Line In, RCA Line In, and AUX Input for connecting various audio sources.
- Output Section: Includes XLR Line Out and Speaker Out for connecting additional speakers or subwoofers.
- Power Input: Standard AC power connection.
- Power Switch: Turns the unit ON or OFF.

Figure 4.2: Digital EQ and Playback Controls. This image highlights the Treble and Bass controls, digital EQ settings, and buttons for play, pause, stop, repeat, and track skipping, located on the control panel.

Figure 4.3: XLR and RCA Line Connections. This image details the XLR Line In, RCA Line In, XLR Line Out, and RCA Line Out ports, used for connecting audio sources and linking to other speakers or subwoofers.

Figure 4.4: Speaker Output. This image shows the Speaker Out connection, which allows for connecting passive speakers or additional active speakers to the subwoofer.
5. Setup
5.1 Placement
Place the subwoofer on a stable, flat surface. Ensure adequate ventilation around the unit to prevent overheating. Avoid placing it directly against walls or in corners, as this can affect sound quality. For optimal bass response, experiment with different positions in your listening area.
5.2 Power Connection
- Ensure the subwoofer's power switch is in the OFF position.
- Connect the provided power cord to the AC power input on the rear panel of the subwoofer.
- Plug the other end of the power cord into a suitable electrical outlet (AC 120V-60Hz or AC 230V-50Hz, depending on your region).
5.3 Audio Connections
Connect your audio source (mixer, DJ controller, etc.) to the subwoofer using one of the following methods:
- XLR Line In: For professional audio equipment, use an XLR cable to connect your source to the XLR Line In port.
- RCA Line In: For consumer audio equipment, use RCA cables to connect your source to the RCA Line In ports.
- AUX Input: Use a 3.5mm stereo cable for connecting devices like smartphones or media players.
To connect additional speakers or another subwoofer:
- XLR Line Out: Use an XLR cable to connect to the input of another powered speaker or subwoofer.
- Speaker Out: Use a speaker cable to connect to a passive speaker or the input of another active speaker.
6. Operating Instructions
6.1 Powering On/Off
- Ensure all connections are secure and the volume knob is set to minimum.
- Flip the Power Switch on the rear panel to the ON position. The digital display will illuminate.
- To power off, turn the volume down and flip the Power Switch to the OFF position.
6.2 Bluetooth Connectivity
- Press the 'MODE' button on the control panel until 'Bluetooth' is displayed. The display will show 'BT' and a blinking icon, indicating it's ready for pairing.
- On your Bluetooth-enabled device (smartphone, tablet, etc.), search for available Bluetooth devices.
- Select 'PRO-SUB18BT' from the list. Once paired, the blinking icon will become solid, and a confirmation tone may sound.
- You can now play audio from your device through the subwoofer. Adjust volume on both your device and the subwoofer.
6.3 USB/SD Card Playback
- Insert a USB drive or SD card (containing MP3 or WMA audio files) into the respective slot on the control panel.
- The subwoofer will automatically switch to USB/SD mode and begin playing the first track. If not, press the 'MODE' button to select USB or SD.
- Use the Play/Pause, Stop, Repeat, and Track Skip buttons to control playback. The 'FOLDER' button allows navigation through folders on the storage device.
6.4 Line Input Usage
- Connect your audio source to the XLR Line In, RCA Line In, or AUX Input ports as described in Section 5.3.
- Press the 'MODE' button until 'LINE' or 'AUX' is displayed, corresponding to your chosen input.
- Play audio from your connected source. Adjust the volume on both the source device and the subwoofer.
6.5 Stereo Pairing (TWS Function)
The PRO-SUB18BT supports wireless stereo pairing with another identical PRO-SUB18BT unit for a true stereo experience.

Figure 6.1: Wireless Stereo Connection. This image illustrates two PRO-SUB18BT subwoofers set up for wireless stereo pairing, enhancing the audio experience.
- Ensure both PRO-SUB18BT units are powered on and in Bluetooth mode.
- On one of the subwoofers (this will be the master unit), press and hold the 'TWS' button (if available, or a combination of buttons as per specific model instructions, typically Play/Pause or Mode button for a few seconds). The display will indicate 'PAIR' or similar.
- The two units will attempt to connect wirelessly. Once connected, one unit will act as the left channel and the other as the right channel.
- Connect your Bluetooth device to the master unit as described in Section 6.2. Audio will now play in stereo across both subwoofers.
7. Maintenance
7.1 Cleaning
- Always disconnect the power cord before cleaning.
- Use a soft, dry cloth to wipe the exterior surfaces of the subwoofer.
- Do not use abrasive cleaners, waxes, or solvents, as they can damage the finish.
- Keep the ventilation openings free of dust and debris.
7.2 Storage
If storing the subwoofer for an extended period, ensure it is clean, dry, and stored in a cool, well-ventilated area, away from direct sunlight and extreme temperatures.
8. Troubleshooting
| Problem | Possible Cause | Solution |
|---|---|---|
| No power | Power cord not connected; Power switch off; Outlet not working | Check power cord connection; Turn power switch ON; Test outlet with another device |
| No sound output | Volume too low; Incorrect input selected; Audio source issue; Cables not connected properly | Increase volume; Select correct input mode (Bluetooth, USB, Line); Check audio source; Ensure cables are securely connected |
| Bluetooth not pairing | Subwoofer not in pairing mode; Device too far; Interference; Incorrect device selected | Ensure subwoofer is in BT pairing mode; Move device closer; Reduce interference; Select 'PRO-SUB18BT' from device list |
| Distorted sound | Volume too high (clipping); Poor audio source quality; Damaged cables | Reduce volume on subwoofer and source; Use high-quality audio files/sources; Replace damaged cables |
| USB/SD playback not working | Unsupported file format; Corrupted files; USB/SD card not inserted correctly | Ensure files are MP3/WMA; Check for corrupted files; Reinsert USB/SD card; Try a different USB/SD card |
9. Specifications
| Feature | Detail |
|---|---|
| Brand | Mr. Dj |
| Model Number | PRO-SUB18BT |
| Speaker Type | Powered Subwoofer |
| Speaker Maximum Output Power | 180 watts (RMS) / 6000 watts (Peak P.M.P.O.) |
| Connectivity Technology | Bluetooth, USB, Line (XLR, RCA, AUX) |
| Audio Output Mode | Mono (can be paired for stereo) |
| Controller Type | Button |
| Power Source | Corded Electric (AC 120V-60Hz / AC 230V-50Hz) |
| Item Weight | 16 ounces (Note: This weight seems unusually low for an 18" subwoofer and may be a data entry error. Please refer to product packaging for accurate weight.) |
| UPC | 826843934322 |
10. Warranty and Support
10.1 Manufacturer's Warranty
This Mr. Dj PRO-SUB18BT subwoofer comes with a 1-year manufacturer's warranty from the date of purchase. This warranty covers defects in materials and workmanship under normal use. It does not cover damage caused by misuse, accident, unauthorized modification, or improper installation.
Please retain your proof of purchase for warranty claims.
10.2 Customer Support
For technical assistance, warranty service, or general inquiries, please contact Mr. Dj customer support through the retailer where the product was purchased or visit the official Mr. Dj website for contact information.