1. Introduction
The WOYO PDR-009 is a specialized Paintless Dent Repair (PDR) tool designed for efficiently removing soft and small dents from aluminum car bodies. This device utilizes advanced technology to quickly repair dents, often within 30 seconds for minor hailstone damage, making it a valuable tool for automotive repair workshops and enthusiasts. It features a digital display for precise control over heating time and power settings, ensuring optimal repair results.
This manual provides comprehensive instructions for the safe and effective operation, setup, maintenance, and troubleshooting of your WOYO PDR-009 tool.
2. Safety Information
Please read all safety warnings and instructions carefully before using the WOYO PDR-009 tool to prevent injury or damage to the product or vehicle.
- Aluminum Car Body Only: The PDR-009 is designed exclusively for repairing dents on aluminum car bodies. It is not suitable for iron or other metal surfaces. Using it on non-aluminum surfaces may cause damage to the tool or the vehicle. To confirm your car's material, use a magnet: if it attaches, the car body is likely iron/steel and not suitable for this tool.
- Pacemaker Warning: Individuals with pacemakers should not operate this device due to potential electromagnetic interference.
- Gentle Application: When heating, do not press the heating head hard against the car shell. Excessive pressure can deform the metal further or create new dents. Move the repair handle gently.
- Paint Color Consideration: If the car paint is white or a light color, set the power mode to the 40% or 60% gear to prevent paint damage.
- Full Contact: Ensure the handle's surface fully contacts the car body during operation. This tool is not for use on convex surfaces.
- Ventilation: Ensure adequate ventilation in the work area.
- Power Supply: Use only the provided power cable and ensure the power supply matches the tool's requirements (100V-110V or 220V-240V, 50Hz/60Hz).
- Keep Dry: Do not operate the tool in wet conditions or expose it to water.
- Children and Pets: Keep the tool out of reach of children and pets.

Figure 2.1: Confirming car body material with a magnet. The PDR-009 is only for aluminum; if a magnet sticks, the material is iron/steel and unsuitable.

Figure 2.2: Types of dents suitable and unsuitable for PDR-009 repair. It is designed for soft, small dents with a repairable range greater than 2.4cm (0.95 inches) in diameter, and cannot repair dents close to corners or sharp dents.
3. What's in the Box
Upon opening the package, verify that all components are present and undamaged:
- Main device (PDR-009 unit)
- Handle Head (repair head)
- Power plug (power cable)
- Extension cable (handle cable)
- Hard carrying case
- Instruction Manual (this document)
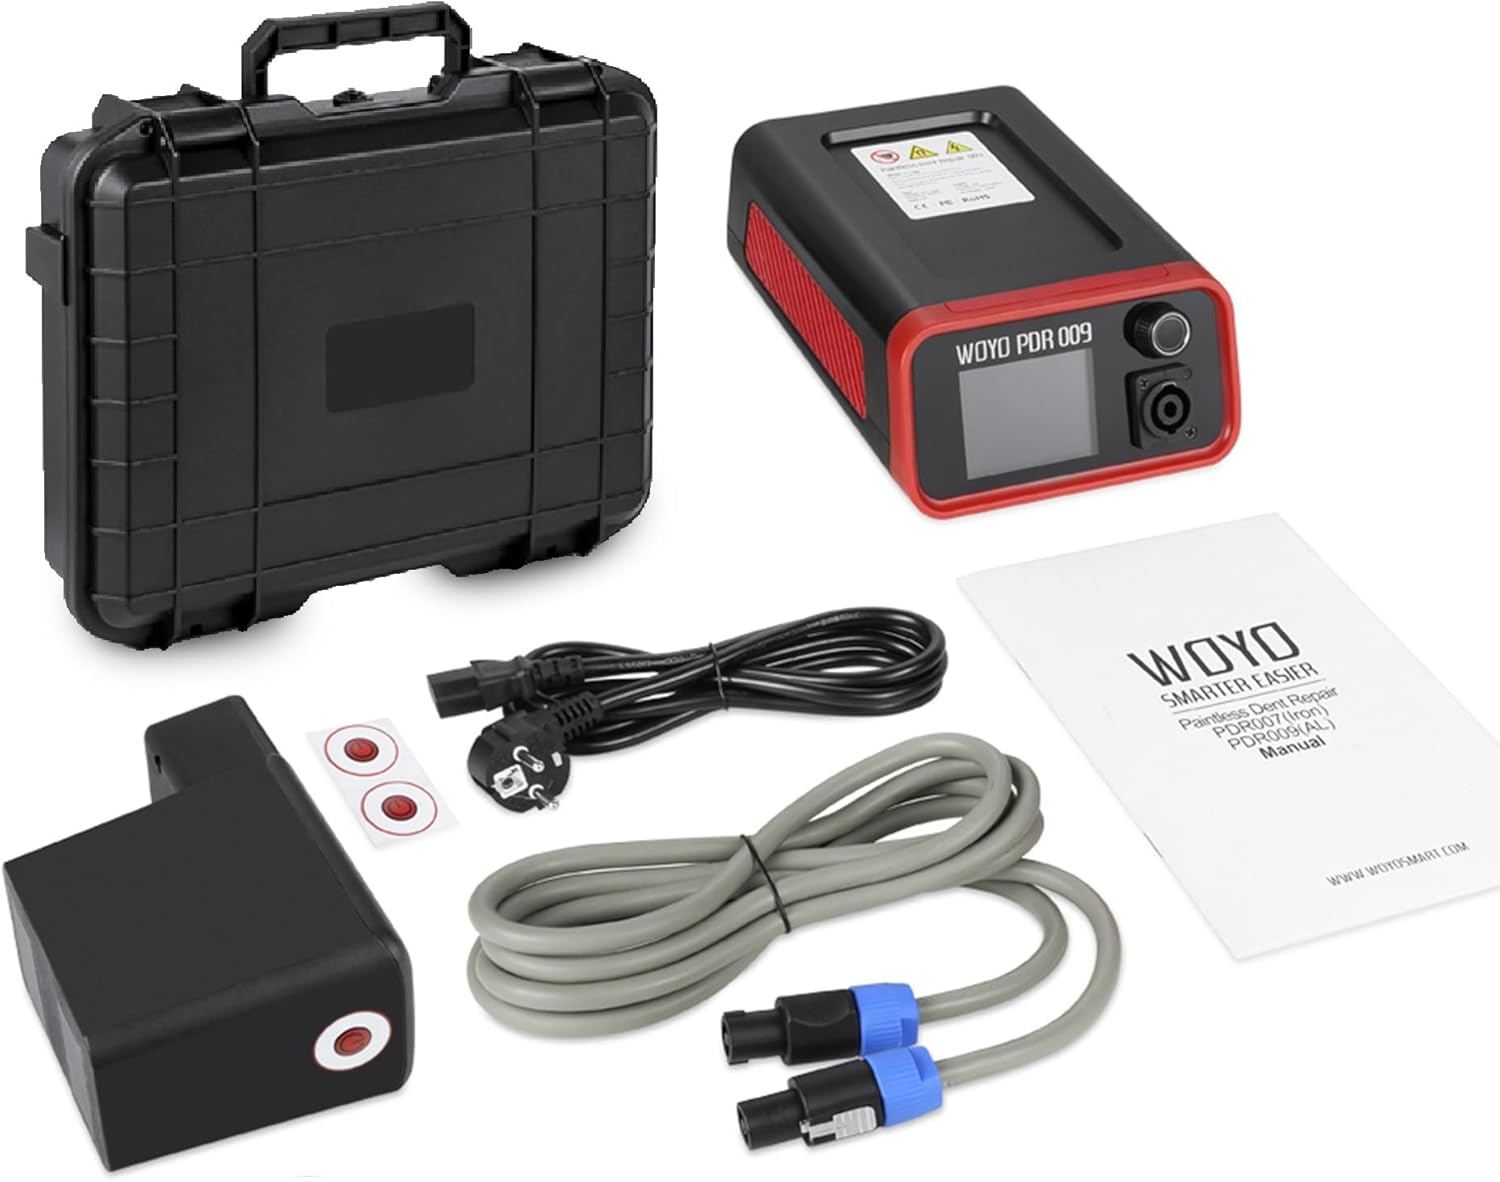
Figure 3.1: Contents of the WOYO PDR-009 package.
4. Product Overview
The WOYO PDR-009 consists of a main control unit and a connected handle head. The main unit features a digital display for controlling power and time settings, along with an ON/OFF switch. The handle head is the part that applies heat to the dent.

Figure 4.1: WOYO PDR-009 main unit and handle dimensions, and digital display interface. The main unit measures approximately 21.2cm x 15cm x 8cm. The handle head measures approximately 14cm x 9.7cm x 5.8cm.

Figure 4.2: Control interface of the PDR-009. The main knob allows for pressing (confirm/switch mode) and rotating (select power/time gear). The power settings range from OFF, 10% to 90%, and MAX. Time settings range from 1.0s to 5.0s, and MAX. There is also an ON/OFF switch on the side.

Figure 4.3: The PDR-009 comes with a sturdy carrying case featuring a robust handle and soft interior padding to protect the device during transport and storage.

Figure 4.4: Application scenarios for the WOYO PDR-009, including professional auto body repair shops, sheet metal repair shops, quick repair chains, and detailing centers.
5. Setup
- Unpack: Carefully remove all components from the carrying case.
- Connect Handle: Connect the extension cable (handle cable) to the main device and then to the handle head. Ensure connections are secure.
- Connect Power: Plug the power cable into the main device, then plug the other end into a suitable electrical outlet. Ensure the voltage matches the tool's requirements (100V-110V or 220V-240V, 50Hz/60Hz).
- Power On: Flip the ON/OFF switch on the side of the main unit to the 'ON' position. The digital display will illuminate.

Figure 5.1: The PDR-009 setup showing the power cable (1.5m/59in) and handle cable (3m/118in), providing ample reach for various repair scenarios.
6. Operating Instructions
Before starting, confirm that the car body is aluminum and the dent is soft and small. The PDR-009 works by heating the metal to allow it to return to its original shape.
- Initial Settings:
- Turn on the device using the ON/OFF switch.
- Use the main knob to adjust the power and time settings. Rotate the knob to select the desired gear for Power and Time. Press the knob to confirm or switch between Power and Time adjustment modes.
- For initial attempts, set the time to 1 second and apply 1-2 clicks (short pulses).
- If the car paint is white or light-colored, set the power mode to 40% or 60% to prevent paint damage.
- Positioning the Handle:
- Place the handle head directly over the center of the dent. Ensure the handle's surface fully contacts the car body.
- For larger dents, you may need to heat around the dent first.
- Applying Heat:
- Activate the heating process by pressing the trigger or button on the handle (if applicable, or as per the device's specific activation method).
- Apply heat in short pulses (e.g., 1-2 seconds per pulse). Do not hold the heat on one spot for too long to avoid overheating the paint or metal.
- If the dent diameter is smaller than the size of the handle head, heat the dent until a small bulge appears.
- Cool Down and Repeat:
- Allow the heated area to cool down naturally between pulses. Cooling time is crucial for the metal to contract and pull the dent out.
- Observe the dent's progress. If the dent is not fully repaired, repeat steps 2 and 3, adjusting power and time as needed.
- When the dent is reversed-drawn and the surface appears smooth, the repair is complete. If not smooth, repeat the process.

Figure 6.1: Step-by-step guide for using the WOYO PDR-009. Start by confirming the car is aluminum with a soft & small dent. Set time for 1s and apply 1-2 clicks, allowing cool-down time. Heat around the dent, do not press hard. If the dent is smaller than the handle, heat until a small bulge appears. Repeat until smooth.

Figure 6.2: The WOYO PDR-009 in action, demonstrating its effectiveness on a car hood. The lower images show a dent before and after repair, as viewed with a reflection board, indicating a smooth finish.
7. Maintenance
Proper maintenance ensures the longevity and optimal performance of your WOYO PDR-009 tool.
- Cleaning: After each use, ensure the device is powered off and unplugged. Wipe the main unit and handle head with a soft, dry cloth. Do not use abrasive cleaners or solvents.
- Storage: Store the tool in its original hard carrying case in a cool, dry place, away from direct sunlight and moisture.
- Cable Inspection: Periodically inspect the power cable and extension cable for any signs of damage, fraying, or kinks. Replace if necessary.
- Ventilation: Ensure the ventilation areas on the main unit are clear of dust and debris to maintain proper heat dissipation. The device has an extensive heat dissipation area.
8. Troubleshooting
If you encounter issues with your WOYO PDR-009, refer to the following common problems and solutions:
| Problem | Possible Cause | Solution |
|---|---|---|
| Tool not powering on. | Power cable not connected, power outlet issue, ON/OFF switch off. | Ensure power cable is securely connected and plugged into a working outlet. Check ON/OFF switch. |
| Dent not repairing or worsening. | Incorrect car body material (not aluminum), dent type unsuitable (sharp/near corner), insufficient heat/time, excessive pressure. | Confirm car body is aluminum. Ensure dent is soft, small, and not near a corner. Adjust power/time settings. Apply heat gently and in pulses. |
| Paint damage. | Too much heat, too long application time, incorrect power setting for light paint. | Reduce power or time settings. For light-colored paint, use 40% or 60% power. Apply heat in short pulses. |
| Handle not making full contact. | Surface is convex or uneven. | The tool is not designed for convex surfaces. Ensure the handle head is flat against the dented area. |
9. Specifications
Detailed technical specifications for the WOYO PDR-009:
| Feature | Specification |
|---|---|
| Model | PDR-009 |
| Manufacturer | WOYO SMART CO.,LTD |
| Input Voltage (PDR 009) | 220V-240V 50Hz/60Hz |
| Input Current (PDR 009) | 6A |
| Output Power (PDR 009) | 1200W |
| Output Voltage (PDR 009) | 55Khz-65Khz |
| Output Current (PDR 009) | 30A |
| Input Voltage (PDR 009) | 100V-110V 50Hz/60Hz |
| Input Current (PDR 009) | 9A |
| Output Power (PDR 009) | 1000W |
| Output Voltage (PDR 009) | 55Khz-65Khz |
| Output Current (PDR 009) | 24A |
| Package Size | 39cm x 33cm x 12cm (approx. 15.35in x 12.99in x 4.72in) |
| Package Weight | 4.7 Kg |
| Main Unit Dimensions | Approx. 21.2cm x 15cm x 8cm (8.34in x 5.90in x 3.14in) |
| Handle Head Dimensions | Approx. 14cm x 9.7cm x 5.8cm (5.51in x 3.82in x 2.28in) |
| Power Cable Length | 1.5m (59in) |
| Handle Cable Length | 3m (118in) |

Figure 9.1: Electrical and packaging specifications for the WOYO PDR-009.
10. Warranty and Support
For warranty information, technical support, or service inquiries, please refer to the warranty card included with your product or contact WOYO customer support directly. You can also visit the official WOYO store for more information and resources:


