
OOYCYOO K
OOYCYOO MPPT Solar Charge Controller 60A 12V/24V User Manual
Model: K
1. Introduction
This manual provides detailed instructions for the installation, operation, and maintenance of your OOYCYOO MPPT Solar Charge Controller. Designed for 12V/24V solar systems, this controller efficiently manages power flow from your solar panels to your battery bank, ensuring optimal charging and system protection. Please read this manual thoroughly before installation and use to ensure safe and correct operation.
2. Key Features
- Advanced MPPT Technology: Features a minimum 99.99% tracking efficiency and a maximum conversion efficiency of 99% for optimal power harvesting.
- Automatic System Voltage Detection: Automatically detects 12V or 24V DC system voltages.
- Versatile Battery Compatibility: Supports various deep cycle battery types including sealed, gel, flooded, AGM, and lithium batteries.
- Comprehensive Protection: Includes electronic protection against reverse polarity, overcharge, over-discharge, overload, short-circuit, and reverse current.
- User-Friendly LCD Display: Clear LCD screen and multiple LED indicators display system operating information and data.
- Adjustable Operating Modes: Load operating mode is adjustable.
- Factory Reset Function: One-key function to restore factory settings.
- USB Charging Ports: Equipped with 2x USB 5V 2.4A output ports.
3. Product Overview
The OOYCYOO MPPT Solar Charge Controller is designed for robust performance and ease of use. Below is an illustration of the controller with its main components labeled.

Image 3.1: Front and side view of the OOYCYOO MPPT Solar Charge Controller with key components labeled. This includes the LCD display, 5S Reset button, Solar Panel Terminal, Battery Terminal, Load Terminal, 2x USB 5V 2.4A ports, Remote Temp Sensor port, Select button, and RS485 Communication Port.

Image 3.2: Front view of the OOYCYOO MPPT Solar Charge Controller, showing the LCD screen and control buttons.
4. Specifications
| Parameter | Value |
|---|---|
| Model | MPPT 60A |
| Maximum Power Current | 60 A |
| System Voltage | 12V / 24V Auto-identification |
| Max. PV Input Voltage (Open Circuit) | 96 V |
| Max. Solar Panel Power | 750 W (12V System) / 1500 W (24V System) |
| Battery Capacity Configuration | 400 Ah |
| Battery Float Voltage | 13.8 V (12V System) / 27.6 V (24V System) |
| Battery Protection (Under-voltage) | 10.6 V (12V System) / 21.2 V (24V System) |
| Battery Recovery Voltage (Under-voltage) | 12.6 V (12V System) / 25.2 V (24V System) |
| System Load Loss | <= 13 mA |
| Buck Loop | <= 100 mV |
| Operating Temperature | -10 ℃ to 60 ℃ |
| Storage Temperature | -30 ℃ to 70 ℃ |
| Operating Humidity | <= 90% (non-condensing) |
| Temperature Compensation | -4 mV/cell/℃ |
| Installation Wire (AWG) | 7# (AWG) / 16 mm² |
| Material | Aluminum |
| Dimensions (Package) | 21.2 x 21.2 x 8.6 cm |
| Weight (Item) | 1.3 Kilograms |
| Display Type | LCD |
| UPC | 768561407293 |
5. Installation
Proper installation is crucial for the safe and efficient operation of your solar charge controller. Follow these steps carefully.
5.1 Connection Diagram
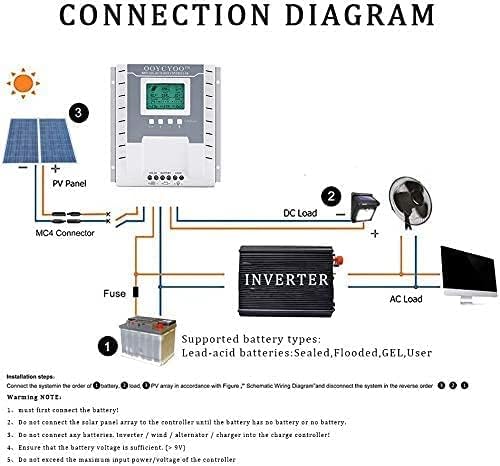
Image 5.1: Schematic wiring diagram showing the connection order for solar panels, battery, and DC/AC loads to the MPPT controller.
5.2 Installation Steps
- Connect the Battery First: Always connect the battery to the controller first. Ensure correct polarity (+ to + and - to -). The controller will automatically detect the system voltage (12V or 24V).
- Connect the Solar Panel: After the battery is connected, connect the solar panel array to the controller. Ensure correct polarity. Do not connect the solar panel before the battery.
- Connect the DC Load: Connect your DC loads (e.g., DC lights, fans) to the load terminals. Ensure correct polarity.
- Connect the Inverter (Optional): If using an inverter for AC loads, connect it directly to the battery terminals, not to the controller's load terminals. Ensure the inverter's input voltage matches the battery voltage.
Important Safety Notes:
- Do not connect the solar panel before connecting the battery.
- Do not connect inverters or inductive loads to the controller's load output. Connect them directly to the battery.
- Ensure the battery voltage is sufficient (typically >9V) for the controller to operate.
- Do not exceed the maximum input power/voltage of the controller.
- Install appropriate fuses between the battery and the controller, and between the battery and the inverter, for safety.
6. Operating Instructions
The controller features an intuitive LCD display and control buttons for easy monitoring and configuration.
6.1 LCD Display Overview

Image 6.1: Detailed explanation of the OOYCYOO MPPT Solar Charge Controller's LCD display, showing various real-time data points.
The LCD display provides comprehensive real-time data on a single screen, including:
- Solar Panel (PV) Information: Voltage (PV), Current (A).
- Battery (BATT) Information: State of Charge (%), Voltage (V), Current (A).
- Load Information: Load State (ON/OFF), Voltage (V), Current (A).
- System Status: Charging Fault, Discharging Fault, Evening/Dawn status, Load Stop Working Hours, Float Charging Voltage, Low Voltage Disconnect/Reconnect Voltage.
6.2 Control Buttons
The controller has four buttons for navigation and settings:
- Toggle Key (Left Arrow): Used to switch between display screens or navigate menu options.
- Plus (+) Button: Used to increase values or move forward in menus.
- Minus (-) Button: Used to decrease values or move backward in menus.
- Manual Load Switch (Light Bulb Icon): Press to manually turn the load ON or OFF.
6.3 Restoring Factory Settings
To restore the controller to its factory default settings, press and hold the 5S Reset button for 5 seconds.
6.4 Network Line Interface Indicator
The controller includes a network line interface with indicator lights:
- Green Light: Represents the battery status.
- Green Light Flashes: Indicates that the load is working properly.
- Yellow Light: Indicates solar energy status.
- Yellow Light Flashes: Indicates solar energy charging.
The network interface is reserved for future use and can be connected to an additional display (purchased separately).
7. Battery Types Supported
The OOYCYOO MPPT Solar Charge Controller is compatible with a variety of 12V/24V deep cycle battery types. Ensure you select the correct battery type in the controller settings for optimal charging.
- Sealed Lead-Acid Batteries
- Gel Batteries
- Flooded Lead-Acid Batteries
- AGM Batteries
- Lithium Batteries
8. Protection Features
The controller incorporates multiple electronic protection mechanisms to safeguard your system and ensure longevity:
- Reverse Polarity Protection: Prevents damage if battery or solar panel connections are reversed.
- Overcharge Protection: Stops charging when the battery reaches its full capacity to prevent damage.
- Over-discharge Protection: Disconnects the load when the battery voltage drops below a safe level to prevent deep discharge.
- Overload Protection: Protects against excessive current draw from the load terminals.
- Short-Circuit Protection: Automatically disconnects in case of a short circuit in the load or solar panel circuit.
- Reverse Current Protection: Prevents current from flowing back from the battery to the solar panels at night.
- Over-temperature Protection: Shuts down or reduces power if the controller's internal temperature becomes too high.
- Battery Under-voltage Protection: Disconnects the load to prevent battery damage from low voltage.
9. Maintenance
Regular maintenance helps ensure the long-term performance and reliability of your solar charge controller.
- Visual Inspection: Periodically check all wiring connections for tightness and corrosion. Ensure no wires are frayed or damaged.
- Cleanliness: Keep the controller clean and free from dust and debris. Use a dry cloth to wipe the casing and display. Ensure ventilation openings are not blocked.
- Environmental Conditions: Ensure the controller is installed in a well-ventilated area, away from direct sunlight, moisture, and corrosive substances.
- Battery Health: Monitor your battery's health and voltage regularly. Follow the battery manufacturer's maintenance guidelines.
- Firmware Updates: Check the manufacturer's website for any available firmware updates, if applicable.
10. Troubleshooting
This section addresses common issues you might encounter with your solar charge controller.
| Problem | Possible Cause | Solution |
|---|---|---|
| Controller not powering on | Battery not connected or low voltage; reverse polarity. | Ensure battery is connected first with correct polarity. Check battery voltage (must be >9V). |
| No charging from solar panels | Solar panels not connected; incorrect polarity; insufficient sunlight; PV voltage too low/high. | Verify solar panel connections and polarity. Check for shading. Ensure PV voltage is within specifications (18V-96V for 12V system, 36V-96V for 24V system). |
| Load not working | Load output disabled; battery low voltage; overload; short circuit. | Check load settings on LCD. Ensure battery voltage is above low voltage disconnect threshold. Reduce load or check for short circuits. |
| Inaccurate voltage readings | Loose connections; faulty sensor. | Check all wiring connections. If using a remote temperature sensor, ensure it is properly connected. |
| Controller overheating | Poor ventilation; excessive load. | Ensure adequate airflow around the controller. Reduce load if consistently overheating. |
11. Package Contents
Upon opening your OOYCYOO MPPT Solar Charge Controller package, you should find the following items:
- 1x OOYCYOO MPPT Solar Charge Controller
- 1x Temperature Sensor
- 1x User Manual (English)
Related documentsK


Ask a question about this manual
Ask about setup, troubleshooting, compatibility, parts, safety, or missing instructions. Manuals+ will review the question and use this page’s manual context to help answer it.