1. Product Overview
The KAER 15-20 Gun Safe (Model 1500AB-GUN SAFE) is designed for secure storage of firearms and valuables. This safe features an electronic combination lock, emergency key access, and robust construction to protect contents from unauthorized access. It offers ample space for rifles, shotguns, handguns, and accessories.
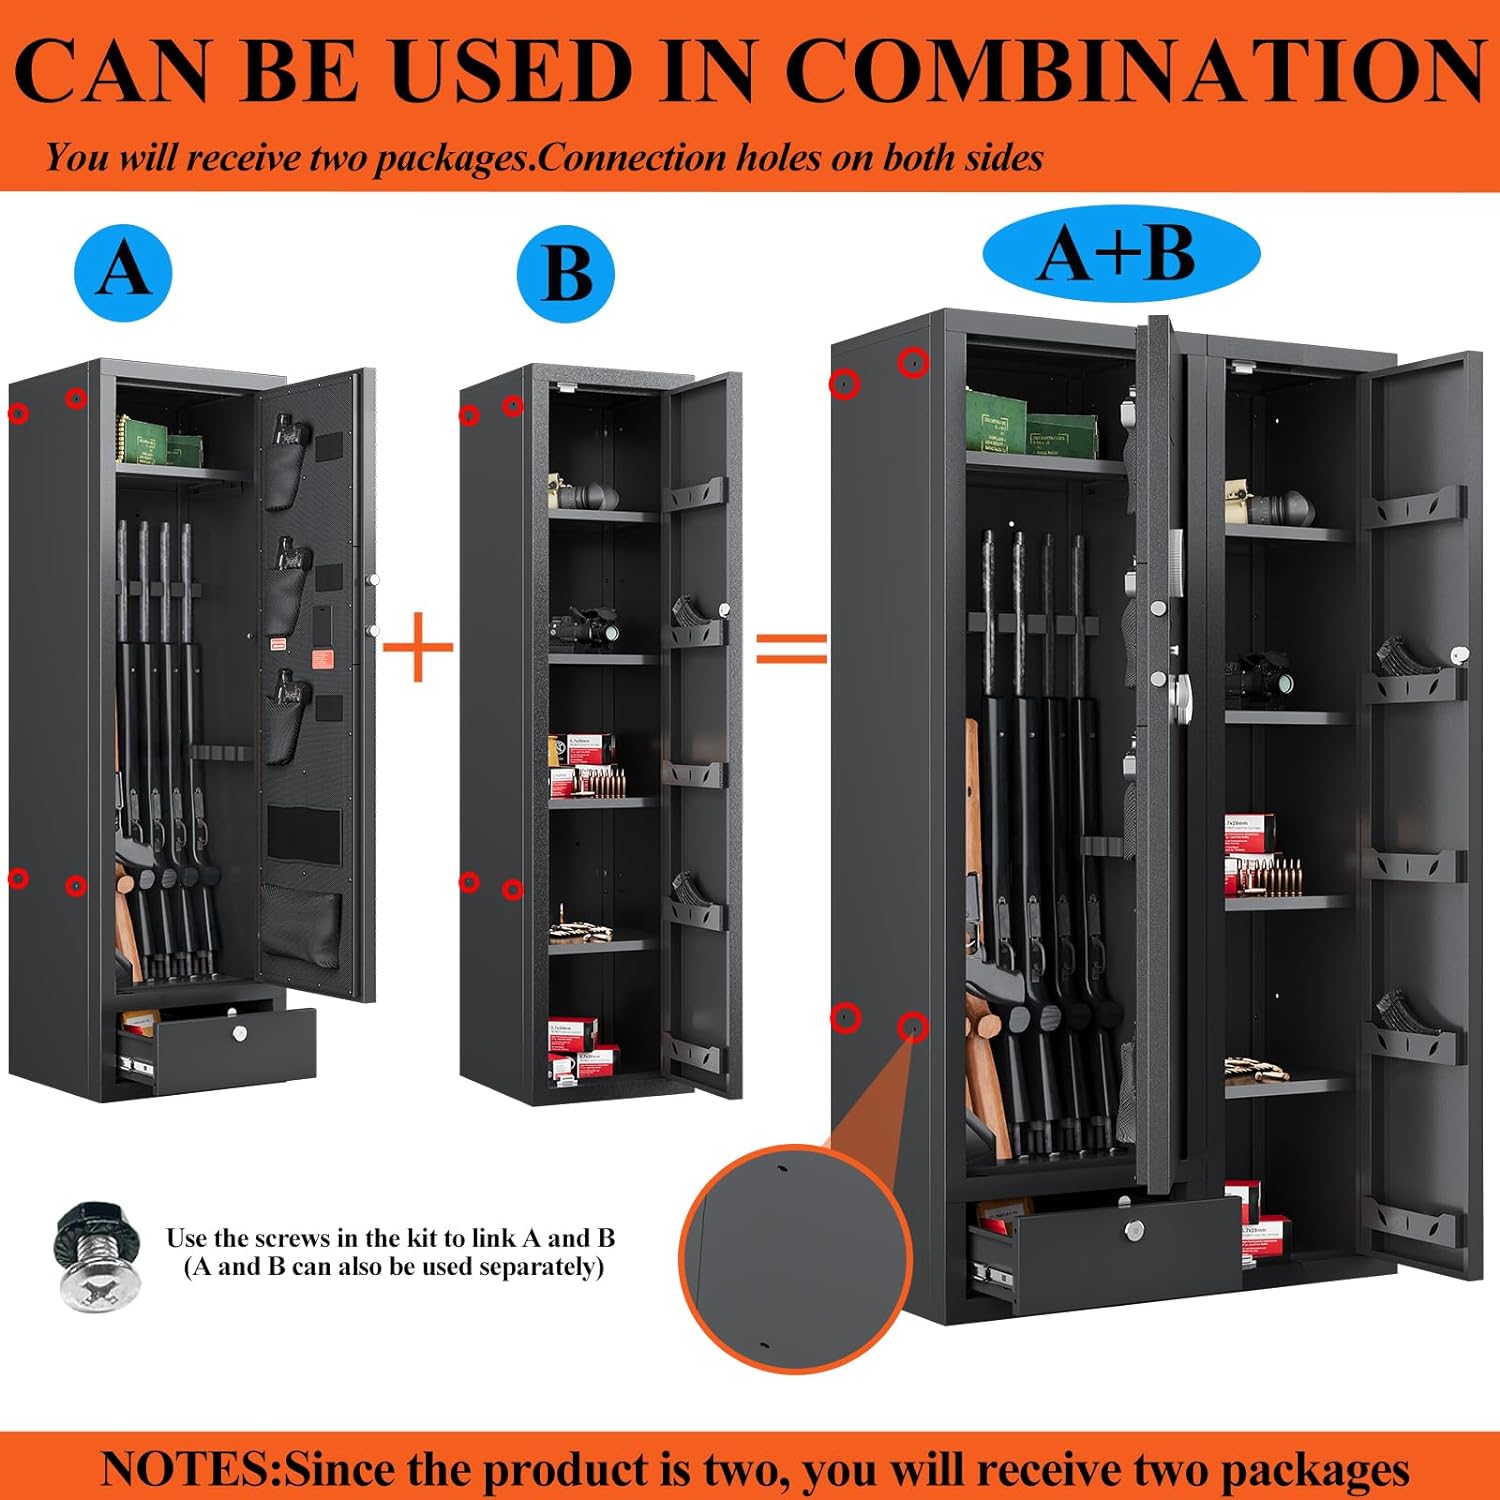
Image 1.1: Front view of the KAER 15-20 Gun Safe.
Key Features:
- Capacity: Designed to hold 15-17 rifles/shotguns (with or without scopes). Includes three gun stocks with an adjustable/removable buttstock, three magazine bandages, three pistol pouches, a mesh pouch, and a storage pouch on the inside door.
- Lockable Drawer: A separate lockable drawer (H8.46" x W13.98" x D13.98") is located at the bottom for storing smaller items like handguns, ammunition, documents, or jewelry.
- Security: Features a 50mm thick door and 30mm latch bolts for enhanced security.
- Access Methods: Electronic code (3-12 digits), emergency key, and external battery box for power failure.
- Alerts: LED light for visibility, silent mode option, and a wrong password alarm.
- Construction: Made from aluminum, designed for freestanding placement with options for wall or floor mounting.

Image 1.2: Detailed dimensions of the gun safe, showing 59.05" height, 18.11" width, and 15.74" depth.
2. Important Safety Information
Read all instructions carefully before operating the gun safe. Failure to follow these instructions may result in injury, damage to the safe, or unauthorized access.
- Secure Key Storage: Always store emergency keys in a secure location away from the safe and out of reach of children. Never store the emergency keys inside the safe.
- Child Safety: Keep the safe locked at all times. Ensure children do not have access to the safe's keys or electronic codes.
- Mounting: For maximum security, the safe must be securely mounted to a wall or floor using the provided expansion bolts.
- Battery: Do not mix old and new batteries. Do not mix alkaline, standard (carbon-zinc), or rechargeable (nickel-cadmium) batteries.
- Proper Use: This safe is designed for storing firearms and valuables. Do not use it for purposes other than its intended design.
3. Setup and Installation
The gun safe requires assembly. It is recommended that two people assist with the assembly due to the weight and size of the components.
3.1 Unpacking and Component Check
- Carefully unpack all components from the packaging. Note that the product may arrive in two separate packages if you purchased a combinable unit.
- Verify that all parts listed in the packing list are present and undamaged.
- Keep all packaging materials until assembly is complete and you are satisfied with the product.
3.2 Assembly Steps
Follow the diagrams below for detailed assembly instructions. Ensure all screws are tightened securely.

Image 3.1: Step-by-step diagram for assembling the gun safe components.

Image 3.2: Additional assembly steps and a list of included hardware and tools.
3.3 Mounting the Safe
The safe is designed to be freestanding but can be securely mounted to a wall or floor for added security. The back of the gun cabinet has 6 pre-drilled holes, and the bottom has 4 pre-drilled holes. Use the provided expansion bolts to fix the safe to a solid surface.
- Choose a discreet and secure location for the safe.
- Mark the drilling points on the wall or floor using the pre-drilled holes on the safe as a template.
- Drill appropriate holes for the expansion bolts.
- Position the safe and secure it using the expansion bolts. Ensure the safe is stable and cannot be easily moved.
3.4 Combining Multiple Units (Optional)
If you have purchased multiple units, they can be combined to create a larger storage solution. Connection holes are provided on both sides of the safes. Use the screws in the kit to link units A and B. Units can also be used separately.

Image 3.3: Illustration of how two gun safes can be combined using connection holes and screws.
4. Operating Instructions
4.1 Powering the Electronic Lock
- The electronic lock requires batteries (not included). Install the correct type and number of batteries into the battery compartment, typically located on the inside of the door or behind the keypad.
- If the internal battery is low, use the emergency key or connect an external battery box to the designated port to power the lock and enter your code.
4.2 Unlocking Methods
The safe offers three ways to access its contents:
- Electronic Code: Enter your 3-12 digit personal code on the keypad.
- Emergency Key: Insert the emergency key into the keyhole and turn to unlock.
- External Power Box + Electronic Code: If batteries are depleted, connect the external power box, then enter your electronic code.

Image 4.1: Visual representation of the digital password and emergency key unlocking methods.
4.3 Setting and Changing Passwords
The gun safe can be programmed with two sets of passwords. Refer to the specific instructions provided with your safe's electronic lock for detailed steps on how to set or change your personal codes. Typically, this involves pressing a program button (often inside the safe) and then entering your desired code.
4.4 LED Light Function
- When you use the electronic code to open the safe, the internal LED light will illuminate, providing visibility in low-light conditions.
- The LED light will not activate when the safe is opened using the emergency key.
4.5 Silent Mode
To switch between silent and non-silent modes for keypad operation, press "11#" on the keypad.
4.6 Wrong Password Alarm
If an incorrect password is entered three times consecutively, an alarm will sound. The alarm will only cease once the correct password is entered.

Image 4.2: Visual explanation of the silent mode and the wrong password alarm system.
5. Maintenance
5.1 Battery Replacement
Replace the batteries in the electronic lock annually or when the low battery indicator appears. Use high-quality alkaline batteries for optimal performance. Always have an external power source or emergency key accessible during battery replacement.
5.2 Cleaning
Clean the exterior of the safe with a soft, damp cloth. Avoid using abrasive cleaners or solvents that could damage the finish. Do not spray cleaning solutions directly onto the keypad or lock mechanism.
5.3 Security Check
Periodically check the mounting bolts to ensure they are tight and the safe remains securely fastened to the wall or floor. Inspect the door hinges and locking bolts for any signs of wear or damage.
6. Troubleshooting
| Problem | Possible Cause | Solution |
|---|---|---|
| Safe does not open with electronic code. | Low batteries, incorrect code, electronic malfunction. | Replace batteries. Use external battery box. Use emergency key. Re-enter code carefully. |
| Alarm sounds after entering code. | Incorrect code entered three times. | Enter the correct password to silence the alarm. |
| LED light does not turn on. | Safe opened with emergency key, low batteries, LED malfunction. | LED only activates with electronic code. Replace batteries. Contact support if issue persists. |
| Safe door is difficult to close or open. | Obstruction, misaligned door, damaged hinges/bolts. | Check for obstructions. Ensure safe is level. Inspect hinges and bolts for damage. |
7. Specifications
| Feature | Detail |
|---|---|
| Brand | KAER |
| Model Name | 1500AB-GUN SAFE |
| Product Dimensions (H x W x D) | 59.05" x 18.11" x 15.74" (for single unit) |
| Capacity | 15-17 Rifles/Shotguns, 17.5 Cubic Feet |
| Lock Type | Electronic Combination Lock |
| Material | Aluminum |
| Mounting Type | Freestanding, Wall/Floor Mountable |
| Included Components | Key, Expansion Bolts |
| Alarm | Sound (Wrong Password Alarm) |
| Water Resistance Level | Not Water Resistant |
| UPC | 759357461117 |
8. Product Videos
8.1 Product Overview and Features
Video 8.1: A comprehensive overview of the KAER 15-20 Gun Safe, detailing its features and design. (Duration: 4:46)
8.2 Detailed Product Walkthrough
Video 8.2: An in-depth walkthrough showcasing the interior organization, locking mechanisms, and overall functionality of the safe. (Duration: 4:57)
8.3 Electronic Lock Operation
Video 8.3: Demonstrates how to operate the electronic combination lock, including setting codes and using emergency access. (Duration: 2:41)
9. Warranty and Support
9.1 Warranty Information
The KAER 15-20 Gun Safe comes with a 1-year limited warranty from the date of purchase. This warranty covers manufacturing defects and workmanship under normal use. It does not cover damage resulting from misuse, unauthorized modifications, or improper installation.
9.2 Customer Support
For warranty claims, technical assistance, or any questions regarding your KAER gun safe, please contact the retailer where the product was purchased or refer to the manufacturer's official website for support contact information.


