1. Introduction
The YERTAI ET5406A+ is a single-channel programmable DC electronic load tester designed for high-precision testing and measurement. It offers 1mV/10mV and 1mA/10mA resolution and precision, making it suitable for various applications including testing chargers, switching power supplies, linear power supplies, and batteries.
This device features a clear LCD segment code screen with adjustable backlight and supports communication with a computer via a USB port for remote control and data acquisition.

Figure 1: YERTAI ET5406A+ Electronic Load Tester front view. This image displays the front of the electronic load tester, showing its display screen, control buttons, and input terminals.
2. Safety Information
Please read and understand all safety instructions before operating the ET5406A+ electronic load tester. Failure to follow these instructions may result in electric shock, fire, or damage to the device.
- Ensure the device is connected to a properly grounded power outlet.
- Do not operate the device in wet or damp conditions.
- Do not exceed the rated input specifications (200W, 120V, 20A).
- Always disconnect power before making or changing connections to the load.
- Do not open the device casing; there are no user-serviceable parts inside. Refer servicing to qualified personnel.
- Keep the device away from flammable materials.
3. What's in the Box
Verify that all components are present upon unpacking:
- YERTAI ET5406A+ Electronic Load Tester x1
- Output Power Cord x1
- User Manual x1
- Power Fuse x2 (Spare)
4. Product Overview
4.1 Front Panel
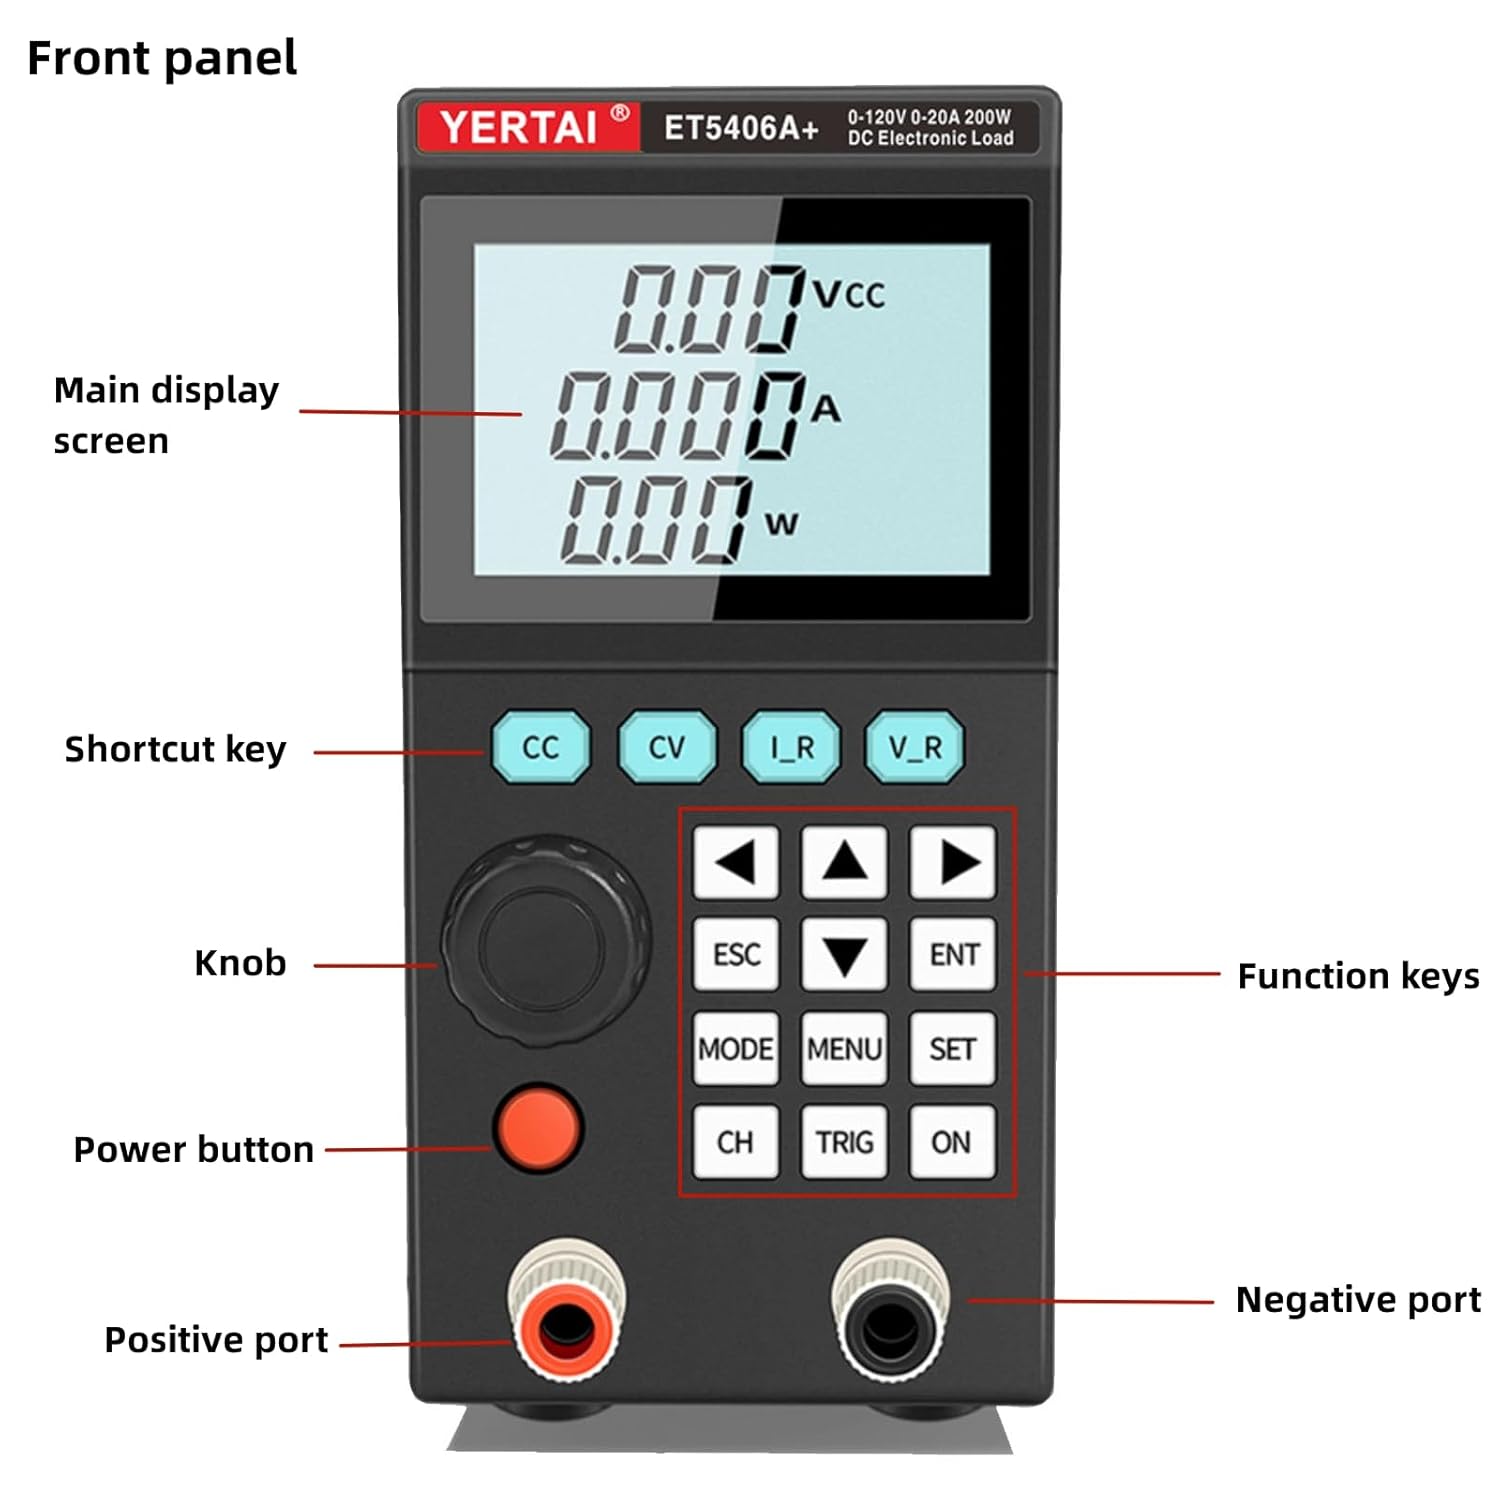
Figure 2: Front Panel Layout. This image highlights the main display screen, shortcut keys (CC, CV, I_R, V_R), knob, power button, function keys (ESC, ENT, MODE, MENU, SET, CH, TRIG, ON), positive port, and negative port on the front of the device.
- Main Display Screen: Shows voltage, current, and power readings.
- Shortcut Keys (CC, CV, I_R, V_R): Quick access to Constant Current, Constant Voltage, Constant Resistance, and Constant Power modes.
- Knob: Used for adjusting parameters and navigating menus.
- Power Button: Turns the device on/off.
- Function Keys (ESC, ENT, MODE, MENU, SET, CH, TRIG, ON): Control various settings, modes, and operations.
- Positive Port (+): Input terminal for the positive connection of the load.
- Negative Port (-): Input terminal for the negative connection of the load.
4.2 Back Panel

Figure 3: Back Panel Layout. This image shows the power plug input, fuse holder, USB port, external input terminal, and heat emission hole on the rear of the device.
- Power Plug: AC power input connector.
- Fuse: Protects the device from overcurrent.
- USB Port: For connecting to a computer for remote control and software communication.
- External Input Terminal: For external control or sensing connections.
- Heat Emission Hole: Ensures proper ventilation and cooling of the device.
5. Setup
5.1 Power Connection
- Ensure the power switch on the front panel is in the OFF position.
- Connect the provided power cord to the power plug input on the back panel of the ET5406A+.
- Plug the other end of the power cord into a grounded AC power outlet.
5.2 Load Connection
- Ensure the ET5406A+ is powered off before connecting any load.
- Connect the positive (+) terminal of your device under test (DUT) to the positive port (+) on the front panel of the ET5406A+.
- Connect the negative (-) terminal of your DUT to the negative port (-) on the front panel of the ET5406A+.
- Verify all connections are secure and correct polarity is observed.
6. Operating Modes and Functions
The ET5406A+ offers a variety of operating modes and functions for comprehensive testing.
6.1 Basic Measurement Modes
Access these modes using the dedicated shortcut keys or through the MODE menu.
- Constant Current (CC) Mode: Maintains a constant current draw from the DUT.
- Constant Voltage (CV) Mode: Maintains a constant voltage across the DUT.
- Constant Resistance (CR) Mode: Simulates a constant resistance load.
- Constant Power (CP) Mode: Maintains a constant power dissipation.
6.2 Advanced Test Functions
- Battery Test Mode: Designed for battery discharge testing, providing professional battery capacity detection.
- Dynamic (Tran) Test Mode: Tests the dynamic output performance of power supplies by simulating rapid load changes.
- List Test Mode: Allows simulation of various loading status changes by programming a sequence of steps.
- Short Circuit Test: Used to simulate a load short circuit condition.
- External Trigger Input: Supports external triggering for synchronized testing.
6.3 Remote Control
The ET5406A+ supports communication with a computer via its USB port. Software and SCPI commands can be acquired from the supplier for remote operation and data logging.

Figure 4: Key Features. This image illustrates the main features of the programmable electronic load, including adjustable backlight, USB communication, CC/CV/CR/CP modes, battery test/scanning list test, and external trigger.
7. Maintenance
Proper maintenance ensures the longevity and reliable operation of your ET5406A+.
- Cleaning: Use a soft, dry cloth to clean the exterior of the device. Do not use abrasive cleaners or solvents.
- Ventilation: Ensure the heat emission holes on the back panel are not obstructed to prevent overheating.
- Storage: Store the device in a cool, dry environment away from direct sunlight and extreme temperatures when not in use.
- Fuse Replacement: If the device does not power on, check and replace the fuse located on the back panel if necessary. Use only fuses of the specified rating.
8. Troubleshooting
This section addresses common issues you might encounter with the ET5406A+.
- Device does not power on:
- Check if the power cord is securely connected to both the device and the power outlet.
- Verify the power outlet is functional.
- Check the fuse on the back panel and replace if blown (refer to Maintenance section).
- No load current/voltage reading:
- Ensure the load is correctly connected to the positive and negative input terminals with correct polarity.
- Verify the device under test (DUT) is supplying power.
- Check the selected operating mode and its settings.
- Over-protection warning:
- The device has built-in overcurrent, overvoltage, overpower, and over-temperature protection.
- Reduce the input voltage, current, or power to stay within the device's specifications.
- Ensure adequate ventilation to prevent over-temperature conditions.
- USB communication issues:
- Ensure the USB cable is properly connected.
- Install the correct drivers and software provided by the supplier.
- Check the computer's device manager for recognition of the ET5406A+.
9. Specifications
Detailed technical specifications for the YERTAI ET5406A+ Electronic Load Tester.

Figure 5: Product Dimensions. This image shows the physical dimensions of the ET5406A+ device: 210mm length, 73mm width, and 145mm height.
| Feature | Detail |
|---|---|
| Model Number | ET5406A+ |
| Brand | YERTAI |
| Rated Input Power | 200W |
| Rated Input Voltage | 0-120V |
| Rated Input Current | 0-20A |
| Min. Operating Voltage | 120 Volts (DC) |
| Power Source | Corded Electric |
| Color | Grey |
| Package Dimensions | 11.7 x 7.9 x 5.4 inches |
| Item Weight | 3.3 Pounds |
| Manufacturer | HZZC |
| Date First Available | February 22, 2024 |
For a comprehensive comparison of detailed electrical specifications, including resolution and accuracy for various modes, please refer to the table below:
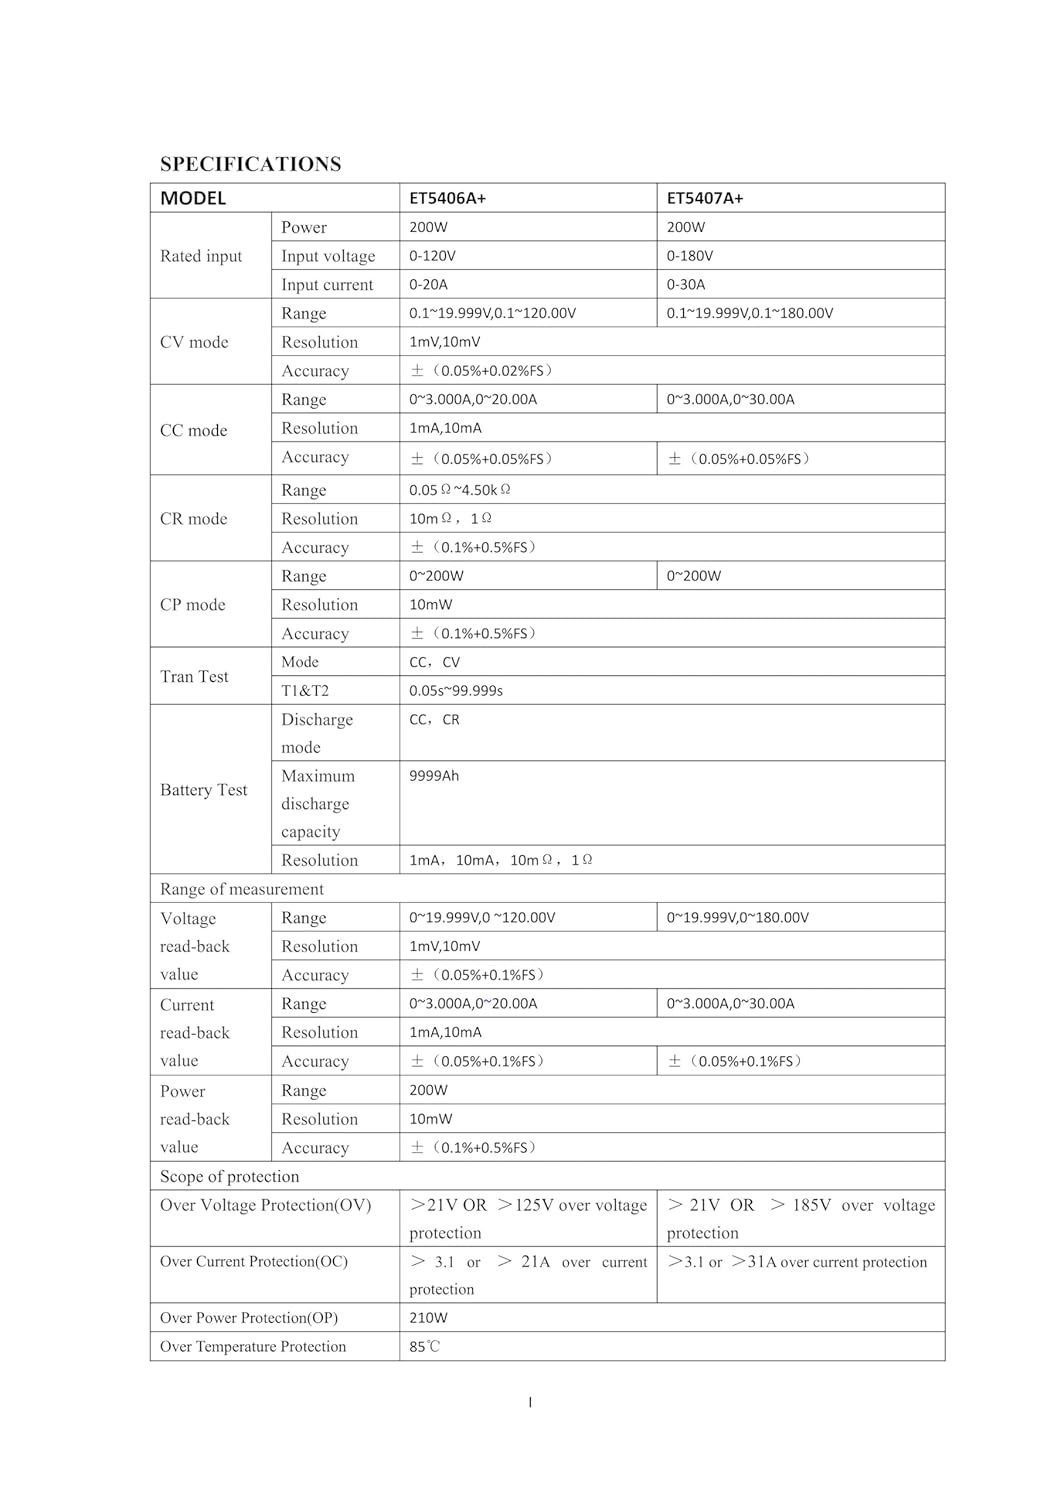
Figure 6: Comprehensive Electrical Specifications. This image provides a detailed table comparing the electrical specifications of the ET5406A+ and ET5407A+ models, including rated input, CV/CC/CR/CP modes, Tran Test, Battery Test, and scope of protection.
10. Warranty and Support
YERTAI provides a ONE YEAR WARRANTY for the ET5406A+ Electronic Load Tester from the date of purchase. This warranty covers defects in materials and workmanship under normal use.
For technical support, warranty claims, or any questions regarding the operation of your device, please contact the seller or YERTAI customer service. Refer to your purchase documentation for specific contact details.
Please retain your proof of purchase for warranty service.