1. Introduction
This manual provides detailed instructions for the installation, operation, and maintenance of your REOLINK Duo 3 PoE 16MP UHD Dual-Lens Security Camera System, which includes the RLN8-410 Network Video Recorder (NVR). Please read this manual thoroughly before using the product to ensure proper functionality and safety.
2. Package Contents
Verify that all components are present in your package:
- REOLINK RLN8-410 NVR (1 unit)
- REOLINK Duo 3 PoE Cameras (4 units)
- Ethernet Cables
- Mounting Screws and Wall Anchors
- Quick Start Guide
- Power Adapter for NVR
- USB Mouse

Image 2.1: Overview of the REOLINK Duo 3 PoE Camera System components, including the NVR and four cameras.
3. Product Overview
3.1 REOLINK Duo 3 PoE Camera
The Duo 3 PoE camera features a dual-lens design, providing a 180° panoramic view. It captures video at 16MP UHD resolution and includes F1.6 aperture for enhanced low-light performance and color night vision capabilities.

Image 3.1: Detailed view of the REOLINK Duo 3 PoE camera, highlighting its dual lenses and integrated spotlights.
- Dual-Lens Design: Provides a wide 180° panoramic field of view.
- 16MP UHD Resolution: Delivers high-clarity video for detailed monitoring.
- Color Night Vision: F1.6 super aperture and 8x infrared LED lights enable clear color images in low-light conditions up to 100ft.
- Motion Track: Captures the complete movement of a target over time in a single image.
- PoE Connectivity: Power and data transmission via a single Ethernet cable.
3.2 REOLINK RLN8-410 NVR
The RLN8-410 is an 8-channel Network Video Recorder designed to manage and record video from REOLINK PoE cameras. It comes with a pre-installed 2TB HDD, expandable up to 8TB for extensive storage.

Image 3.2: The REOLINK RLN8-410 NVR unit, indicating its 2TB pre-installed hard drive.
- 8-Channel Input: Supports up to 8 REOLINK IP cameras.
- 2TB Pre-installed HDD: Provides ample storage for continuous recording.
- Expandable Storage: Supports external HDD up to 8TB.
- PoE Ports: Simplifies camera connection and power supply.
- Independent System: Can operate without internet for local viewing and recording.
4. Setup
4.1 Camera Installation
Before mounting, test the camera's functionality and network connection in the desired location. Ensure the mounting surface is strong enough to support the camera.
- Choose a suitable location for the camera, considering the 180° panoramic view.
- Use the provided mounting template to mark drill holes.
- Drill holes and insert wall anchors if necessary.
- Secure the camera bracket to the wall or ceiling using the mounting screws.
- Adjust the camera angle for optimal coverage.

Image 4.1: Example of a REOLINK Duo 3 PoE camera mounted on an exterior wall, showing its position and cable routing.
4.2 NVR Connection
Connect the NVR to your network and cameras using Ethernet cables.
- Connect the NVR to a monitor using an HDMI or VGA cable.
- Connect the NVR to a power source using the provided power adapter.
- Connect the cameras to the NVR's PoE ports using Ethernet cables.
- Connect the NVR's LAN port to your router using an Ethernet cable for internet access (optional for local operation).
- Connect the USB mouse to the NVR for navigation.

Image 4.2: Connection diagram illustrating how PoE cameras connect to a PoE switch/NVR and how the NVR connects to a router.
4.3 Initial System Configuration
Upon first power-up, the NVR will guide you through the initial setup process. This typically involves setting a password, configuring network settings, and adding cameras.
- Follow the on-screen prompts to complete the NVR setup wizard.
- Download the REOLINK App for mobile access or the REOLINK Client for desktop access.
- Scan the QR code on the NVR or camera to add devices to the app/client.
5. Operating Instructions
5.1 Live View
Access live video feeds from your cameras through the NVR, REOLINK App, or Client software.

Image 5.1: A multi-camera live view interface displayed on a monitor connected to the NVR.
- On the NVR, use the mouse to select cameras for single or multi-channel display.
- In the REOLINK App/Client, select the desired camera to view its live feed.
5.2 Recording and Playback
The NVR continuously records video to the pre-installed 2TB hard drive. You can review recorded footage at any time.
- Continuous Recording: The system is configured for 24/7 recording by default.
- Motion-Triggered Recording: Configure cameras to record only when motion is detected to save storage space.
- Playback: Access the playback interface on the NVR, app, or client to select a date and time for reviewing recorded events.
5.3 Motion Detection and Alerts
The Duo 3 PoE camera features advanced motion detection, including person/vehicle detection, and a unique Motion Track feature.

Image 5.2: The Motion Track feature consolidating a 15-second video of movement into a single image with timestamps.
- Motion Track: View a summary of movement within a single image, showing the path of detected objects.
- Customizable Motion Zones: Define specific areas for motion detection to reduce false alarms.
- Alerts: Receive push notifications, emails, or trigger a siren when motion is detected.
5.4 Night Vision Modes
The Duo 3 PoE camera offers both infrared black & white night vision and color night vision.
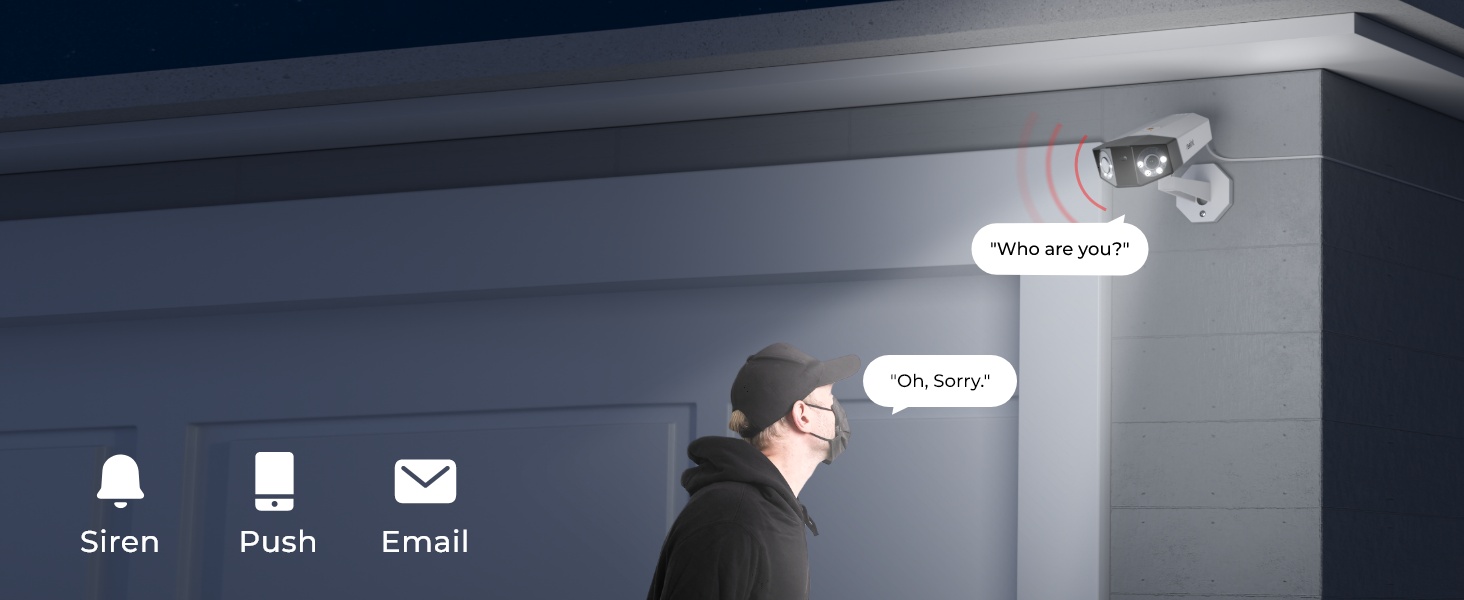
Image 5.3: Comparison of night vision modes, showing a scene with spotlights off (black and white) and spotlights on (color).
- Infrared Night Vision: Provides clear black and white video up to 100ft in complete darkness.
- Color Night Vision: Activated by the F1.6 aperture and built-in spotlights, providing full-color video in low-light conditions.
- Adjustable Spotlights: Control the brightness of the integrated spotlights via the app or client.
5.5 Remote Access
Access your camera system remotely using the REOLINK App on your smartphone or the REOLINK Client on your computer.
- Ensure your NVR is connected to the internet.
- Open the REOLINK App/Client and log in to your account.
- Select your NVR or individual cameras to view live feeds, playback recordings, and configure settings from anywhere.
6. Maintenance
- Regular Cleaning: Periodically clean the camera lenses with a soft, dry cloth to ensure clear image quality.
- Firmware Updates: Check for and install firmware updates for both cameras and NVR to ensure optimal performance and security. Updates are available via the REOLINK App/Client or the official REOLINK website.
- Hard Drive Management: The NVR will automatically overwrite older footage when the hard drive is full. Regularly back up important recordings if needed. Consider expanding storage with an external HDD if more retention is required.
- Cable Inspection: Periodically inspect all Ethernet cables for damage or wear, especially outdoor cables, to maintain reliable connections.
7. Troubleshooting
7.1 No Video Feed
- Check Power: Ensure the NVR is powered on and cameras are receiving power via PoE.
- Check Cables: Verify all Ethernet cables are securely connected between cameras and NVR, and between NVR and monitor/router.
- NVR Status: Check the NVR's status lights. Refer to the NVR's specific manual for indicator meanings.
- Camera Status: Some cameras have indicator lights. Consult the camera's manual.
7.2 Poor Image Quality
- Clean Lens: Ensure the camera lens is clean and free from dust or smudges.
- Resolution Settings: Verify the camera's resolution settings are set to 16MP UHD in the NVR or app.
- Lighting: Ensure adequate lighting for optimal image quality, especially at night. Adjust spotlight settings if using color night vision.
7.3 Motion Detection Not Working
- Enable Detection: Confirm motion detection is enabled for the specific camera in the NVR or app settings.
- Configure Motion Zones: Ensure motion detection zones are properly configured and cover the desired areas.
- Sensitivity: Adjust motion detection sensitivity. High sensitivity may trigger false alarms, while low sensitivity might miss events.
7.4 Remote Access Issues
- Internet Connection: Verify the NVR has a stable internet connection.
- Router Settings: Ensure your router's firewall or security settings are not blocking the REOLINK app/client.
- App/Client Version: Ensure you are using the latest version of the REOLINK App or Client software.
8. Specifications
| Feature | Specification |
|---|---|
| Camera Model | REOLINK Duo 3 PoE |
| NVR Model | REOLINK RLN8-410 |
| Video Resolution | 16MP UHD (4K) |
| Viewing Angle | 180° Panoramic |
| Night Vision | Color Night Vision (F1.6 aperture, 6500K spotlights), up to 100ft Black & White IR Night Vision |
| Connectivity | Wired (PoE) |
| NVR Channels | 8 Channels |
| NVR Storage | 2TB HDD (pre-installed), expandable up to 8TB external HDD |
| Motion Detection | Person/Vehicle Detection, Motion Track |
| Frame Rate | 30 FPS (for 4K resolution, may vary with higher resolutions) |
| Operating Temperature | (Refer to product packaging or official website for exact range) |
9. Warranty and Support
REOLINK products typically come with a limited warranty. For specific warranty terms and conditions, please refer to the warranty card included in your package or visit the official REOLINK website.
For technical support, product registration, or to download the latest software and firmware, please visit the REOLINK Support Center:
Official REOLINK Website: www.reolink.com
Customer Service Email: (Refer to official website for current contact information)


