1. Introduction
The MRCARTOOL C210 Plastic Welder is a versatile 2-in-1 tool designed for efficient and durable repair of plastic components. This device is ideal for repairing car bumpers, motorcycle parts, boat hulls, and other plastic items. It features adjustable power settings and rapid heating capabilities to ensure optimal welding results across various plastic materials. This manual provides essential information for safe operation, setup, maintenance, and troubleshooting.

Image: The MRCARTOOL C210 Plastic Welder unit with its handle, control panel, and attached welding head. Various welding nails, a smoothing head, and pliers are also displayed, indicating a complete repair kit.
2. Safety Information
Please read and understand all safety warnings and instructions before operating the device. Failure to follow these instructions may result in electric shock, fire, or serious injury.
- Electrical Safety: Ensure the power supply matches the device's voltage (220V). Do not operate the welder with wet hands or in damp conditions. Always unplug the device when not in use or before cleaning.
- Heat Hazard: The welding head and staples become extremely hot during operation. Avoid direct contact with skin. Allow the device to cool completely before handling or storing.
- Overheat Protection: The machine has built-in high-temperature protection. If the transformer temperature exceeds 120℃, the plastic welder will stop operating. Allow it to cool down before resuming work.
- Ventilation: Use the device in a well-ventilated area to avoid inhaling fumes from melting plastic.
- Personal Protective Equipment (PPE): Always wear appropriate safety glasses and heat-resistant gloves when operating the welder.
- Children and Pets: Keep the device out of reach of children and pets.
3. Package Contents
Verify that all items listed below are included in your package:
- MRCARTOOL C210 Plastic Welder Unit
- Welding Head with integrated LED light
- 600 Welding Nails (various types: flat, M-shaped, wave, V-shaped)
- Heat Smoothing Head
- Cutting Pliers
- Storage Case
- Power Cord (10mm thick)
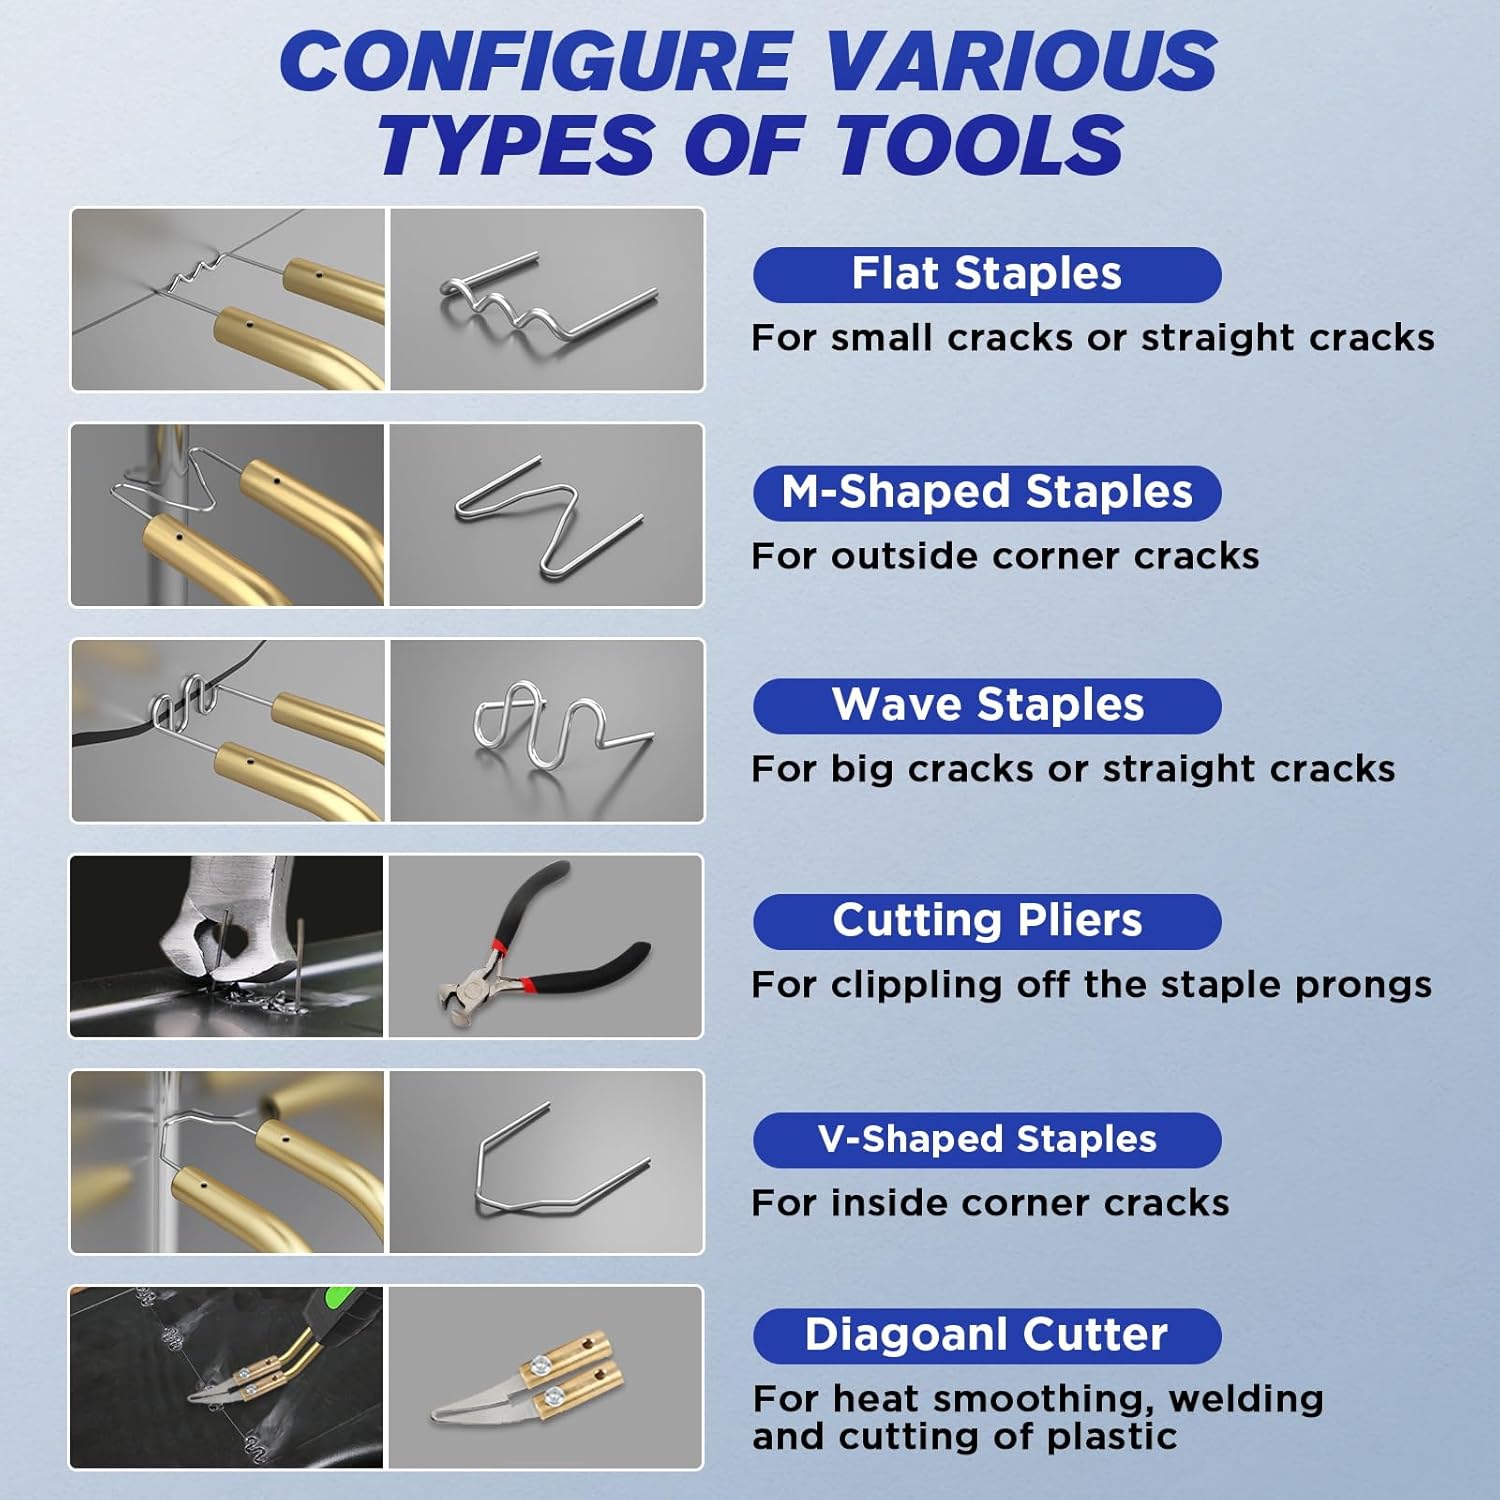
Image: A visual guide to the different types of staples and tools: Flat Staples for small/straight cracks, M-Shaped Staples for outside corner cracks, Wave Staples for big/straight cracks, Cutting Pliers for clipping prongs, V-Shaped Staples for inside corner cracks, and a Diagonal Cutter for heat smoothing, welding, and plastic cutting.
4. Product Features
- 2-in-1 Functionality: Combines plastic welding with hot stapling for comprehensive repair.
- Adjustable Power Settings: Features 5 adjustable power levels (15W, 35W, 45W, 65W, 80W) to suit different plastic materials and repair needs.
- Rapid Heating: Achieves maximum output power of 80W, heating up in 1-2 seconds for quick repairs.
- Ergonomic Design: Robust, anti-slip, and corrosion-resistant handle for comfortable grip. Easy-to-use control knob.
- Integrated LED Light: Illuminates dark work areas for improved visibility and safety.
- Versatile Staple Connection: Connects staples in 3 directions (30°, 45°, 90°) to accommodate various welding angles.
- Efficient Heat Dissipation: Unique air hole design and 3 cooling channels ensure rapid cooling and extended welder runtime.
- Wide Application: Compatible with 99% of vehicles, including cars, motorcycles, boats, lawn mowers, ATVs, and other industrial plastic applications.

Image: The MRCARTOOL C210 Plastic Welder with icons illustrating its features: 80W Fast Heating, 5-speed Power Adjustment, ability to Equip Various Welding Staples, LED Light, Portable Design, and Wide Use.

Image: Close-up views of the welder's features: Button Design for easy operation, 3 Angle Installed Welded Staples (30°, 45°, 90°), a 10mm Thick Power Cord for durability, and the LED Light Design for working in dark environments.
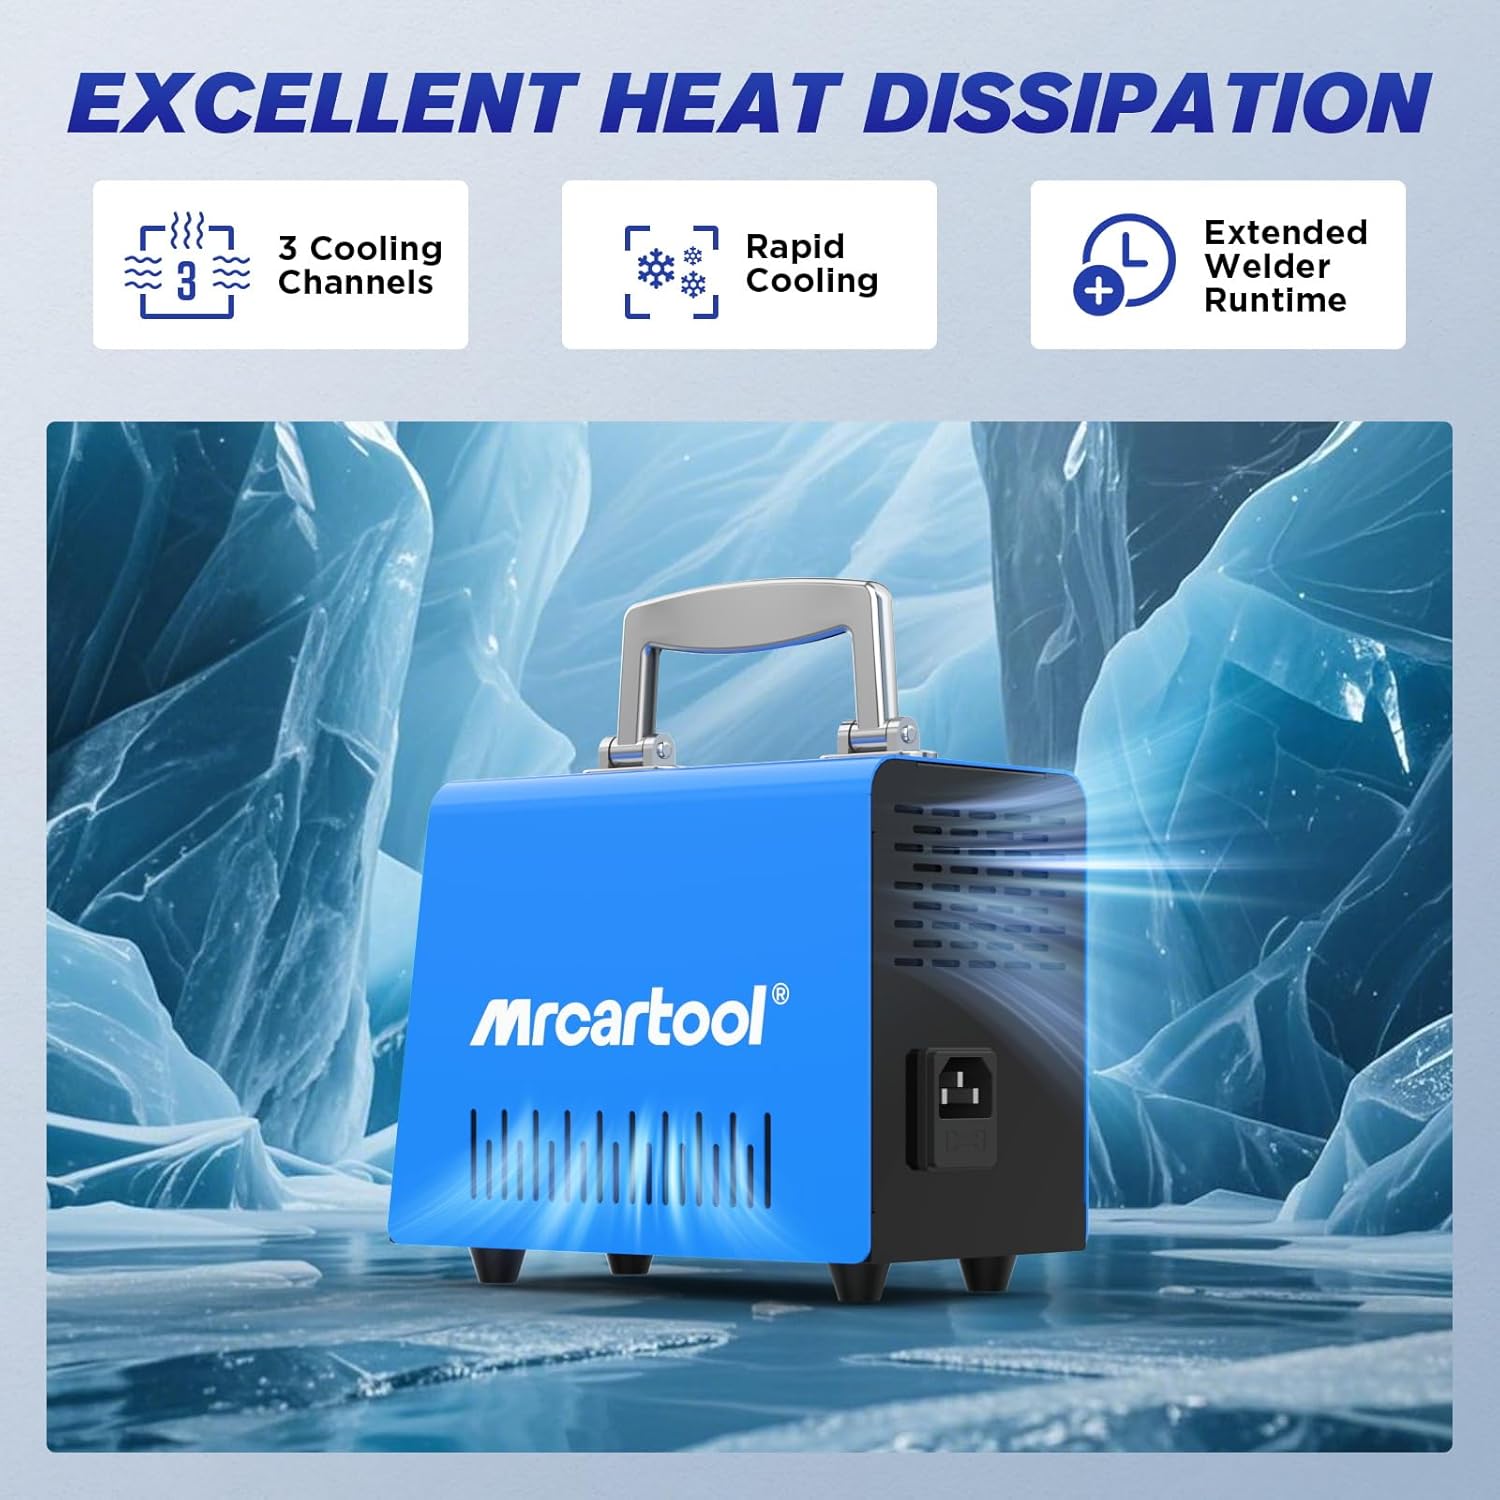
Image: An illustration of the welder's heat dissipation capabilities, showing 3 Cooling Channels, Rapid Cooling, and Extended Welder Runtime, set against an icy background to emphasize cooling efficiency.
5. Setup
- Unpack: Carefully remove all components from the packaging and inspect for any damage.
- Power Connection: Connect the power cord to the welder unit and then plug it into a standard 220V AC power outlet. Ensure the power switch is in the "OFF" position before plugging in.
- Staple Insertion: Select the appropriate welding staple for your repair task. Insert the staple into the welding head. The design allows for insertion at 30°, 45°, or 90° angles.
- Work Area Preparation: Ensure your work area is clean, well-ventilated, and free from flammable materials. Wear appropriate PPE (safety glasses, heat-resistant gloves).
6. Operating Instructions
Follow these steps for effective plastic repair:
- Power On: Turn the power switch to the "ON" position. The LED indicator will light up.
- Select Power Level: Use the rotary knob to select the desired power level (15W, 35W, 45W, 65W, or 80W) based on the thickness and type of plastic being repaired. Higher wattage provides faster heating and deeper penetration.
- Insert Staple: Ensure the correct staple type (flat, M-shaped, wave, V-shaped) is securely inserted into the welding head.
- Apply to Crack: Place the staple over the crack or damaged area. Press the trigger button to heat the staple. The staple will heat rapidly (1-2 seconds) and melt into the plastic.
- Embed Staple: Once the staple is embedded and the plastic has fused around it, release the trigger button and allow the plastic to cool and solidify.
- Trim Excess: Use the provided cutting pliers to trim any excess staple prongs that protrude from the plastic surface.
- Smooth Surface: For a smooth finish, use the heat smoothing head (diagonal cutter) to melt and level the repaired area.
- Repeat: Repeat the process for other sections of the crack as needed.

Image: A four-step visual guide demonstrating the welding process: 1. Select the right hot staples and mode. 2. Precise repair of the crack location by embedding the staple. 3. Use pliers to cut residual heat nail after heating and solidification. 4. The area after clip break repair is restored with a heated smoothing head.

Image: A close-up of the welder's control panel, highlighting the 5-speed power adjustment knob and indicator lights for 15W, 35W, 45W, 65W, and 80W settings. This allows temperature and power to be adjusted for different plastic materials.
7. Maintenance
- Cleaning: Ensure the device is unplugged and completely cool before cleaning. Wipe the exterior with a soft, dry cloth. Do not use abrasive cleaners or solvents.
- Staple Residue: Periodically clean any plastic residue from the welding head using a non-abrasive tool when the device is cool.
- Storage: Store the welder and its accessories in the provided storage case in a dry, cool place, away from direct sunlight and moisture.
- Cord Inspection: Regularly inspect the power cord for any signs of damage. Do not use the device if the cord is frayed or damaged.
8. Troubleshooting
| Problem | Possible Cause | Solution |
|---|---|---|
| Device does not power on. | No power supply; power cord damaged; power switch off. | Check power outlet; inspect power cord for damage; ensure power switch is ON. |
| Staples do not heat up. | Incorrect power setting; loose staple insertion; internal fault. | Increase power setting; ensure staple is firmly inserted; contact customer support if problem persists. |
| Device stops working during operation. | Overheat protection activated. | Allow the device to cool down. It will resume operation once the temperature drops below 120℃. Ensure proper ventilation. |
| Poor welding results. | Incorrect power setting for plastic type; wrong staple type; insufficient pressure. | Adjust power setting; use appropriate staple type; apply firm, consistent pressure. |
9. Specifications
| Attribute | Value |
|---|---|
| Model Number | C210 |
| Brand | MRCARTOOL |
| Input Voltage | 220 Volts AC |
| Adjustable Power Output | 15W / 35W / 45W / 65W / 80W (Max) |
| Heating Time | 1-2 seconds (to max output) |
| Overheat Protection | Automatic shutdown at >120℃ transformer temperature |
| Included Staples | 600 pieces (Flat, M-shaped, Wave, V-shaped) |
| Product Dimensions (Package) | 28.3 x 24.4 x 13.7 cm |
| Product Weight | 2.5 Kilograms |
| Color | Blue |
10. Warranty and Support
MRCARTOOL is committed to providing high-quality products and excellent customer service.
- Warranty: This product comes with a 24-month quality support warranty from the date of purchase.
- Customer Service: For any issues, questions, or technical assistance, please contact MRCARTOOL customer service. We offer 7x24h customer support and will provide a solution as soon as possible.

Image: Customer service representatives wearing headsets, actively assisting customers, symbolizing the available support.


