1. Introduction
Thank you for choosing the DEGLASERS 4x360° Cross Line Laser Level. This advanced tool is designed for precision leveling and alignment tasks in various construction and home improvement projects. Featuring both red and green laser beams, comprehensive 360° coverage, and multiple operating modes, it provides enhanced visibility and accuracy. This manual provides detailed instructions for safe operation, setup, maintenance, and troubleshooting to ensure optimal performance and longevity of your device.
2. Safety Information
Please read and understand all safety warnings and instructions before operating this laser level. Failure to follow the warnings and instructions may result in serious injury.
- Laser Radiation: This product emits laser radiation. Avoid direct eye exposure to the laser beam. The laser class is Class II, with a power output of <1 mW.
- Do not stare into the laser beam.
- Do not intentionally direct the laser beam at people or animals.
- Do not modify the laser level in any way. Unauthorized modifications can increase the laser output and result in serious personal injury.
- Keep the device out of reach of children.
- Use only the specified battery and charger provided with the device.
- Operate the device in a well-ventilated area.
3. Package Contents
Verify that all items listed below are included in your package. If any items are missing or damaged, please contact customer support.
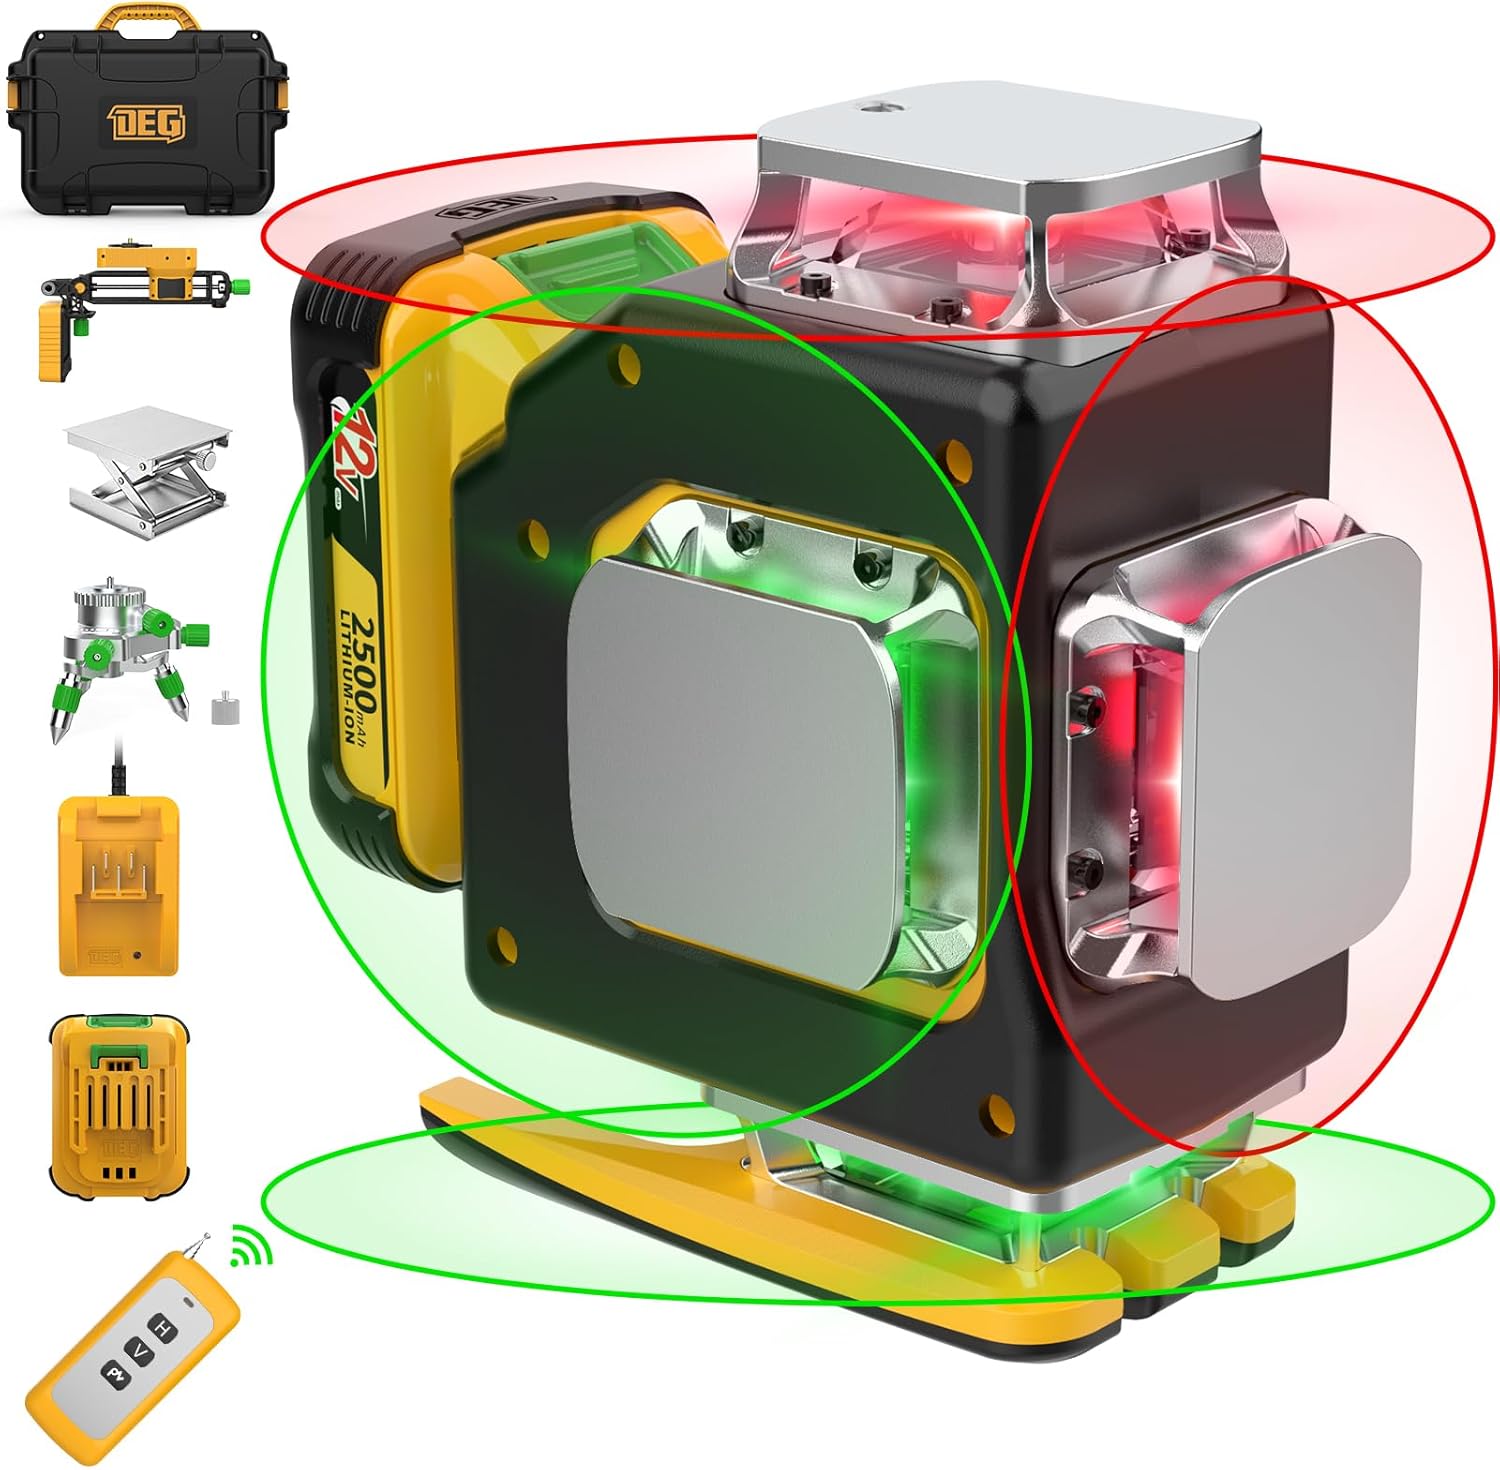
- 1 x Laser Tool
- 1 x 2500 mAh 12V Rechargeable Li-ion Battery
- 1 x Charger
- 1 x Remote Control
- 1 x 1/4" Connector
- 1 x Multifunctional Magnetic Bracket
- 1 x Lifting Base Stand
- 1 x Mini Rotary Base
- 1 x Metal Sheet
- 1 x Laser Target Plate
- 1 x User Manual
- 1 x Explosion-proof Box (Carrying Case)
4. Product Features
The DEGLASERS 4x360° Cross Line Laser Level is equipped with several features designed for precision and ease of use:
- Dual Color Laser Beams: Innovative red and green laser lines provide enhanced visibility and clarity, allowing for easier differentiation and referencing of multiple lines simultaneously.
- Four Brightness Adjustments: Adapt the laser brightness to various lighting conditions, including energy-saving (dim), normal, super bright (outdoor), and light flashing modes for strong outdoor light.
- 4x360° Full Layout Coverage: Projects two 360° horizontal lines and two 360° vertical lines, ensuring comprehensive coverage for all corners of a room.
- Long-lasting 12V Rechargeable Li-ion Battery: The included 2500 mAh battery provides 15-40 hours of continuous operation on a single charge.
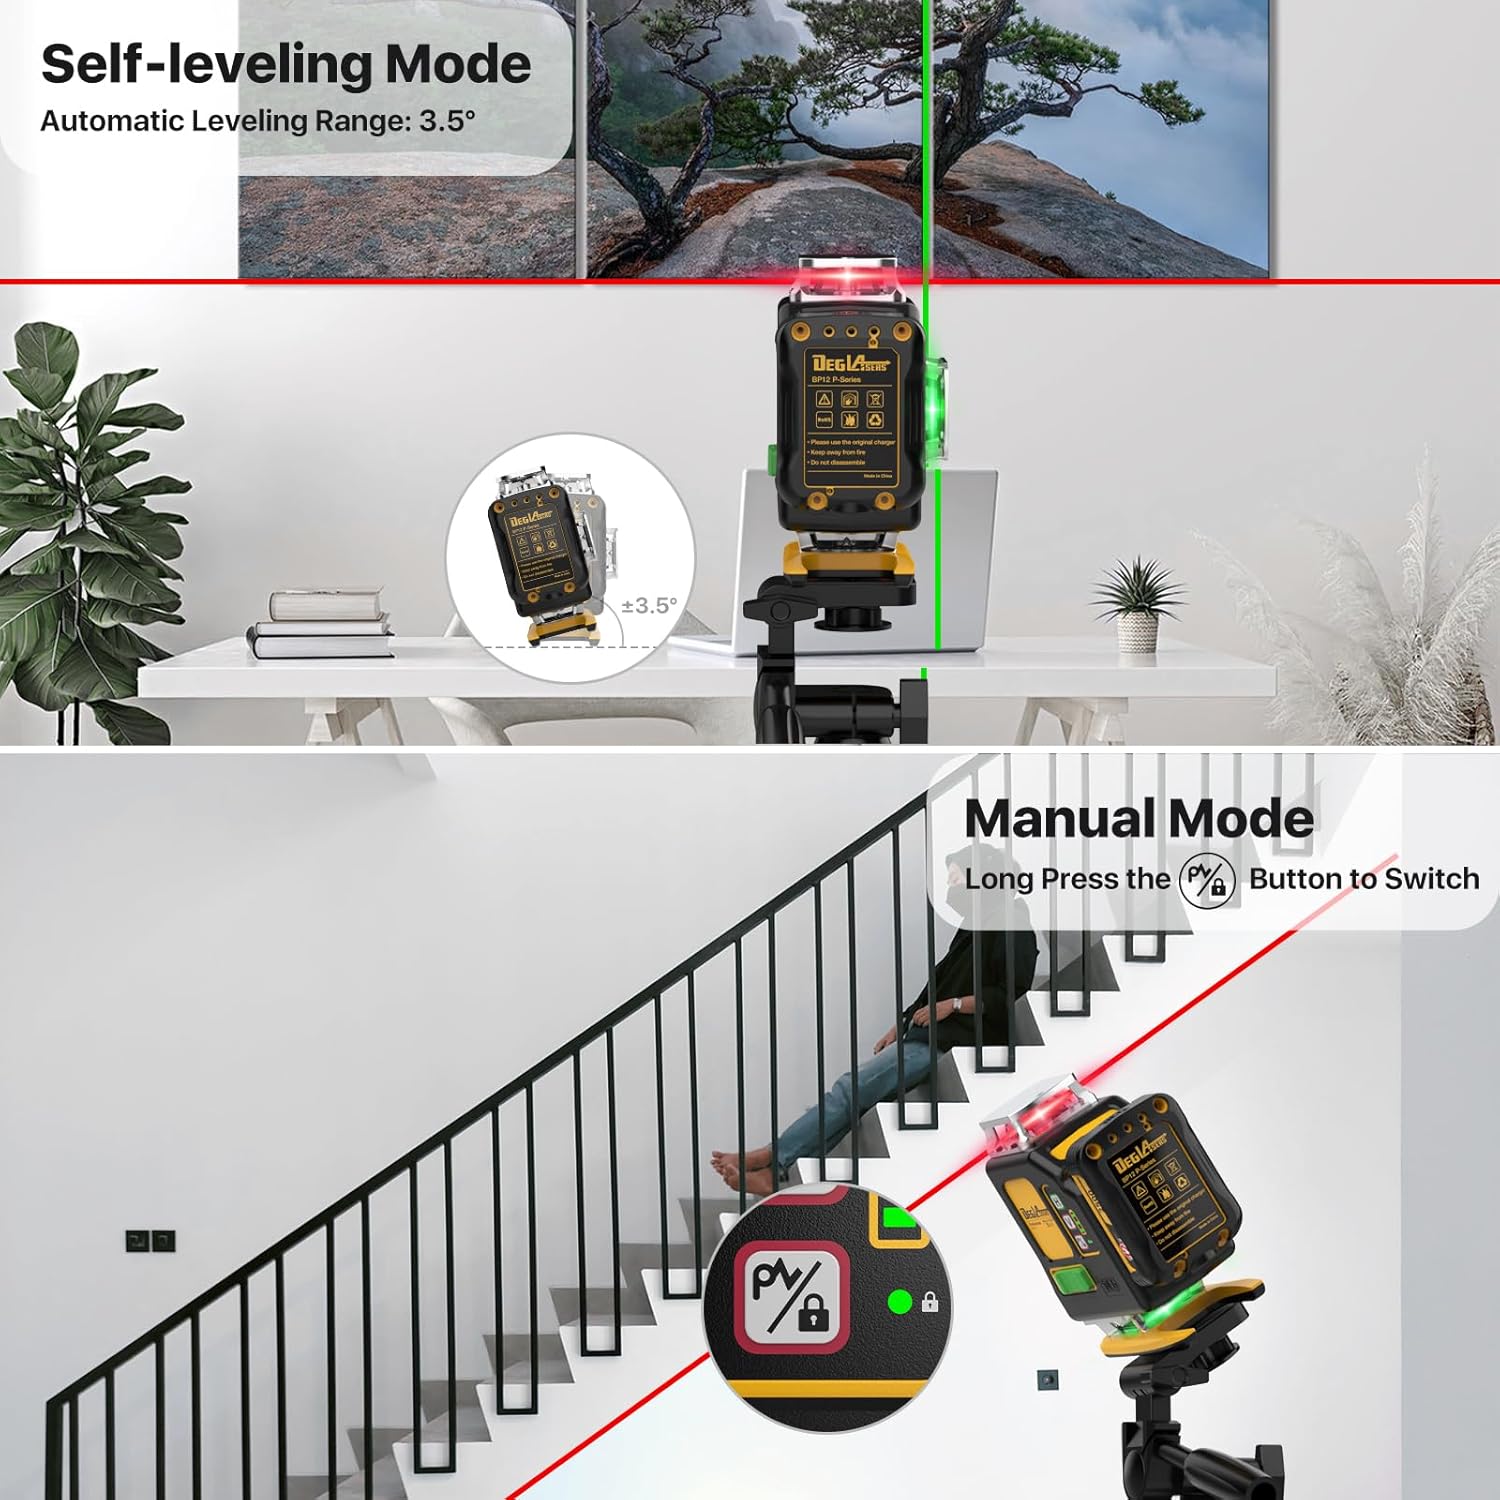
- Self-Leveling & Manual Mode: Easily switch between automatic self-leveling within ±3.5° and manual mode for angled projections.
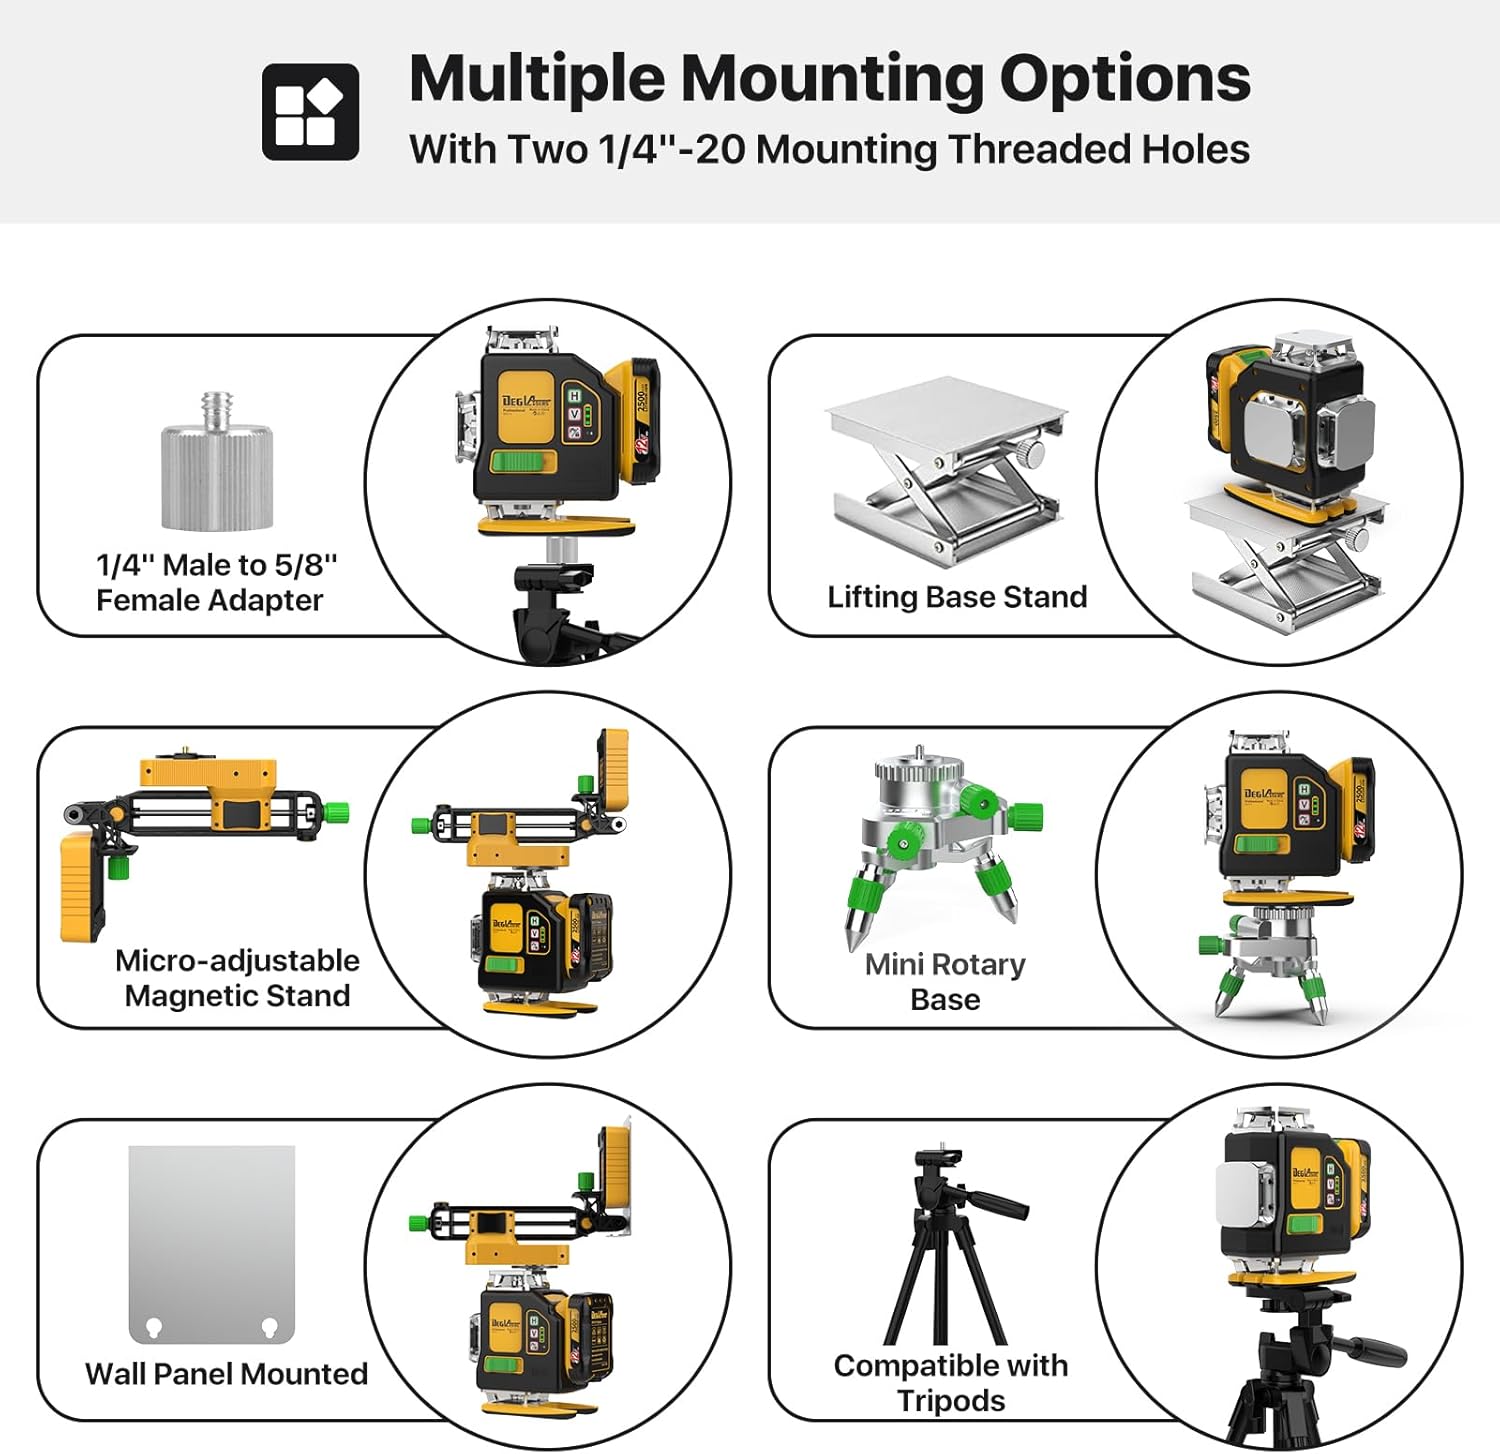
- Multiple Mounting Options: Features two 1/4"-20 mounting threaded holes and comes with various accessories like a magnetic bracket, lifting base stand, and mini rotary base for versatile positioning.


5. Setup
5.1 Battery Installation and Charging
- Ensure the laser level is turned off.
- Locate the battery compartment on the device.
- Insert the 12V 2500 mAh Li-ion battery into the compartment, ensuring proper alignment with the terminals.
- To charge the battery, connect the charger to the battery pack and plug it into a power outlet. The charging indicator light will show the charging status.
- A full charge typically takes approximately 1 hour and provides up to 40 hours of use depending on the mode.

5.2 Mounting the Laser Level
The laser level offers various mounting options for different applications:
- Magnetic Bracket: Attach the multifunctional magnetic bracket to the laser level using the 1/4"-20 threaded hole. The bracket can then be secured to metal surfaces.
- Lifting Base Stand: Use the lifting base stand for precise height adjustments on flat surfaces.
- Mini Rotary Base: The mini rotary base allows for fine rotational adjustments of the laser lines.
- Tripod Compatibility: The device can be mounted on standard tripods using its 1/4"-20 threaded holes.

6. Operating Instructions
6.1 Power On/Off and Mode Selection
To power on the device and select the operating mode, use the slide switch and the square button on the laser level or the remote control.
- Self-Leveling Mode: Slide the power button to the "ON" position. The leveler will power on and automatically enter self-leveling mode. If the tool is tilted within ±3.5° from the horizontal, it will self-level. If the tilt exceeds 3.5°, the laser line will blink and an alarm will sound, indicating it is out of range.
- Manual Mode: To activate manual mode, long press the manual mode button (often indicated by a lock icon) on the device or remote control. The indicator light will turn green, and the laser level will be in manual mode. In this mode, the angle can be adjusted as needed, and the tool will not alarm for tilt. This is ideal for projecting angled lines.


6.2 Brightness Adjustment
The laser level features four brightness settings to optimize visibility in various environments:
- Low Brightness: Ideal for dim indoor conditions to conserve battery life.
- Medium Brightness: Standard mode for well-lit indoor environments.
- High Brightness: Super bright mode for outdoor use or brightly lit areas.
- Flash Brightness: A flashing mode designed for strong outdoor light conditions to enhance visibility.
Cycle through the brightness settings using the dedicated button on the device or remote control.

6.3 Laser Line Selection
The device allows you to activate specific laser lines (horizontal or vertical) as needed for your task. Use the 'H' button for horizontal lines and the 'V' button for vertical lines on the device or remote control to toggle them on or off.

7. Maintenance
Proper maintenance ensures the longevity and accuracy of your laser level.
- Cleaning: Regularly clean the laser windows and the device body with a soft, damp cloth. Do not use abrasive cleaners or solvents.
- Storage: When not in use, store the laser level and its accessories in the provided explosion-proof box in a dry, cool place, away from direct sunlight and extreme temperatures.
- Battery Care: Fully charge the battery before long-term storage and recharge it every 3-6 months to maintain battery health. Remove the battery from the device if storing for extended periods.
- Protection: While the device has some durability, avoid dropping it or subjecting it to strong impacts.


8. Troubleshooting
If you encounter issues with your laser level, refer to the following common problems and solutions:
| Problem | Possible Cause | Solution |
|---|---|---|
| Laser line blinks and alarms in self-leveling mode. | Device is tilted beyond its self-leveling range (±3.5°). | Place the device on a more level surface. If an angled line is desired, switch to manual mode. |
| Laser lines are dim or not visible. | Low battery; Bright ambient light; Incorrect brightness setting. | Recharge the battery. Adjust brightness setting to a higher level. Use the laser target plate to enhance visibility. |
| Device does not power on. | Battery not installed correctly; Battery is depleted; Device malfunction. | Ensure battery is properly inserted. Charge the battery. If problem persists, contact customer support. |
| Remote control not working. | Remote control battery depleted; Obstruction between remote and device. | Replace remote control battery. Ensure clear line of sight to the device's sensor. |
9. Specifications
Detailed technical specifications for the DEGLASERS 4x360° Cross Line Laser Level:
| Feature | Specification |
|---|---|
| Projection | 4 x 360° Laser level |
| Laser Class | Safety level-Class II, <1 mW power output |
| Line Accuracy | ± 3/100 Inch at 16 Feet |
| Laser Wavelength | 515-535nm (Green/Red) |
| Leveling Range | ±3.5° |
| Leveling Time | <3s |
| Working Distance | 100ft Away |
| Operation Modes | Self-leveling / Manual Mode |
| Power Source | 12V / 2500mAh Li-ion Battery |
| Working Time | 15-40 Hours (depending on usage) |
| Mount Size | 1/4" - 20 |
| IP Rating | IP54 (Dust and Splash Resistant) |
| Operation Temperature | -10°C ~ 50°C |
| Storage Temperature | -20°C ~ 70°C |
| Material | Aluminum, Metal, Rubber |
| Item Weight | 10.03 pounds |

10. Warranty and Support
DEGLASERS offers a one-year after-sale service for this product. If you encounter any problems or have questions regarding your laser level, please do not hesitate to contact our customer support team. We are committed to providing prompt assistance and ensuring your satisfaction.
For support, please refer to the contact information provided on the product packaging or the official DEGLASERS website.


