1. Introduction
This manual provides detailed instructions for the setup, operation, maintenance, and troubleshooting of your AWOW Mini PC, Model MGI9. This device is a barebone mini PC, meaning it requires the user to install RAM, an SSD, and an operating system before use. It is designed for various applications including office work, multimedia, and light gaming.
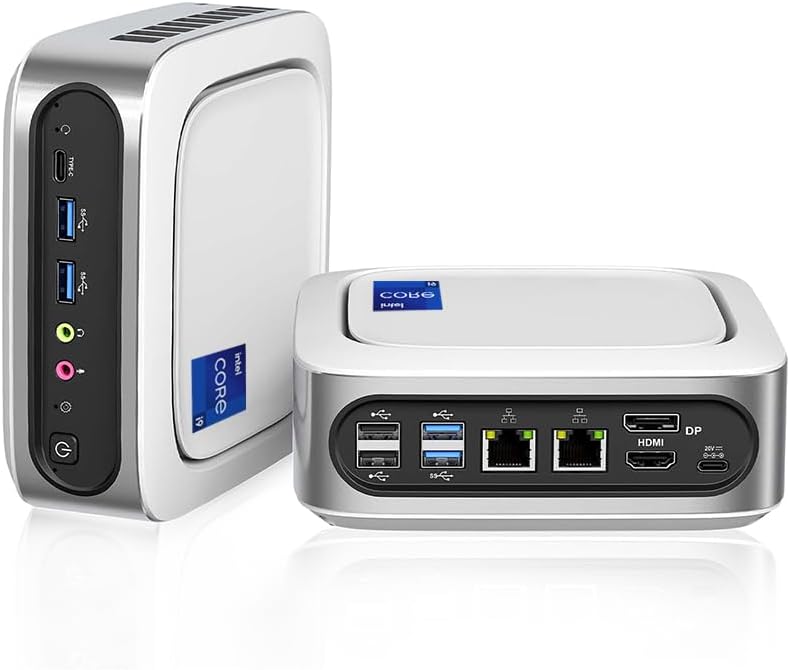
Figure 1.1: AWOW Mini PC (Front and Rear Views)
This image displays the compact design of the AWOW Mini PC, showcasing its front and rear panels with various ports and ventilation.
2. Key Features
- Processor: Equipped with an Intel Core i9-11900H processor (8 Cores/16 Threads/24 MB Cache/up to 4.9 GHz), providing robust performance for demanding applications.
- Connectivity: Features dual 2.5-Gigabit Ethernet ports, dual-band Wi-Fi 6, and Bluetooth 5.2 for high-speed wired and wireless connections.
- Storage Expansion: Supports dual-channel memory up to 64GB (2x 32GB) and M.2 2280 NVMe SSD storage. An additional 2.5-inch SATA HDD (up to 2TB, 7mm thickness) can be added for expanded storage.
- Display Support: Integrated Intel UHD Graphics for 11th Gen Processors supports 4K Ultra HD (4096 x 2304) video playback. Supports simultaneous triple-screen display via HDMI, DisplayPort 1.4, and Type-C interfaces.

Figure 2.1: Key Features Overview
This diagram highlights the core specifications of the AWOW Mini PC, including its processor, memory, storage, and connectivity options.

Figure 2.2: Intel Core i9-11900H Processor
An illustration detailing the Intel Core i9-11900H processor, emphasizing its 8 cores, 16 threads, 24MB Smart Cache, and 4.9GHz Max Turbo Frequency.
3. Physical Overview
Familiarize yourself with the ports and indicators on your AWOW Mini PC.

Figure 3.1: Port Layout
This diagram labels all input/output ports on the AWOW Mini PC, including USB, audio jacks, Ethernet, HDMI, DisplayPort, and Type-C connections.
Front Panel:
- Type-C Port: For data transfer and display output.
- USB 3.2 Gen 2 Ports (x2): High-speed data transfer.
- Headphone Jack: Audio output.
- MIC-IN: Microphone input.
- Power Button: To turn the device on/off.
- System Reset (CMOS CLR): Button for resetting CMOS settings.
Rear Panel:
- USB 2.0 Ports (x2): For connecting peripherals.
- USB 3.2 Gen 2 Ports (x2): High-speed data transfer.
- RJ45 2.5GbE NIC (x2): Dual 2.5 Gigabit Ethernet ports for network connectivity.
- DP1.4 Port: DisplayPort for video output.
- HDMI Port: HDMI for video output.
- Type-C (DC IN): Power input port.
4. Setup Guide
As a barebone unit, the AWOW Mini PC requires the installation of essential components before first use.
4.1. Hardware Installation (RAM & SSD)
- Prepare the Mini PC: Ensure the device is powered off and disconnected from all cables.
- Open the Chassis: Carefully open the mini PC chassis to access the internal components. Refer to the specific model's disassembly instructions if available, or gently remove the bottom panel.
- Install RAM: Locate the SODIMM RAM slots. Align the notch on the RAM module with the notch in the slot and gently push down until the clips on both sides secure the module. This unit supports dual-channel DDR4 memory up to 64GB (2x 32GB).
- Install M.2 NVMe SSD: Locate the M.2 2280 slot. Insert the M.2 SSD at an angle into the slot and then gently push it down, securing it with the provided screw.
- Install 2.5-inch SATA HDD (Optional): If expanding storage with a 2.5-inch SATA HDD (not included), connect it to the SATA 3.0 6.0Gb/s interface. Ensure the hard disk thickness does not exceed 7mm. Secure the drive within the designated bay.
- Close the Chassis: Carefully reassemble the mini PC chassis, ensuring all screws are tightened.
4.2. Operating System Installation
The AWOW Mini PC does not come with a pre-installed operating system. You will need to install one, such as Windows 10/11 or a Linux distribution.
- Create Bootable USB: Prepare a bootable USB drive with your desired operating system's installation media.
- Connect Peripherals: Connect a monitor, keyboard, and mouse to the mini PC.
- Power On and Enter BIOS: Connect the power adapter to the Type-C (DC IN) port and press the power button. Immediately press the designated key (usually Del, F2, or F10) to enter the BIOS/UEFI setup.
- Configure Boot Order: In the BIOS/UEFI, navigate to the Boot section and set your USB drive as the primary boot device. Save changes and exit.
- Install OS: The mini PC will boot from the USB drive, and you can proceed with the operating system installation following the on-screen prompts.
- Install Drivers: After OS installation, install necessary drivers for optimal performance. Drivers can typically be found on the AWOW support website.
5. Operating Instructions
5.1. Initial Power On and Connectivity
- Connect Power: Plug the power adapter into the Type-C (DC IN) port on the rear panel and connect it to a power outlet.
- Connect Display: Connect your monitor(s) using the HDMI, DisplayPort, or front Type-C port.
- Connect Peripherals: Plug in your keyboard, mouse, and any other USB devices into the available USB ports.
- Power On: Press the power button on the front panel. The power indicator light will illuminate.
- Network Connection:
- Wired: Connect an Ethernet cable to one of the dual 2.5GbE RJ45 ports on the rear panel.
- Wireless: Once the OS is loaded, connect to a Wi-Fi network using the built-in Wi-Fi 6 module.

Figure 5.1: Wireless Connectivity
This image illustrates the AWOW Mini PC's support for Wi-Fi 6 and Bluetooth 5.2, highlighting faster speeds and more reliable wireless connections.
5.2. Triple Display Configuration
The AWOW Mini PC supports simultaneous output to three displays, enhancing productivity and multimedia experiences.
- Connect Displays: Use the HDMI, DisplayPort 1.4, and front Type-C ports to connect up to three monitors.
- Configure in OS: Once connected, navigate to your operating system's display settings (e.g., Display Settings in Windows) to arrange and extend or duplicate your displays as needed. The system supports 4K UHD resolution (4096 x 2304).

Figure 5.2: Triple Display Setup
This image demonstrates the AWOW Mini PC connected to three monitors, showcasing its 4K UHD triple display capability via HDMI, DP, and Type-C ports.
6. Maintenance
Regular maintenance helps ensure the longevity and optimal performance of your AWOW Mini PC.
- Cleaning: Regularly clean the exterior of the mini PC with a soft, dry cloth. Use compressed air to clear dust from ventilation grilles and ports to prevent overheating. Ensure the device is powered off and unplugged before cleaning.
- Software Updates: Keep your operating system and drivers updated to the latest versions to ensure security, compatibility, and performance improvements.
- Storage Management: Periodically check your storage usage and free up space by deleting unnecessary files or uninstalling unused applications. Consider defragmenting HDDs (if applicable) or optimizing SSDs.
- Ventilation: Ensure the mini PC is placed in a well-ventilated area, away from direct sunlight or heat sources, to allow for proper airflow. Do not block the ventilation openings.
7. Troubleshooting
This section addresses common issues you might encounter with your AWOW Mini PC.
7.1. No Power
- Check Power Connection: Ensure the power adapter is securely connected to the mini PC's Type-C (DC IN) port and the wall outlet.
- Verify Outlet: Test the wall outlet with another device to confirm it is functional.
- Power Adapter: Ensure you are using the original power adapter provided with the mini PC.
7.2. No Display Output
- Monitor Connection: Verify that the display cable (HDMI, DP, or Type-C) is securely connected to both the mini PC and the monitor.
- Monitor Input: Ensure your monitor is set to the correct input source (e.g., HDMI 1, DisplayPort).
- RAM/SSD Installation: Since this is a barebone unit, confirm that RAM and SSD are correctly installed and seated firmly. Incorrect installation can prevent the system from booting or displaying.
- Test with Single Display: If using multiple displays, try connecting only one monitor to isolate the issue.
7.3. Network Connectivity Issues
- Wired Connection: Check the Ethernet cable connection to both the mini PC and the router/modem. Verify router status.
- Wireless Connection: Ensure Wi-Fi is enabled in your operating system. Check if the Wi-Fi network is visible and enter the correct password. Restart your router/modem.
- Drivers: Ensure network drivers (Ethernet and Wi-Fi) are properly installed and updated.
7.4. System Performance Issues
- Overheating: Ensure proper ventilation. Clean dust from vents. Monitor CPU temperatures using software.
- Resource Usage: Check Task Manager (Windows) or System Monitor (Linux) for applications consuming excessive CPU, RAM, or disk resources.
- Driver Issues: Outdated or corrupted drivers can impact performance. Update all drivers, especially graphics and chipset drivers.
- Storage Space: Low disk space on the primary drive can significantly slow down the system. Free up space if necessary.
8. Technical Specifications
| Feature | Specification |
|---|---|
| Brand | AWOW |
| Model Name | Mini pc-MGI9 |
| Processor | Intel Core i9-11900H (8 Cores, 16 Threads, up to 4.9 GHz) |
| Graphics Coprocessor | Intel UHD Graphics for 11th Gen Processors |
| RAM Type | DDR4 SODIMM (Barebone, user installable) |
| Maximum Memory Supported | 64 GB (2x 32GB) |
| Storage | M.2 2280 NVMe SSD (Barebone, user installable), supports 2.5-inch SATA HDD (up to 2TB, not included) |
| Display Resolution | 4096 x 2304 (4K UHD) |
| Display Outputs | 1x HDMI, 1x DisplayPort 1.4, 1x Type-C (supports triple display) |
| Ethernet | Dual 2.5GbE RJ45 ports (Intel I225/226V) |
| Wireless Connectivity | Wi-Fi 6 (802.11ax), Bluetooth 5.2 |
| USB Ports | 4x USB 3.2 Gen 2, 2x USB 2.0, 1x Type-C (front) |
| Audio Ports | Headphone Jack, MIC-IN |
| Power Input | Type-C (DC IN) |
| Dimensions | 156 x 156 x 58 mm (approx.) |
| Item Weight | 953 g |
| Operating System | No OS (Barebone, user installable) |

Figure 8.1: Compact Size
This image provides a visual reference for the compact dimensions of the AWOW Mini PC, comparing it to common desktop items.
9. Warranty and Support
AWOW provides reliable after-sales service and technical support for your Mini PC.
- After-Sales Service: Contact AWOW for any issues or inquiries regarding your product.
- Technical Support: 24/7 technical support services are available, staffed by senior computer experts who can assist with technical problems.
- Local Customer Call Service: Available during 9:00 AM to 5:00 PM EST.
- OEM Customized Pre-Sales Services: For specific business needs or bulk inquiries.
For detailed warranty information and to access support, please refer to the official AWOW website or contact their customer service directly.


