1. Introduction
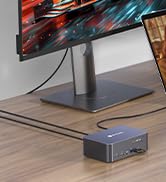
The AV Access iDock C10 is a versatile KVM switch and docking station designed to streamline your workspace by allowing two computers (one laptop and one desktop) to share two monitors and multiple USB peripherals. This device supports high-resolution video outputs up to 4K@60Hz, 2K@144Hz, and 1080P@240Hz, making it suitable for both professional and gaming environments. It integrates essential connectivity including Ethernet, USB 3.0, USB 2.0, USB-C with 60W power delivery, SD card reader, and audio ports, all within a durable aluminum chassis.
Video: Overview of the AV Access iDock C10 KVM Switch and Docking Station, demonstrating its core functionality and design.
2. Package Contents
Verify that all items listed below are included in your package:
- 1x AV Access iDock C10 KVM Switch with Docking Station
- 1x Power Adapter (20V/6A)
- 1x USB-C to USB-C cable (USB 3.2 Gen 2, 3ft)
- 1x USB-A to USB-B cable (USB 3.0, 5ft)
- 1x HDMI 2.0 cable (5ft)
- 1x DisplayPort 1.2a cable (5ft)
- 1x User Manual
Video: Unboxing and initial setup guide for the iDock C10, showing all included cables and the device itself.
3. Product Overview
3.1 Front Panel
The front panel provides convenient access to frequently used ports and control buttons:
- Power Button: To power the device on/off.
- KVM Switch Button: To switch between connected computers (Laptop/Desktop).
- 2x USB 2.0 Ports: Dedicated for keyboard and mouse connections, ensuring stable input.
- 1x USB-C Port (SS): For data transfer and charging devices.
- 3.5mm Headset Jack: For audio input/output.
- SD Card Slot: For reading/writing data from SD cards.

3.2 Rear Panel
The rear panel houses the primary connectivity options for your computers and monitors:
- LAN Port: For wired Ethernet connection.
- USB-C IN (Laptop): Connects to your laptop for video, data, and power delivery (up to 60W).
- DP IN (Desktop): DisplayPort input for desktop computer.
- HDMI IN (Desktop): HDMI input for desktop computer.
- USB-B (Desktop): USB 3.0 input for desktop computer peripherals.
- 3x USB 3.0 Ports: For high-speed data transfer with peripherals.
- TOSLINK OUT: Optical audio output.
- 20V Power Input: Connects to the included power adapter.
- HDMI OUT 1 & 2: Connects to your two monitors.

4. Setup Guide
Follow these steps to set up your AV Access iDock C10 KVM Switch and Docking Station:
- Connect Power: Plug the 20V power adapter into the '20V' input port on the rear panel of the iDock C10, then connect the adapter to a power outlet.
- Connect Monitors: Use the provided HDMI cables to connect your two monitors to the 'HDMI OUT 1' and 'HDMI OUT 2' ports on the rear panel of the iDock C10.
- Connect Laptop (Computer 1):
- Connect the supplied USB-C to USB-C cable from your laptop's full-featured USB-C port to the 'USB-C IN (Laptop)' port on the rear panel of the iDock C10. This single cable handles video, data, and power delivery.
- Note: Ensure your laptop's USB-C port supports video output and data transfer for full functionality. Mirrored output only on macOS.
- Connect Desktop (Computer 2):
- Connect the supplied DisplayPort cable from your desktop's DisplayPort output to the 'DP IN (Desktop)' port on the rear panel.
- Connect the supplied HDMI cable from your desktop's HDMI output to the 'HDMI IN (Desktop)' port on the rear panel.
- Connect the supplied USB-A to USB-B cable from your desktop's USB-A port to the 'USB-B (Desktop)' port on the rear panel. This enables peripheral sharing.
- Connect Peripherals:
- Connect your keyboard and mouse to the dedicated USB 2.0 ports on the front panel.
- Connect other USB devices (e.g., webcam, external hard drive) to the USB 3.0 ports on the rear panel or the USB-C port on the front.
- If desired, connect a headset to the 3.5mm jack and an SD card to the SD card slot on the front panel.
- For a wired network connection, connect an Ethernet cable from your router to the 'LAN' port on the rear panel.
- Power On: Press the power button on the front panel of the iDock C10 to turn it on.

Video: A detailed demonstration of the setup process for the AV Access iDock C10, including cable connections and initial power-on.
5. Operating Instructions
5.1 Switching Between Computers
To switch between your connected laptop (Computer 1) and desktop (Computer 2), simply press the KVM switch button located on the front panel of the iDock C10. The switch is designed for fast and efficient transitions, typically taking 2-3 seconds.

5.2 EDID Emulation and Automatic PC Wake-up
The iDock C10 features EDID emulation and an automatic PC wake-up function to enhance user experience:
- EDID Emulation: Ensures that desktop icons and window arrangements remain consistent after switching, preventing rearrangement or screen flickering.
- Automatic PC Wake-up: When switching to a computer that is in sleep mode, you do not need to manually move the mouse or type on the keyboard to wake it up. The iDock C10 automatically sends a signal to wake the PC.


Video: Demonstration of how the iDock C10 boosts productivity through efficient switching and peripheral sharing.
6. Features and Capabilities
- Dual Monitor KVM Switch: Seamlessly switch between a laptop and a desktop, sharing two monitors, keyboard, mouse, and other peripherals.
- High-Resolution Support: Supports up to 4K@60Hz 4:4:4, 1080P@240Hz/165Hz/144Hz/120Hz, and 2560×1440@144Hz/120Hz for an enhanced visual experience.
- Versatile 12-in-1 Docking Station: Includes 3x USB 3.0, 2x USB 2.0, 1x USB-C, 1x SD card, 1x LAN, 1x Toslink out, 1x 3.5mm headset, and two HDMI outputs.
- Full-Featured USB-C: Provides data transfer speeds up to 20Gbps and charges your laptop with up to 60W power delivery.
- Stable Gigabit Ethernet: Offers a reliable wired network connection for your laptop.
- Durable Construction: Machined from aircraft-grade aluminum for a robust and wear-resistant design.

7. Compatibility Notes
- macOS Limitations: Only supports mirrored output on macOS. Extended display mode is not supported via USB-C MST on macOS.
- Direct Connections: iDock C10, computers, and monitors should be directly connected without any other adapters, docking stations, or converters between them to ensure optimal performance.
- USB-C Port Requirements: Before purchasing, confirm that the USB-C port on your laptop supports video output and data transfer for full functionality.
8. Specifications
| Feature | Value |
|---|---|
| Operation Mode | Manual |
| Current Rating | 6 Amps |
| Operating Voltage | 120 Volts |
| Connector Type | USB Type C |
| Material | Aluminum |
| Dimensions (L x W x H) | 5.51 x 3.74 x 1.97 inches |
| Item Weight | 3.72 pounds |
| Wattage | 94.5 watts |
| Connectivity Protocol | Ethernet |
| Color | Grey |
| Compatible Devices | Dell, HP, LENOVO |
9. Troubleshooting
If you encounter issues with your iDock C10, consider the following:
- No Display/Incorrect Resolution: Ensure all video cables (HDMI, DisplayPort, USB-C) are securely connected. Verify that your monitors and computers support the selected resolutions and refresh rates. Check for direct connections without intermediate adapters.
- Peripherals Not Responding: Confirm USB cables are properly connected. Try connecting peripherals to different USB ports on the iDock C10. Ensure the USB-B cable is connected from the desktop to the iDock C10.
- Laptop Not Charging: Verify that the USB-C cable used supports power delivery and is connected to a compatible port on your laptop. Ensure the iDock C10 power adapter is correctly plugged in.
- Switching Delays/Issues: Allow 2-3 seconds for switching. Ensure EDID emulation is functioning correctly (this is automatic). If issues persist, power cycle the iDock C10.
- macOS Display Issues: Remember that macOS only supports mirrored output. If you require extended display, ensure your setup is compatible with this limitation or consider alternative solutions.
10. Maintenance
To ensure the longevity and optimal performance of your AV Access iDock C10:
- Keep the device in a cool, dry place away from direct sunlight and extreme temperatures.
- Clean the exterior with a soft, dry cloth. Avoid using harsh chemicals or abrasive materials.
- Ensure proper ventilation around the device to prevent overheating.
- Regularly check cable connections for any looseness or damage.
11. Warranty and Support
AV Access provides comprehensive support for the iDock C10:
- 1-Year Free Replacement Warranty: The product is covered by a 1-year warranty.
- 1-Month Free Replacement: Enjoy a free replacement within the first month of purchase.
- Lifetime After-Sale Support: Dedicated support is available for the lifetime of the product.
For any questions or assistance, please contact AV Access customer support via email. They are committed to providing a 100% satisfactory solution.


