
1. Introduction
This manual provides detailed instructions for the installation, operation, and maintenance of your HSZJsto ARGB PWM Fan Hub. Please read this manual thoroughly before use to ensure proper functionality and safety. This hub is designed to expand the fan and ARGB lighting control capabilities within your PC case.
2. Product Features
- ARGB PWM 2-in-1 Fan Hub: Each port supports PWM function for synchronized fan speed adjustment and 5V-3PIN ARGB for lighting control.
- Wide Compatibility: Supports up to 9 fans with 4-pin PWM ports and 9 ARGB ports for ARGB fans and LED strips. 4-pin PWM ports are compatible with both 3-pin and 4-pin fans (PWM function requires 4-pin fans).
- Magnetic Back Design: Features a magnetic base for easy and secure placement on the metal surface of your PC case without the need for adhesive tape.
- SATA Power Input: Direct power input from the power supply via SATA ensures stable power delivery for up to 9 fans, preventing stray currents and voltage loss for smooth and efficient operation.
- Easy Setup: Designed for straightforward installation and compatibility with major motherboard brands such as Asus, MSI, Gigabyte, and ASRock.
3. Package Contents
- 1 x HSZJsto ARGB PWM Fan Hub
- 1 x Remote Control
- Connection Cables (SATA power cable, PWM signal cable, ARGB sync cable)

Image: The ARGB PWM Fan Hub, remote control, and various connection cables included in the package.
4. Product Overview
Familiarize yourself with the various interfaces and components of the ARGB PWM Fan Hub.
4.1 Hub Layout

Image: Top view of the fan hub, illustrating the arrangement of 9 PWM (4-pin) and 9 ARGB (3-pin) ports.
4.2 Interface Details

Image: Detailed view of the left interface (RESET, POWERIN, M/B) and right interface (PWM, ARGB, FP) for main connections.

Image: A close-up highlighting the specific port for connecting to the CPU fan or a normal fan, emphasizing its importance for proper operation.
4.3 Motherboard Compatibility
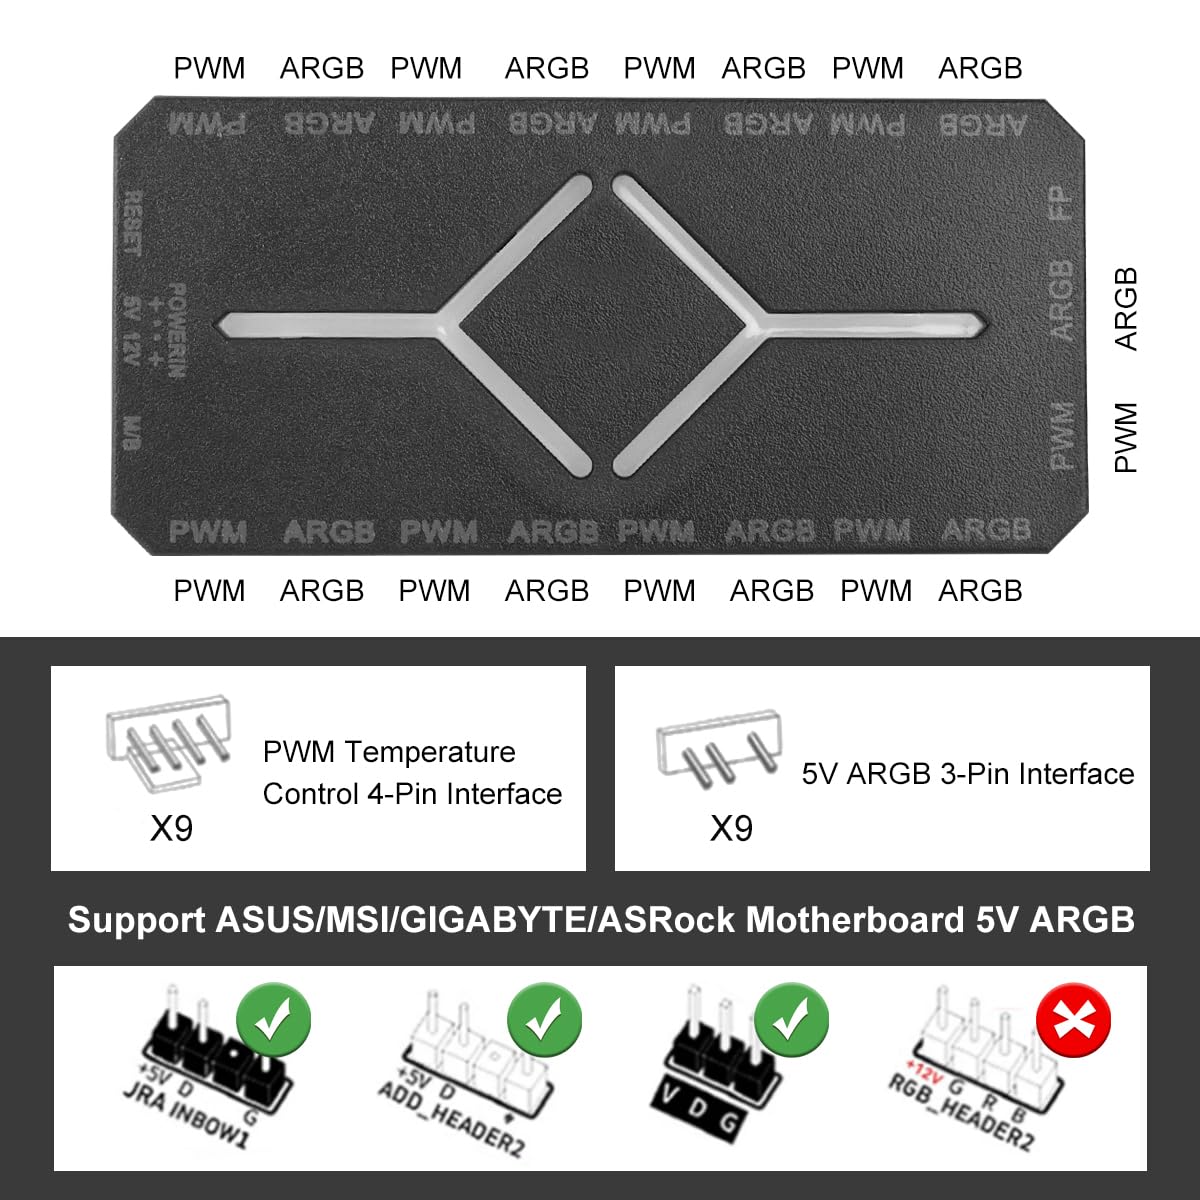
Image: Visual representation of the 9x 4-pin PWM temperature control interfaces and 9x 5V ARGB 3-pin interfaces, along with supported motherboard ARGB headers (ASUS, MSI, GIGABYTE, ASRock).
4.4 Magnetic Mounting

Image: The underside of the hub, illustrating the magnetic bottom for easy installation and showing product dimensions (4.72"L x 2.16"W x 0.75"H).
5. Setup and Installation
Follow these steps to correctly install and connect your ARGB PWM Fan Hub.
- Placement: Position the magnetic fan hub on a metal surface inside your PC case.
- SATA Power Connection: Connect the SATA power cable from the fan hub to an available SATA power connector from your power supply unit (PSU).
- Motherboard PWM Connection: Connect the PWM signal cable from the fan hub's 'M/B' port to a 4-pin CPU_FAN or CHA_FAN header on your motherboard. This allows the motherboard to control fan speeds.
- Motherboard ARGB Connection: Connect the ARGB sync cable from the fan hub to a 5V-3PIN ARGB header on your motherboard (e.g., +5V D G, +5V ADD_HEADER2, VDG). Do not connect to a 12V RGB header, as this will damage the ARGB components.
- Fan Connections: Connect your 4-pin PWM fans to the 'PWM' ports on the hub. Connect your 5V-3PIN ARGB fans or LED strips to the 'ARGB' ports on the hub.
- CPU Cooler Fan: If you have a CPU cooler fan, link its 1st PWM port to the designated red port on the hub for proper CPU temperature-based control.
- Reset/Front Panel Connection (Optional): If desired, connect your case's reset button or front panel ARGB control cable to the 'RESET' or 'FP' ports on the hub for manual control.

Image: A comprehensive diagram illustrating all necessary connections for the ARGB PWM Fan Hub, including SATA power, motherboard sync, and fan/ARGB device connections. Note the warning against incorrect power interface usage.
6. Operating Instructions
The ARGB PWM Fan Hub can be controlled via the included remote or synchronized with your motherboard's ARGB software.
6.1 Remote Control Functions
Use the provided remote control to adjust fan speeds and ARGB lighting effects.

Image: The remote control showing buttons for Power On/Off, Automatic Mode Cycle, Fan Speed adjustment (S+, S-), Static Brightness adjustment (M+, M-), Static Color selection, and RGB sequence adjustment.
- ON/MB SYNC: Toggles between manual remote control and motherboard ARGB synchronization.
- AUTO: Activates automatic lighting mode cycle.
- OFF: Powers off the lighting.
- S+/S-: Adjusts fan speed.
- M+/M-: Adjusts static brightness.
- Static Color Buttons: Selects a specific static color.
- RGB Sequence Adjustment: Double click 10 times to enter adjustment mode. Press red key until red, green key until green. Press OFF key to save.
6.2 Motherboard Synchronization
If connected to a compatible 5V-3PIN ARGB header on your motherboard, you can control the lighting effects using your motherboard's proprietary software (e.g., ASUS Aura Sync, MSI Mystic Light, Gigabyte RGB Fusion, ASRock Polychrome Sync). Ensure the hub is set to MB SYNC mode via the remote or front panel button if applicable.
6.3 Visual Demonstration
Video: A demonstration of the ARGB PWM Fan Hub controlling various RGB lighting effects within a PC case, showcasing color changes and patterns.
7. Maintenance
To ensure the longevity and optimal performance of your ARGB PWM Fan Hub, follow these maintenance guidelines:
- Dust Removal: Periodically open your PC case and gently clean the fan hub and connected components with compressed air to remove dust buildup. Ensure the PC is powered off and unplugged before cleaning.
- Cable Management: Ensure all cables are securely connected and properly routed to prevent accidental disconnections or damage.
- Environmental Conditions: Operate the hub in a dry, well-ventilated environment within recommended temperature ranges to prevent overheating.
8. Troubleshooting
If you encounter issues with your ARGB PWM Fan Hub, refer to the following common problems and solutions:
- Fans or ARGB lights not working:
- Ensure the SATA power cable is securely connected to both the hub and the PSU.
- Verify that the hub's PWM signal cable is correctly connected to a motherboard fan header.
- Check if the ARGB sync cable is connected to a 5V-3PIN ARGB header (not 12V RGB).
- Confirm that individual fans and ARGB devices are properly plugged into the hub.
- If using the remote, ensure it has working batteries and is pointed towards the hub's receiver.
- ARGB lights glitching or displaying incorrect colors:
- Unplug and replug the SATA power cable to the controller to restart it.
- Ensure the hub is in the correct mode (remote control or motherboard sync).
- If using motherboard sync, verify your motherboard software settings.
- Check for loose ARGB connections.
- Fan speed not controllable:
- Ensure 4-pin PWM fans are used for PWM control; 3-pin fans will run at full speed.
- Verify the PWM signal cable is connected to the motherboard and the motherboard's fan control settings are configured.
- If using the remote, ensure it is in manual mode and use the S+/S- buttons.
- Connectors feel loose:
- Gently push connectors firmly into place. While designed for ease of use, ensure they are fully seated.
- Route cables to minimize tension or pulling on the connectors.
9. Specifications
| Feature | Specification |
|---|---|
| Model | FanHub |
| Brand | HSZJsto |
| Product Dimensions | 4.72"L x 4.72"W x 0.75"H |
| Power Connector Type | SATA (Input), 3-Pin (Output) |
| Voltage | 5 Volts (ARGB) |
| Cooling Method | Air (Fan Control) |
| Compatible Devices | Desktop PCs |
| Noise Level | 1 Decibels (Hub itself) |
| Material | Iron |
| Number of PWM Ports | 9 |
| Number of ARGB Ports | 9 |
| Item Weight | 4.2 ounces |
10. Warranty and Support
HSZJsto products are manufactured to high-quality standards. For warranty information, please refer to the purchase platform or contact HSZJsto customer support directly. Keep your proof of purchase for warranty claims.
For technical assistance or further inquiries, please visit the official HSZJsto website or contact their customer service team through the contact information provided with your purchase.