1. Introduction
Thank you for choosing the Villastar Pool Heat Pump, Model YC-020. This electric heat pump is designed to efficiently heat inground and above-ground pools up to 14,000 gallons, ensuring a comfortable swimming experience. This manual provides essential information for the safe installation, operation, and maintenance of your heat pump. Please read it thoroughly before use and retain it for future reference.

Figure 1: Villastar Pool Heat Pump Model YC-020
2. Safety Information
Always observe the following safety precautions to reduce the risk of fire, electric shock, or injury.
- Electrical Safety: Ensure the unit is connected to a properly grounded electrical outlet with the correct voltage (208-230V/60Hz). Do not use extension cords. All electrical work should be performed by a qualified electrician.
- Water and Electricity: Never operate the heat pump if water is present around electrical components. Disconnect power before performing any maintenance or inspection.
- Installation: Install the unit on a stable, level surface, ensuring adequate clearance for airflow. Do not block the air intake or exhaust.
- Children and Pets: Keep children and pets away from the unit during operation.
- Maintenance: Only perform maintenance as described in this manual. For complex repairs, contact qualified service personnel.
- Operating Environment: The unit is designed for outdoor use. Ensure it operates within the specified ambient temperature range (19.4°F to 109.4°F).
3. Product Overview and Components
The Villastar Pool Heat Pump is engineered for efficient pool heating. Understanding its main components will assist in installation and maintenance.
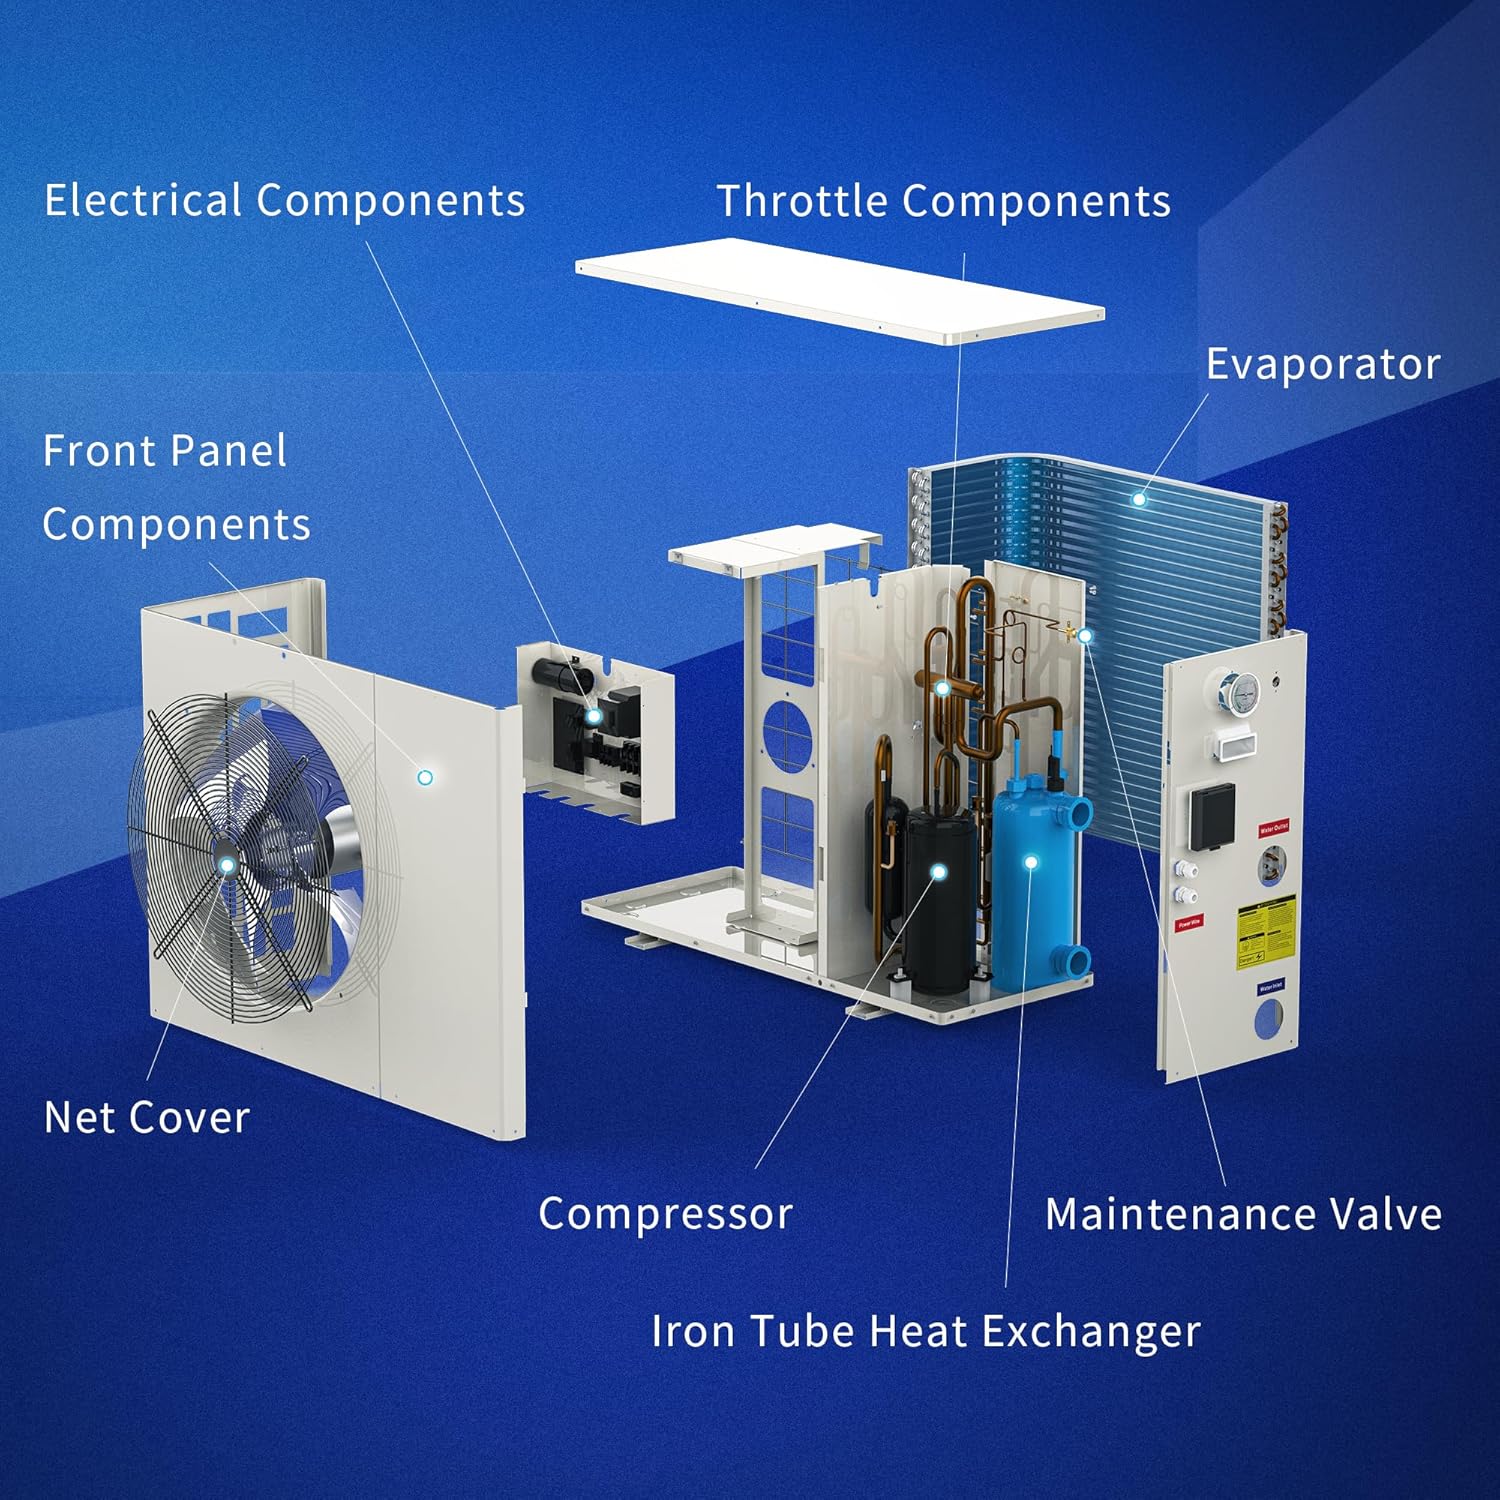
Figure 2: Exploded View of Heat Pump Components
- Compressor: The heart of the heat pump, compressing refrigerant.
- Evaporator: Absorbs heat from the ambient air.
- Spiral Titanium Heat Exchanger: Transfers heat from the refrigerant to the pool water.
- Powerful Ventilation Fan: Draws air across the evaporator coil.
- Electrical Components: Control board and wiring for operation.
- Maintenance Valve: For system servicing.
- Water Inlet/Outlet: Connections for pool water circulation.

Figure 3: Internal Components highlighting Spiral Titanium Heat Exchanger and Fan Motor
4. Specifications
Detailed technical specifications for the Villastar Pool Heat Pump Model YC-020.
| Parameter | Value |
|---|---|
| Model | YC-020 |
| Heating Capacity (80°F Air 80°F Water 63% RH) | 68,000 BTU/h |
| Power Input (80°F Air 80°F Water 63% RH) | 11,752 BTU/h |
| COP (Coefficient of Performance) | 5.67 |
| Heating Capacity (50°F Air 80°F Water 63% RH) | 36,502 BTU/h |
| Power Input (50°F Air 80°F Water 63% RH) | 10,896 BTU/h |
| COP (50°F Air 80°F Water 63% RH) | 3.35 |
| Power Supply | 208-230V/60Hz/1-Phase |
| Max Power Input | 15,354 BTU/h |
| Max Current | 25.5 A |
| Setting Temperature Range (Heating) | 46°F - 104°F |
| Setting Temperature Range (Cooling) | 46°F - 82°F |
| Running (Air) Temperature Range | 19.4°F - 109.4°F |
| Net Dimensions (LxWxH) | 40 x 17 x 32 inches |
| Net Weight | 168 lbs |
| Noise Level | 62 dB(A) |

Figure 4: Dimensions and Key Specifications

Figure 5: Model Selection Guide based on Pool Size and Ambient Temperature
5. Setup and Installation
The Villastar Pool Heat Pump is designed for straightforward installation. While professional installation is not strictly required, it is recommended to ensure proper electrical connections and plumbing.
5.1 Included Accessories
The following items are typically included inside the metal housing of the unit. Use a screwdriver to access.
- Installation & Operation Manual (this document) x1
- Drain-pipe (2m) x1
- Drain-pipe connector x1
- Rubber shock absorber x4
- Heat Pump Unit (with pre-installed pipe connector) x1

Figure 6: Included Accessories and Built-in Power Cable
5.2 Placement
- Choose a well-ventilated outdoor location.
- Ensure sufficient clearance around the unit for proper airflow (refer to local codes and installation diagrams for specific distances).
- Place the unit on a solid, level foundation capable of supporting its weight (168 lbs). The included rubber shock absorbers should be placed under the unit's feet.
5.3 Plumbing Connections
- Connect the pool's filtration system to the heat pump's water inlet and outlet. The unit features a 1.2" (32mm) water pipe connection.
- Ensure all connections are watertight to prevent leaks.
- The heat pump should be installed after the pool filter and before any chemical feeders.
5.4 Electrical Connections
- The unit comes with a built-in 10ft power cable with a USA standard plug.
- Connect the power cable to a dedicated 208-230V/60Hz/1-Phase grounded electrical circuit.
- Ensure the circuit breaker is rated appropriately for the maximum current draw (25.5 A).
- Consult a qualified electrician for all electrical connections to ensure compliance with local codes.
6. Operating Instructions
The Villastar Pool Heat Pump features a simple and intuitive control system.
6.1 Initial Startup
- Ensure all plumbing connections are secure and the pool pump is running, circulating water through the heat pump.
- Connect the heat pump to the power supply.
- The LED display will illuminate, showing the current water temperature.
6.2 Setting Desired Temperature
- Use the control buttons on the LED display to adjust the desired water temperature. The heating range is 46°F to 104°F.
- The unit will automatically start heating the water until the set temperature is reached.
- The heat pump will cycle on and off as needed to maintain the desired temperature.

Figure 7: Key Operational Parts
- LED Display: Shows water temperature and settings.
- Front Air-Out Screen: Where heated air is expelled.
- Upwards/Downwards Cycle Hole: Water connections.
- Cable Waterproof Connector: For secure electrical connection.
- Waterproof Box: Protects electrical components.
7. Maintenance
Regular maintenance ensures optimal performance and longevity of your Villastar Pool Heat Pump.
- Clean Coils: Periodically inspect and clean the evaporator coils to remove dirt, leaves, and debris. A clean coil ensures efficient heat transfer.
- Clear Airflow: Ensure the area around the heat pump is free from obstructions to allow for proper airflow. Trim any vegetation that may impede air circulation.
- Check Water Connections: Regularly inspect all plumbing connections for leaks. Tighten any loose fittings.
- Drainage: Ensure the drain pipe is clear and allows for proper condensation drainage.
- Winterization: In colder climates, follow proper winterization procedures to protect the unit from freezing temperatures. Consult a pool professional if unsure.
- Casing: The robust galvanized steel casing is designed for durability. Clean the exterior with a mild detergent and water as needed.

Figure 8: Durable and Sturdy Construction
8. Troubleshooting
This section provides solutions to common issues you might encounter. For problems not listed here, please contact customer support.
| Problem | Possible Cause | Solution |
|---|---|---|
| Heat pump not turning on. | No power supply; tripped circuit breaker; unit off. | Check power connection; reset circuit breaker; ensure unit is switched on. |
| Insufficient heating or slow heating. | Dirty evaporator coils; low ambient temperature; incorrect temperature setting; insufficient water flow. | Clean coils; verify ambient temperature is within operating range; adjust temperature setting; check pool pump and filter for proper water flow. |
| Unit making unusual noises. | Debris in fan; loose components; refrigerant issue. | Inspect fan for obstructions (power off first!); check for loose screws; if noise persists, contact support. |
| Water leaking from unit. | Condensation (normal); loose plumbing connections. | Condensation is normal and drains from the unit. If it's continuous or excessive, check and tighten all water pipe connections. |
| LED display not working. | Power issue; display malfunction. | Check power supply; if power is present and display is blank, contact customer support. |
9. Warranty and Support
Villastar is committed to providing high-quality products. For warranty information, please refer to the warranty card included with your purchase or visit the official Villastar website.
If you require technical assistance, have questions about installation, operation, or maintenance, or need to report a defect, please contact Villastar customer support.
- Website: Visit the Villastar Store on Amazon
- Email: Refer to your purchase documentation for direct support email.
- Phone: Refer to your purchase documentation for direct support phone number.
When contacting support, please have your product model (YC-020) and purchase date ready.


