
Introduction
Welcome to your Oster LA Press Xpress Steam Iron user manual. This guide provides essential information for the safe and efficient operation, maintenance, and troubleshooting of your new steam iron. Please read this manual thoroughly before first use and keep it for future reference.
Important Safety Instructions
When using electrical appliances, basic safety precautions should always be followed to reduce the risk of fire, electric shock, and injury to persons, including the following:
- Read all instructions before using the iron.
- Use the iron only for its intended use.
- To protect against a risk of electric shock, do not immerse the iron in water or other liquids.
- Always turn the iron OFF before plugging or unplugging from the electrical outlet. Never yank cord to disconnect from outlet; instead, grasp plug and pull to disconnect.
- Do not allow cord to touch hot surfaces. Let iron cool completely before putting away. Loop cord loosely around iron when storing.
- Always disconnect iron from electrical outlet when filling with water or emptying and when not in use.
- Do not operate iron with a damaged cord or if the iron has been dropped or damaged. To avoid the risk of electric shock, do not disassemble the iron; take it to a qualified service person for examination and repair. Incorrect reassembly can cause a risk of electric shock when the iron is used.
- Close supervision is necessary for any appliance being used by or near children. Do not leave iron unattended while connected or on an ironing board.
- Burns can occur from touching hot metal parts, hot water, or steam. Use caution when you turn a steam iron upside down – there may be hot water in the reservoir.
Product Overview
Familiarize yourself with the components of your Oster LA Press Xpress Steam Iron:
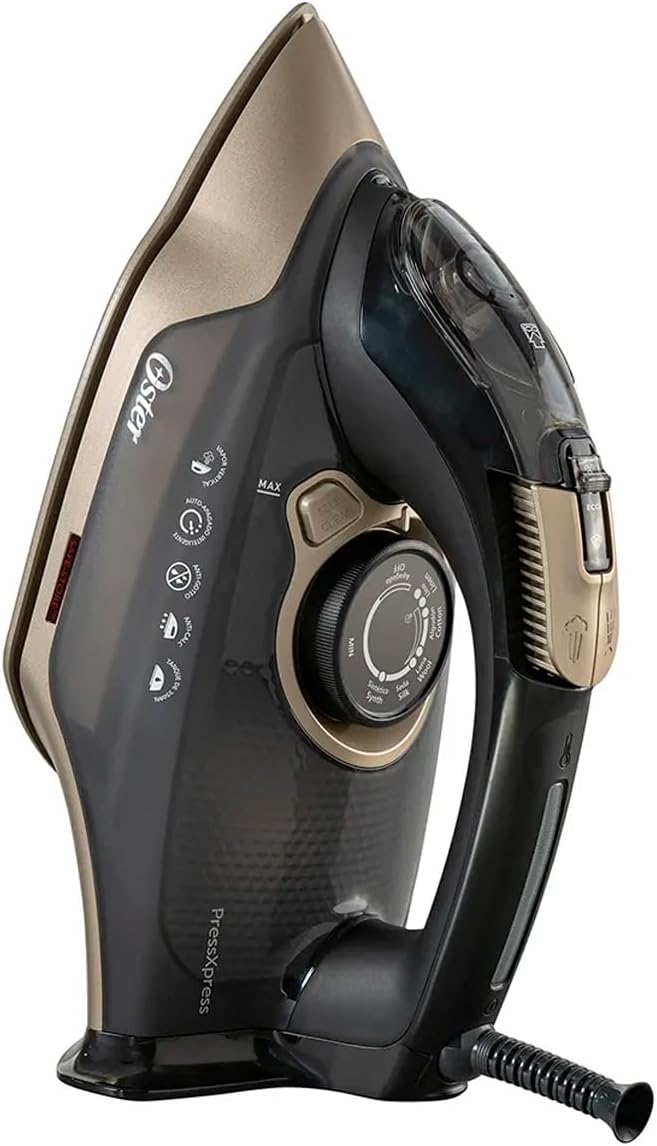
This image displays the Oster LA Press Xpress Steam Iron, highlighting its sleek black and gold design, transparent water tank, temperature dial, and steam controls. Key features visible include the self-clean button and various fabric settings on the dial.
- Water Tank: Transparent reservoir for water.
- Temperature Dial: Used to select the appropriate heat setting for different fabrics.
- Steam Control: Adjusts the amount of steam or enables dry ironing.
- Soleplate: The heated surface that glides over fabrics.
- Spray Nozzle: For misting water onto stubborn wrinkles.
- Self-Clean Button: Initiates the self-cleaning process.
- Power Cord: Connects the iron to the electrical outlet.
Setup
Follow these steps to prepare your iron for first use:
- Unpack the Iron: Carefully remove the iron and all accessories from the packaging. Retain packaging for storage or future transport.
- Initial Cleaning: Before first use, wipe the soleplate with a damp cloth to remove any manufacturing residues.
- Fill Water Tank: Ensure the iron is unplugged. Open the water tank cover and fill the tank with clean tap water up to the MAX fill line. Do not overfill. Close the cover securely.
- Plug In: Plug the power cord into a suitable electrical outlet.
Operating Instructions
Temperature Settings
The temperature dial allows you to select the appropriate heat for various fabric types. Always check the garment's care label before ironing.
- MIN: Lowest heat setting, suitable for delicate fabrics like Synthetics and Silk.
- Wool: Medium heat for wool garments.
- Cotton: High heat for cotton fabrics.
- Linen: Highest heat setting for linen.
- OFF: Turns the iron off.
Allow the iron to heat up for a few minutes until the indicator light turns off, signaling it has reached the selected temperature.
Steam Ironing
Steam ironing is ideal for most fabrics. Ensure the water tank is filled and the temperature dial is set to a steam-compatible setting (typically Wool, Cotton, or Linen). The steam control lever can be adjusted for different steam levels (e.g., ECO for energy saving, MAX for maximum steam).
- Continuous Steam: Move the steam control lever to the desired steam position.
- Vertical Steam: Hold the iron vertically and press the steam shot button for a burst of steam to remove wrinkles from hanging garments.
Dry Ironing
For dry ironing, ensure the water tank is empty or the steam control lever is set to the "no steam" position. Select the desired temperature and iron as usual.
Spray Function
Press the spray button to mist water onto stubborn wrinkles. This function is useful for dampening fabrics before ironing.
Maintenance and Care
Proper maintenance ensures the longevity and performance of your iron.
Cleaning the Soleplate
After the iron has cooled completely, wipe the soleplate with a damp cloth and a mild, non-abrasive cleaner if necessary. Do not use abrasive pads or harsh chemicals.
Descaling (Self-Clean Function)
To prevent mineral buildup and maintain optimal steam performance, use the self-clean function regularly (e.g., once a month or as needed based on water hardness).
- Fill the water tank to the MAX line.
- Set the temperature dial to MAX and plug in the iron.
- Once the iron reaches maximum temperature (indicator light turns off), unplug it.
- Hold the iron horizontally over a sink. Press and hold the Self-Clean button. Hot water and steam will be expelled from the soleplate, flushing out mineral deposits.
- Gently rock the iron back and forth until the water tank is empty.
- Plug the iron back in and let it heat up to dry the soleplate. Unplug and store once cool.
Storage
Always ensure the iron is unplugged and completely cool before storing. Empty any remaining water from the tank. Store the iron upright on its heel rest to prevent soleplate damage.
Troubleshooting
Refer to this table for common issues and their solutions:
| Problem | Possible Cause | Solution |
|---|---|---|
| Iron not heating up. | Not plugged in; power outlet issue; temperature dial set to OFF. | Check power connection; try a different outlet; turn temperature dial to desired setting. |
| Water leaking from soleplate. | Water tank overfilled; temperature too low for steam; iron not hot enough. | Do not overfill; set temperature to a steam-compatible setting (Wool, Cotton, Linen); wait for iron to heat up completely. |
| No steam or insufficient steam. | Water tank empty; temperature too low; steam vents clogged. | Fill water tank; set temperature to a steam-compatible setting; perform self-clean to clear vents. |
| Soleplate sticking or dirty. | Residue buildup; ironing over zippers/buttons. | Clean soleplate with a damp cloth; avoid ironing over sharp objects. |
Specifications
| Feature | Value |
|---|---|
| Brand | Oster |
| Model | LA Press Xpress |
| Item Weight | 2.01 Kilograms |
| Package Dimensions | 33.5 x 19 x 18.5 cm |
| Assembly Required | No |
| Number of Pieces | 1 |
| Batteries Required | No |
| Included Components | Steam Iron |
| ASIN | B0CVYBDGDD |
| Special Feature | Steam Control |
| Color | Black |
| Wattage | 2000W |
| Recommended Uses | Delicate and thick clothing |
Warranty and Support
Your Oster LA Press Xpress Steam Iron comes with a manufacturer's warranty. Please refer to the warranty card included in your product packaging for specific terms and conditions, including warranty period and coverage details.
For technical support, service, or warranty claims, please contact Oster customer service. Contact information can typically be found on the Oster official website or on your product's packaging.
You can also visit the Oster Store on Amazon for more product information and support resources.


