1. Introduction
This manual provides comprehensive instructions for the installation, operation, and maintenance of your Kimpex Premium Heated Grips and Thumbs Kit, model 000418. Designed for ATVs with 22 mm (7/8") handlebars, this kit enhances riding comfort in cold conditions by providing adjustable heat to both the grips and the thumb throttle.
2. Product Features
- Heat Levels: Independent 3+3 heat settings for grips and thumb warmer.
- Mounting Type: Secure clamping ring for easy installation without adhesive.
- Color: Black grips and components.
- Thumb Warmer: Integrated thumb warmer for complete hand warmth.
- Handlebar Compatibility: Designed for 22 mm (7/8") handlebars.
- Voltage: Operates on 12V systems.
- Weather Resistant: Grips are designed to withstand various weather conditions.
- Ergonomic Design: Provides a comfortable and secure grip.
- Sloped Wiring Exit: Wires are molded into the handle with a sloped exit for protection and proper orientation.
3. Package Contents
Verify that all the following components are included in your package:
- Heated Grips (2)
- Thumb Warmer
- Heat Control Switch
- Wiring Harness with Fuse
- Mounting Bracket for Control Switch
- Adhesive Pad (for switch mounting)
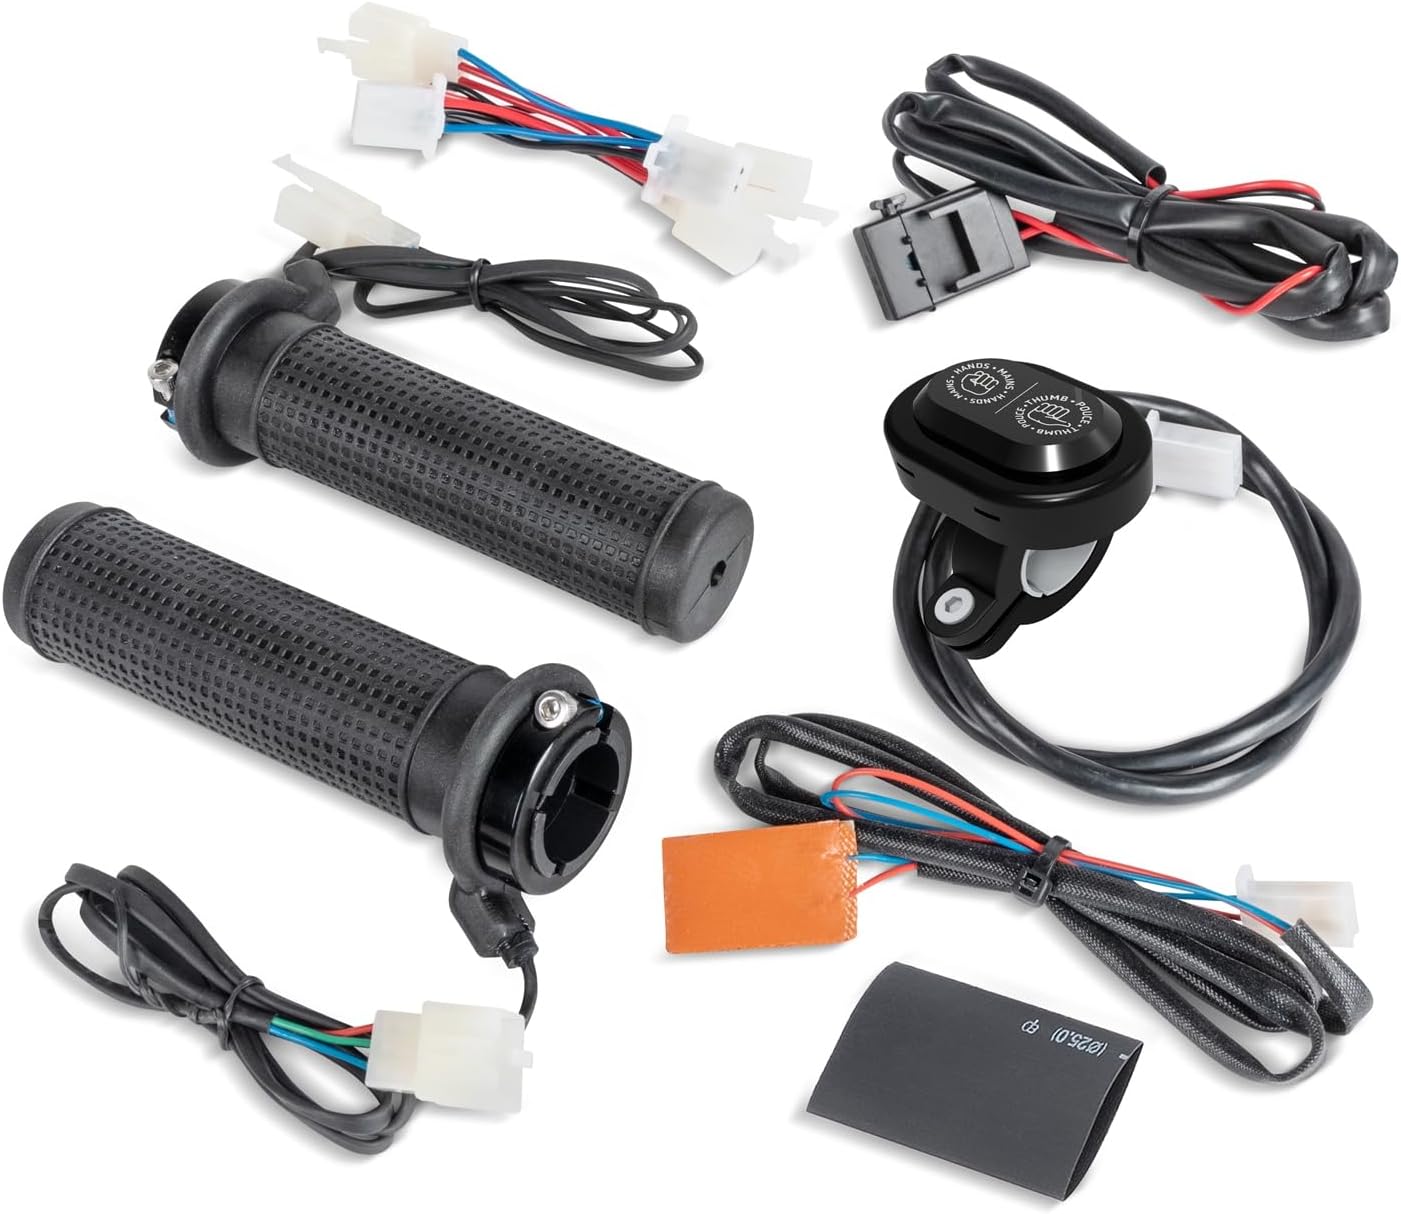
The kit includes two heated grips, a separate thumb warmer, a heat control switch, and the necessary wiring harness with an inline fuse for protection. A mounting bracket and adhesive pad are provided for securing the control switch.

The grips feature a textured surface for improved handling and are designed for easy installation using a clamping ring mechanism, eliminating the need for adhesives. The wiring is integrated into the grips with a sloped exit to prevent damage and ensure proper routing.
4. Setup and Installation
Proper installation is crucial for the safe and effective operation of your heated grips. If you are unsure about any steps, consult a qualified technician.
4.1 Pre-Installation Checks
- Ensure your ATV has a 12V electrical system.
- Verify your handlebars are 22 mm (7/8") in diameter.
- Disconnect the vehicle's battery before beginning installation to prevent electrical shorts.
4.2 Grip Installation
- Carefully remove your existing grips from the handlebars.
- Slide the new heated grips onto the handlebars. The clamping ring design allows for secure fitment without the need for adhesive.
- Ensure the sloped wiring exit is positioned to allow for proper wire routing and protection from pinching or abrasion.
4.3 Thumb Warmer Installation
Attach the thumb warmer to the thumb throttle lever. Ensure it is positioned for optimal contact and comfort.
4.4 Wiring Connections
- Connect the wiring from the heated grips and thumb warmer to the main wiring harness. Ensure all connections are secure and properly insulated.
- Connect the main wiring harness to a 12V power source on your ATV. It is recommended to connect to a switched power source (e.g., ignition switch) to prevent battery drain when the vehicle is off. The harness includes an inline fuse for circuit protection.
- Route all wires away from moving parts, heat sources, and sharp edges to prevent damage. Use zip ties or cable clamps to secure the wiring.
4.5 Control Switch Mounting
The heat control switch can be mounted on the handlebars using the provided bracket or directly onto the vehicle console. No drilling is required for console mounting, as an adhesive pad is supplied.

After all connections are made and secured, reconnect the vehicle's battery.
4.6 Installation Video Guide
For a visual guide on the installation process, please refer to the video below:
Video 4.1: Installation guide for 7/8'' Handlebar Heated Grips. This video demonstrates the connection of the grips, thumb warmer, and control unit to the wiring harness, and the mounting of the control switch.
5. Operating Instructions
The Kimpex Premium Heated Grips and Thumbs Kit features an intuitive control switch for adjusting heat levels.
5.1 Powering On/Off
To power on the heated grips, press and hold the power button on the control switch. Repeat to power off.
5.2 Adjusting Heat Levels
The control switch allows for independent adjustment of heat intensity for the grips and the thumb warmer. There are three heat levels for each, indicated by different colors or illumination patterns on the switch.
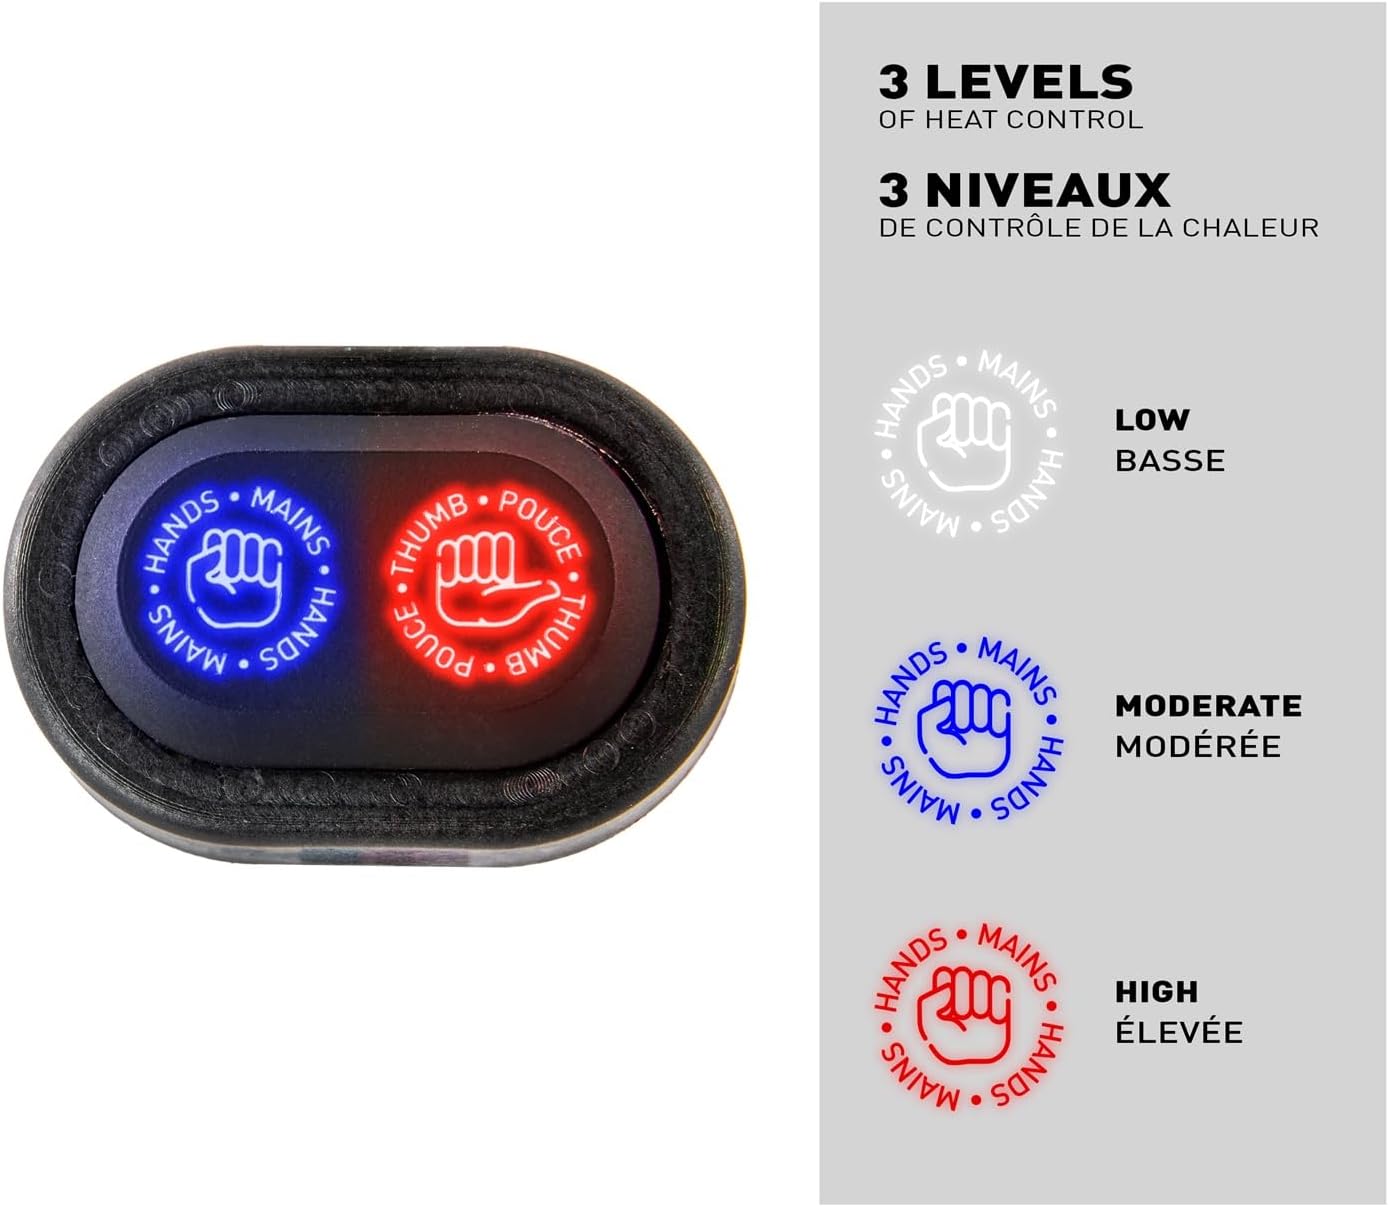
- Low Heat: Indicated by a specific light color (e.g., white).
- Moderate Heat: Indicated by a specific light color (e.g., blue).
- High Heat: Indicated by a specific light color (e.g., red).
Press the respective button (hands or thumb) repeatedly to cycle through the heat settings until your desired level is reached.
5.3 Important Considerations
- Avoid prolonged use on the highest setting if it causes discomfort.
- Monitor your vehicle's battery voltage during extended use, especially at higher heat settings, to prevent battery drain.
6. Maintenance
Regular maintenance ensures the longevity and optimal performance of your heated grips.
- Cleaning: Clean the grips and control switch with a damp cloth and mild soap. Avoid harsh chemicals or abrasive cleaners.
- Wiring Inspection: Periodically inspect all wiring for signs of wear, fraying, or damage. Ensure all connections remain secure.
- Fuse Check: If the grips stop working, check the inline fuse in the wiring harness. Replace with a fuse of the same rating if blown.
- Storage: If storing the vehicle for an extended period, ensure the heated grips are turned off and consider disconnecting the battery.
7. Troubleshooting
| Problem | Possible Cause | Solution |
|---|---|---|
| Grips do not heat up. | No power supply; Blown fuse; Loose wiring connection; Faulty component. | Check battery connection and voltage. Inspect and replace the inline fuse if necessary. Verify all wiring connections are secure. If problem persists, contact support. |
| Grips are too hot or not hot enough. | Incorrect heat setting. | Adjust the heat level using the control switch. |
| Control switch not responding. | No power to switch; Faulty switch. | Ensure the vehicle's ignition is on if connected to a switched power source. Check wiring to the switch. |
| Battery drains quickly. | Grips left on when vehicle is off; High heat setting used excessively. | Ensure grips are turned off when not in use. Consider connecting to a switched power source. Reduce heat setting if possible. |
8. Specifications
- Brand:
- Kimpex
- Model:
- Premium Heated Grips and Thumbs Kit
- Item Model Number:
- 000418
- Handlebar Compatibility:
- 22 mm (7/8")
- Voltage:
- 12 V
- Heat Levels:
- 3+3 (independent for grips and thumb)
- Mounting Type:
- Clamping ring
- Color:
- Black
- Item Weight:
- 14.4 ounces
- Product Dimensions:
- 7.76 x 6.3 x 2.56 inches
9. Warranty and Support
For specific warranty information and customer support regarding your Kimpex Premium Heated Grips and Thumbs Kit, please refer to the documentation included with your purchase or contact Kimpex directly through their official website or customer service channels.