1. Introduction
Thank you for purchasing the ulafbwur 8082T Digital Desk Clock. This device combines a digital clock with a weather forecast station, perpetual calendar, and displays humidity and temperature. Its LED color screen provides clear readability. This manual provides detailed instructions for setup, operation, and maintenance to ensure optimal performance and longevity of your device.
2. Safety Information
- Do not expose the device to extreme temperatures, direct sunlight, or high humidity.
- Avoid dropping or subjecting the device to strong impacts.
- Do not attempt to disassemble or repair the device yourself. Refer all servicing to qualified personnel.
- Use only the specified power source (USB cable or AA batteries).
- Keep out of reach of children.
- Dispose of batteries according to local regulations.
3. Package Contents
Please check the package contents upon opening:
- 1 x ulafbwur 8082T Digital Desk Clock
- 1 x USB Cable
- 1 x User Manual (this document)
Note: AA batteries are not included and must be purchased separately.
4. Product Overview
The ulafbwur 8082T Digital Desk Clock features a comprehensive display and intuitive controls.
4.1 Front Display
The LED color screen displays time, date, day of the week, weather forecast icon, indoor temperature, and humidity.
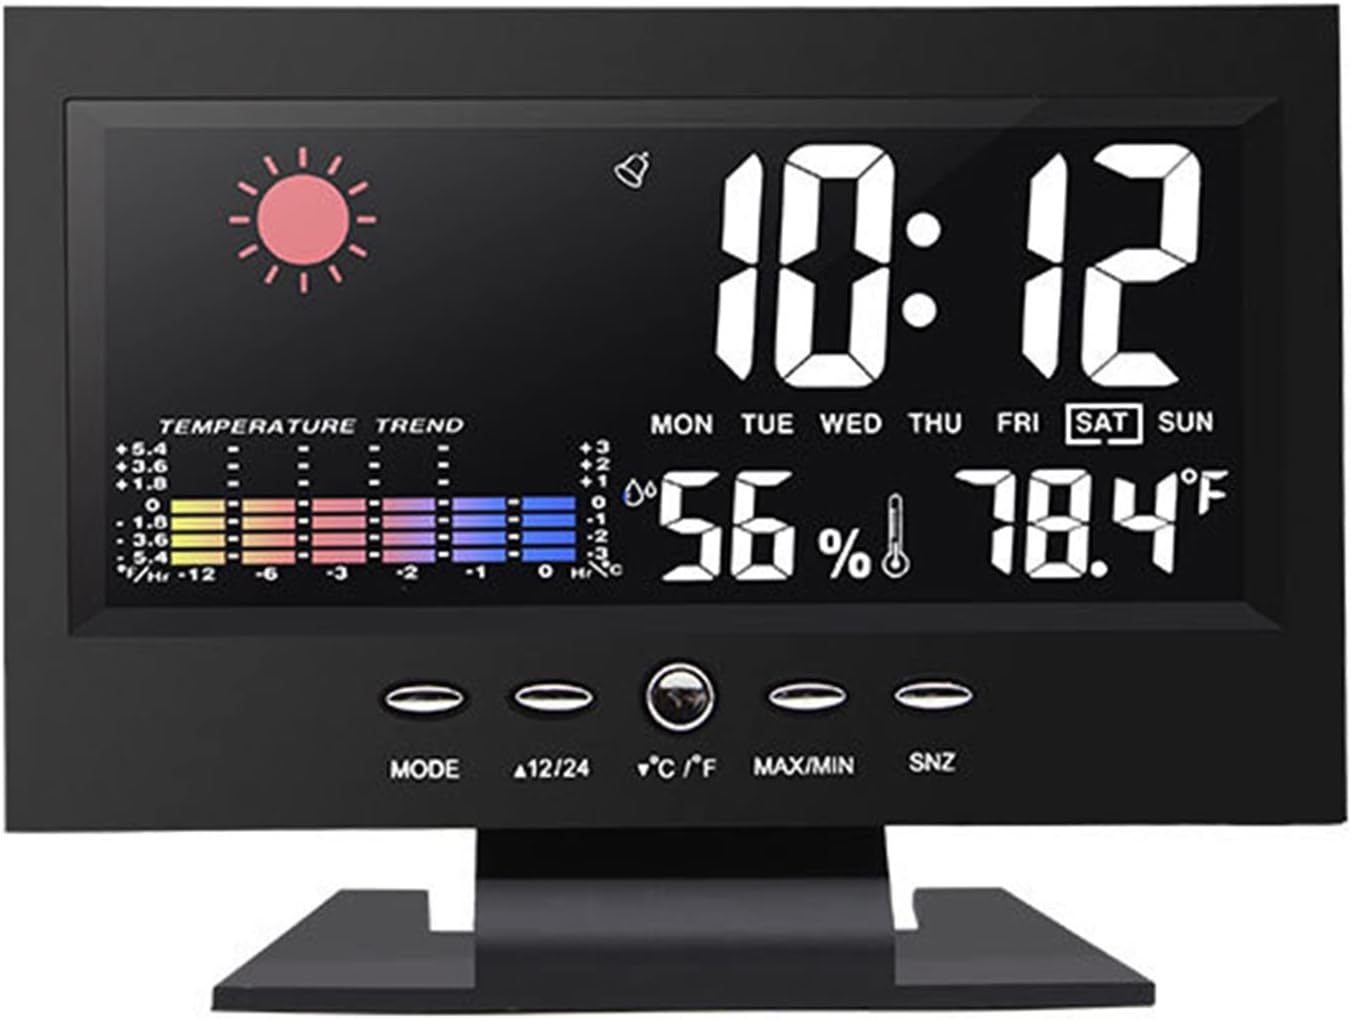
Figure 1: Front view of the ulafbwur 8082T Digital Desk Clock, showing time, date, weather, temperature, and humidity.
4.2 Control Buttons
The clock features several control buttons located below the display for easy adjustment:
- MODE: Used to switch between display modes and enter setting modes.
- 12/24: Toggles between 12-hour and 24-hour time formats.
- °C/°F: Switches temperature display between Celsius and Fahrenheit.
- MAX/MIN: Displays maximum and minimum temperature/humidity records.
- SNZ (Snooze): Activates the snooze function during an alarm.
4.3 Rear Panel
The rear panel houses the battery compartment and power input.

Figure 2: Rear view of the clock, illustrating the battery compartment for two AA batteries and the DC 4.5V power input.
5. Setup
5.1 Powering the Device
The clock can be powered by either the included USB cable or two AA batteries (not included).
- Using USB Power: Connect the provided USB cable to the DC 4.5V port on the back of the clock and plug the other end into a compatible USB power adapter (not included) or a USB port. The backlight will remain on when powered by USB.
- Using Batteries: Open the battery compartment on the back of the clock. Insert two AA batteries, ensuring correct polarity (+/-). Close the compartment. Note: When powered by batteries, the backlight will not remain continuously on to conserve power. It will illuminate briefly when a button is pressed.
5.2 Initial Settings
Upon first power-up, the clock may display default settings. Follow the operating instructions to set the correct time, date, and other preferences.
6. Operating Instructions
6.1 Setting Time and Date
- Press and hold the MODE button for approximately 3 seconds to enter time setting mode. The year display will start flashing.
- Use the 12/24 or °C/°F buttons to adjust the flashing value (e.g., year).
- Press MODE again to confirm the setting and move to the next item (month, day, hour, minute).
- Repeat steps 2 and 3 until all time and date settings are complete.
- Press MODE one last time or wait for 15 seconds for the clock to exit setting mode automatically.
6.2 Setting the Alarm
- From normal time display, press the MODE button once to display the alarm time.
- Press and hold the MODE button for approximately 3 seconds. The alarm hour will start flashing.
- Use the 12/24 or °C/°F buttons to adjust the alarm hour.
- Press MODE again to confirm and move to the alarm minute. Adjust using 12/24 or °C/°F.
- Press MODE again to confirm and exit alarm setting mode.
- To activate/deactivate the alarm, press the 12/24 button while the alarm time is displayed. An alarm icon will appear/disappear on the screen.
6.3 Snooze Function
When the alarm sounds, press the SNZ button to activate the snooze function. The alarm will temporarily stop and sound again after a few minutes (default snooze duration is typically 5 minutes, but may vary). To turn off the alarm completely, press any other button.
6.4 12/24 Hour Format Selection
In normal time display mode, press the 12/24 button to toggle between 12-hour (with AM/PM indicator) and 24-hour time formats.
6.5 Celsius/Fahrenheit Selection
In normal display mode, press the °C/°F button to switch the temperature display between Celsius and Fahrenheit.
6.6 MAX/MIN Temperature and Humidity Records
Press the MAX/MIN button to view the maximum recorded temperature and humidity. Press it again to view the minimum recorded temperature and humidity. Press a third time to return to the current display. The records are typically reset daily or when the device is reset.

Figure 3: Detailed view of the color screen display, highlighting temperature and humidity readings.
7. Maintenance
- Cleaning: Wipe the clock's surface with a soft, dry cloth. Do not use abrasive cleaners or solvents.
- Battery Replacement: If using batteries, replace them when the display dims or functions become erratic. Ensure correct polarity.
- Storage: If storing the clock for an extended period, remove the batteries to prevent leakage.
8. Troubleshooting
| Problem | Possible Cause | Solution |
|---|---|---|
| Display is blank or dim. | No power, low batteries, or USB cable not connected. | Ensure USB cable is securely connected or replace AA batteries. Note: Backlight is not continuous on battery power. |
| Time/Date is incorrect. | Not set correctly after power-up or power interruption. | Follow "Setting Time and Date" instructions in Section 6.1. |
| Alarm does not sound. | Alarm is not activated or volume is too low (if adjustable). | Ensure the alarm icon is displayed. Re-check alarm time settings. |
| Inaccurate temperature/humidity. | Device placed near heat sources, vents, or in direct sunlight. | Relocate the clock to a stable environment away from extreme conditions. Allow time for readings to stabilize. |
9. Specifications
- Model: 8082T
- Material: ABS
- Display Type: LED Color Screen
- Time Format: 12/24 Hour Switchable
- Date Range: 2002-2099 (Perpetual Calendar)
- Temperature Range: 0°C to 50°C (32°F to 122°F)
- Power Source: 2 x AA Batteries (not included) or USB Cable (DC 4.5V)
- Product Dimensions: Approximately 14.5cm x 11cm x 5.5cm (5.71" x 4.33" x 2.17")

Figure 4: Product dimensions of the ulafbwur 8082T Digital Desk Clock.
10. Warranty and Support
This product comes with a standard manufacturer's warranty. For specific warranty details, please refer to the documentation provided at the time of purchase or contact your retailer. For technical support or inquiries, please reach out to the ulafbwur customer service department through your purchase platform.