Introduction
This manual provides essential information for the safe and efficient operation, maintenance, and troubleshooting of your CREWORKS 1100W Mini Metal Lathe. Please read this manual thoroughly before operating the machine to ensure proper usage and to prevent injury or damage.
The CREWORKS mini metal lathe is a robust machine designed for precision metalworking tasks. It features an 1100W motor, a 220mm swing over bed, and a 750mm distance between centers, making it suitable for small to medium-sized projects. The machine includes a high-precision 3-jaw chuck, a digital display for real-time speed monitoring, and a 4-way tool post, offering comprehensive control for turning, cutting, drilling, and threading operations on various materials.
Safety Instructions
Always prioritize safety when operating machinery. Failure to follow these safety guidelines can result in serious injury or damage to the equipment.
- Read the entire manual: Understand all instructions and warnings before use.
- Wear appropriate personal protective equipment (PPE): Always wear safety glasses or a face shield. Hearing protection is recommended. Avoid loose clothing, jewelry, and long hair that can get caught in moving parts.
- Ensure a safe work environment: Keep the work area clean, well-lit, and free from obstructions. Do not operate the lathe in damp or wet conditions.
- Secure the workpiece: Always ensure the workpiece is securely clamped in the chuck or between centers before starting the machine.
- Use sharp tools: Dull tools can cause kickback and are less efficient.
- Never leave the machine unattended: Turn off and unplug the machine when not in use or when changing tools.
- Avoid reaching over moving parts: Keep hands clear of the chuck, workpiece, and cutting tools during operation.
- Emergency Stop: Familiarize yourself with the location and operation of the emergency stop button.
- Electrical Safety: Ensure the machine is properly grounded. Do not operate with damaged cords or plugs.
Setup
Proper setup is crucial for the performance and safety of your lathe. The machine is heavy (75 kg), so ensure you have adequate assistance for placement.
- Unpacking: Carefully remove the lathe and all accessories from the packaging. Retain packaging for future transport if needed.
- Cleaning: The lathe is coated with a protective anti-corrosion oil. Thoroughly clean all surfaces, especially the bedways, chuck, and moving parts, using a suitable degreaser.
- Placement: Position the lathe on a sturdy, level workbench or stand capable of supporting its weight. Ensure there is sufficient space around the machine for safe operation and material handling.
- Leveling: Use a spirit level to ensure the lathe bed is perfectly level. Adjust the machine's feet or use shims if necessary. Proper leveling prevents inaccuracies in machining.
- Electrical Connection: Connect the lathe to a grounded power outlet (AC power source). Verify that the voltage matches the machine's requirements (220V).
- Initial Lubrication: Apply a thin layer of machine oil to all moving parts, including the lead screw, cross slide, and compound slide.
- Chuck Installation: If the chuck is not pre-installed, attach it securely to the spindle flange using the provided bolts. Ensure it is centered and tightened properly.
- Tool Post Setup: Install the 4-way tool post. Select and install appropriate cutting tools, ensuring they are correctly aligned with the workpiece center height.

Image: An overview of the CREWORKS Mini Metal Lathe, showcasing its compact design and various applications such as metalworking, drilling, internal and external threading, polishing, gyroscope processing, woodworking, screw turning, and slot turning. This image provides a general view of the machine for initial setup reference.
Operating Instructions
This section covers the basic operation of your CREWORKS Mini Metal Lathe for common tasks such as turning, drilling, and threading.
1. Basic Turning Operations
- Workpiece Mounting: Securely clamp the workpiece in the 3-jaw chuck. Ensure it is concentric and held firmly. For longer workpieces, use the tailstock for support.
- Tool Selection and Setup: Choose the appropriate cutting tool for the operation (e.g., turning, facing). Mount it in the 4-way tool post and adjust its height so the cutting edge is exactly on the center line of the workpiece.
- Speed Adjustment: Use the digital display and control knob to set the desired spindle speed (0-3000 rpm). Refer to material-specific speed charts for optimal results.
- Engage Power: Turn on the main power switch. The digital display will show the current RPM.
- Feed Control: Use the handwheels for the cross slide and compound slide to manually feed the tool into the workpiece. For automatic feeding, engage the lead screw.
- Cutting: Begin cutting with light passes, gradually increasing depth as needed. Apply cutting fluid if required for the material.
- Monitoring: Continuously monitor the cutting process, chip formation, and surface finish. Adjust speed and feed as necessary.
- Stopping: Disengage the feed, retract the tool, and turn off the spindle motor.

Image: The digital display for speed control, showing the real-time RPM. This feature allows for precise and stepless adjustment of the spindle speed up to 3000 rpm.

Image: Close-up of the precision handwheels for the bed slide, cross slide, compound slide, and tailstock feed. These handwheels provide granular control for accurate machining operations, with clear markings and display.

Image: The adaptable 3-jaw chuck, illustrating its internal and external clamping ranges (Internal Jaws: A-A1 2.5-40 mm, B-B1 38-125 mm; External Jaws: C-C1 38-110 mm). This chuck is designed for high precision and versatility.
2. Threading Operations
The lathe supports both metric (0.5-3 mm) and imperial (8-44 TPI) threading.
- Gear Setup: Consult the threading chart on the machine or in the manual to select and install the correct change gears for the desired thread pitch.
- Tool Selection: Use a sharp, correctly ground threading tool.
- Engage Lead Screw: Engage the lead screw for automatic feed. Do not disengage until the threading pass is complete.
- Cutting Passes: Take multiple light passes, retracting the tool at the end of each pass and returning the carriage to the start position before re-engaging for the next pass.
- Thread Depth: Use the compound slide to feed the tool at an angle (typically 29 or 30 degrees) to ensure proper chip formation and thread profile.
Maintenance
Regular maintenance ensures the longevity and accuracy of your CREWORKS Mini Metal Lathe.
- Daily Cleaning: After each use, clean the machine thoroughly. Remove all chips, dust, and debris from the bedways, lead screw, and other moving parts.
- Lubrication: Regularly lubricate all sliding surfaces (bedways, cross slide, compound slide) and lead screws with appropriate machine oil. Check and replenish gearbox oil if applicable.
- Chuck Maintenance: Keep the chuck jaws clean and lubricated. Periodically remove the chuck for thorough cleaning and inspection.
- Tool Inspection: Inspect cutting tools for sharpness and damage. Replace or regrind dull tools.
- Belt Tension: Check the drive belt tension periodically. Adjust if too loose or too tight.
- Electrical Inspection: Periodically inspect the power cord and plug for any signs of damage.
- Storage: When not in use for extended periods, cover the lathe to protect it from dust and moisture. Apply a thin layer of rust preventative to exposed metal surfaces.
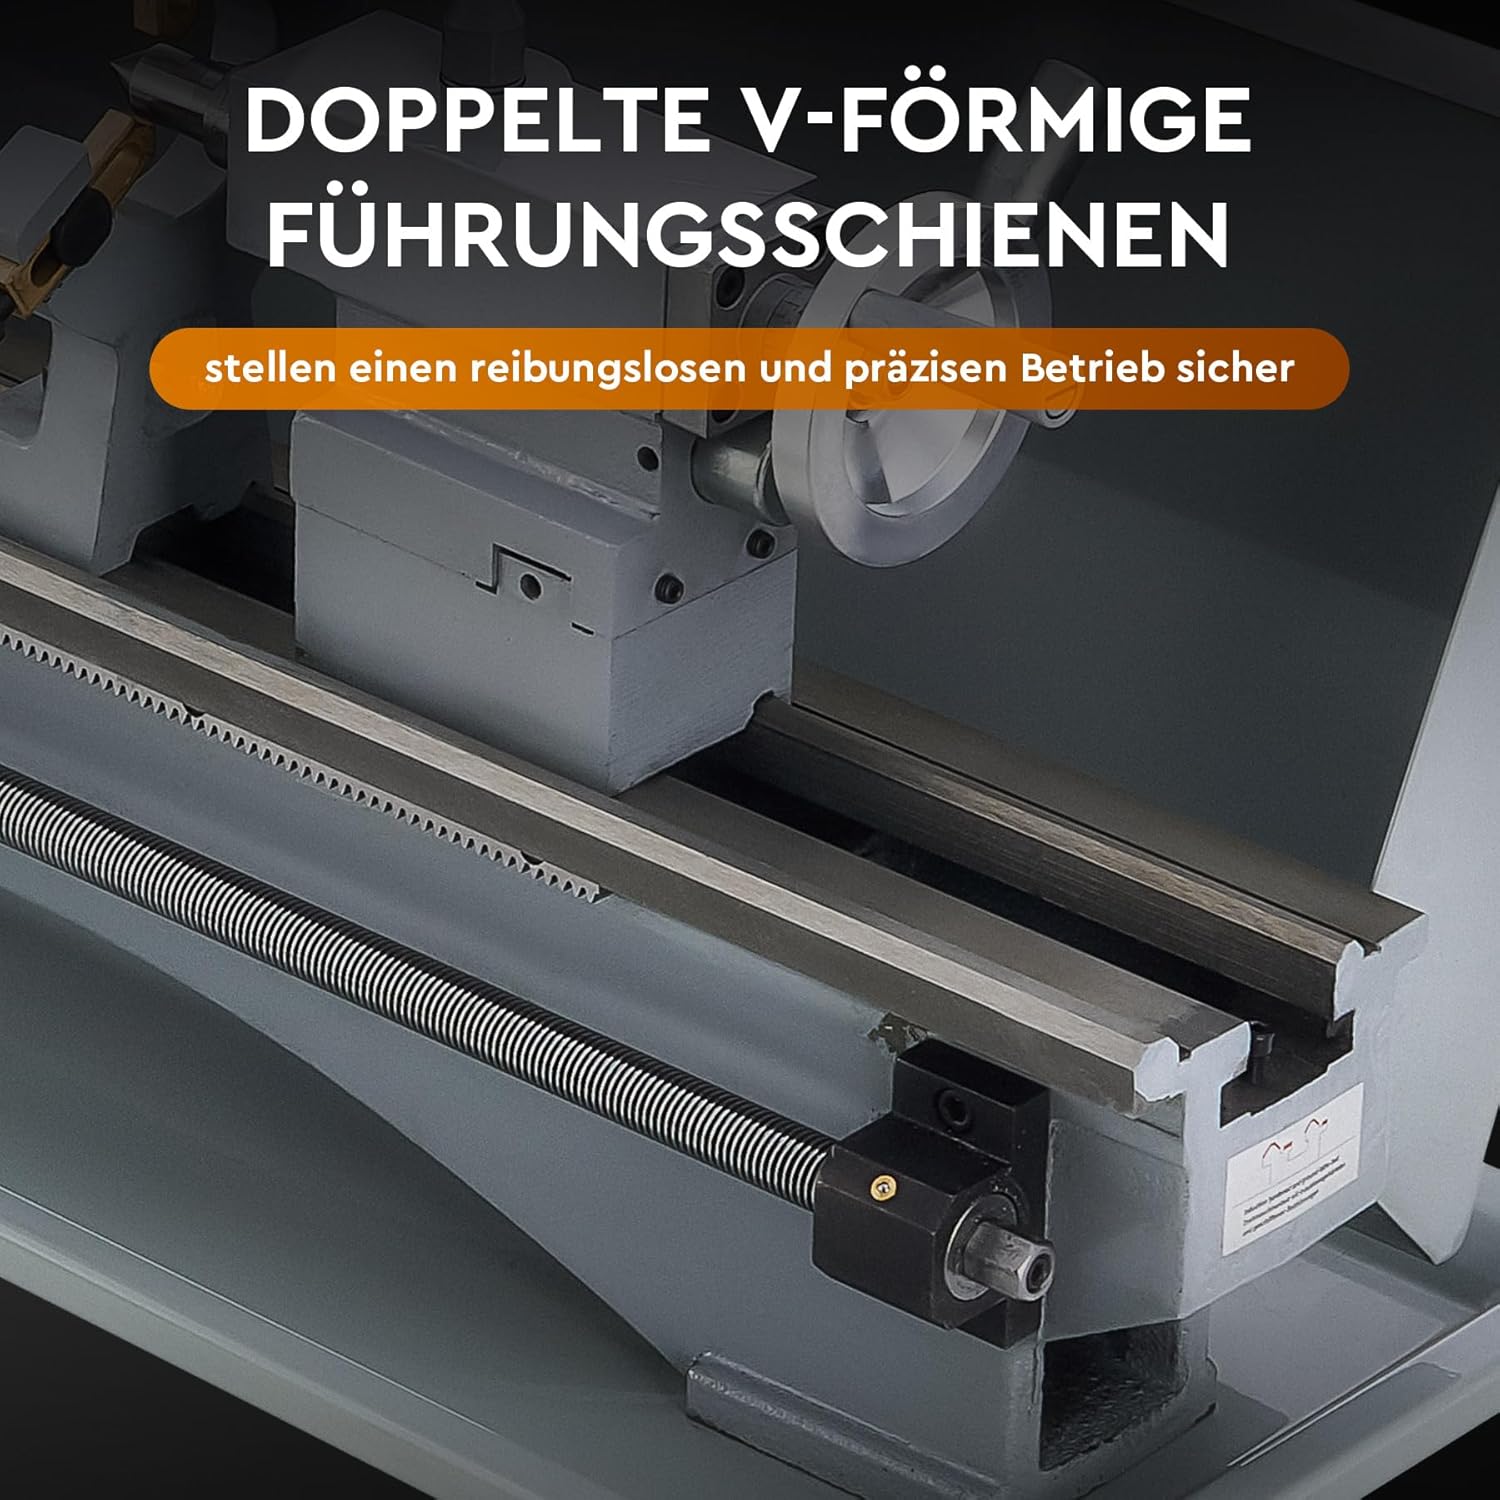
Image: A view of the double V-shaped guide rails, which are critical for smooth and precise movement of the carriage. Regular cleaning and lubrication of these rails are essential for maintaining accuracy.

Image: The durable metal gear set, designed for wear-resistant and efficient power transmission. Inspect these gears periodically for wear and ensure they are properly lubricated.
Troubleshooting
This section provides solutions to common issues you might encounter with your lathe. For problems not listed here, contact customer support.
| Problem | Possible Cause | Solution |
|---|---|---|
| Lathe does not start | No power supply; Emergency stop engaged; Faulty switch. | Check power connection; Release emergency stop; Inspect switches. |
| Excessive vibration | Unbalanced workpiece; Loose mounting; Dull tool; Incorrect speed. | Balance workpiece; Tighten mounting bolts; Sharpen/replace tool; Adjust speed. |
| Poor surface finish | Dull tool; Incorrect speed/feed; Excessive depth of cut; Machine not rigid. | Sharpen tool; Adjust speed/feed; Reduce depth of cut; Check machine leveling and mounting. |
| Tool chatter | Tool overhang too long; Loose tool post; Incorrect tool height; Workpiece not rigid. | Reduce tool overhang; Tighten tool post; Adjust tool height; Ensure workpiece is securely held. |
| Inaccurate cuts | Machine not level; Worn lead screw/nuts; Play in slides; Tailstock misalignment. | Level the machine; Inspect and replace worn parts; Adjust gibs for slides; Align tailstock. |
Specifications
Detailed technical specifications for the CREWORKS 1100W Mini Metal Lathe.
- Material: Cast Iron, Stainless Steel, ABS
- Rated Power: 1100W
- Motor Type: Brushed
- Spindle Bore: 38 mm
- Swing Over Bed: 220 mm
- Tailstock Taper: MK#2
- Spindle Taper: MK#5
- Metric Thread Range: 0.5-3 mm
- Imperial Thread Range: 8-44 TPI
- Distance Between Centers: 750 mm
- Chuck Diameter: 125 mm (5 inch)
- Max. Spindle Speed: 3000 rpm
- Product Dimensions: 111 x 43 x 34.5 cm (43.7 x 16.9 x 13.6 inches)
- Net Weight: 75 kg (165 lbs)
- Model Number: MLML

Image: A diagram illustrating the key dimensions and technical specifications of the CREWORKS Mini Metal Lathe, including its overall size (111 x 43 x 34.5 cm) and net weight (75 kg).
Package Contents
The following items are included with your CREWORKS Mini Metal Lathe:
- 1x Mini Lathe
- 1x Chuck Wrench
- 3x Chuck Jaws (set)
- 2x Screwdrivers
- 3x Wrenches
- 6x Metal Gears (change gears)
- 1x Steady Rest
- 1x Follow Rest
- 1x Cutting Oil Bottle (empty)
- 5x Hex Keys
- 1x Dead Center
- 3x Slide Levers
- 5x Brazed Carbide Tools
- 1x Tool Bag
- 1x User Manual
Warranty and Support
CREWORKS products are manufactured to high-quality standards. For warranty information, technical support, or service inquiries, please refer to the warranty card included with your product or contact your retailer. Keep your purchase receipt as proof of purchase.
For further assistance, you may visit the official CREWORKS brand store: CREWORKS Store on Amazon.


