
1. Introduction
Thank you for choosing the K&F Concept Wireless Outdoor 2K Panning Security Camera GW50.0035. This manual provides essential information for the proper installation, operation, and maintenance of your security camera. Please read this manual thoroughly before use and retain it for future reference.
1.1 Package Contents
Verify that all items are present and in good condition upon opening the package. If any items are missing or damaged, please contact customer support.
- 1 x K&F Security Camera (Model KF50.001)
- 1 x Solar Panel with 2.9m Micro USB Charging Cable
- 1 x 1.5m Micro USB Charging Cable (USB Charger not included)
- 1 x Screws & Mounting Kit for Camera and Solar Panel
- 1 x User Manual (this document)
2. Important Safety Information
Please observe the following safety precautions to prevent damage to the product or injury to yourself and others:
- Do not disassemble or modify the camera or solar panel. Unauthorized modifications may void the warranty and pose safety risks.
- Ensure the camera is installed securely to prevent it from falling.
- Keep the camera away from extreme temperatures, direct sunlight for prolonged periods (if not intended for solar charging), and excessive moisture.
- Use only the provided charging cables or compatible DC 5V 2A USB power adapters.
- Avoid placing the camera near strong magnetic fields or sources of electrical interference.
- Dispose of the product and its battery responsibly according to local regulations.
3. Product Overview
The K&F Concept GW50.0035 is a wireless outdoor security camera designed for comprehensive surveillance. It features a motorized pan-tilt function, solar charging capability, and advanced night vision.
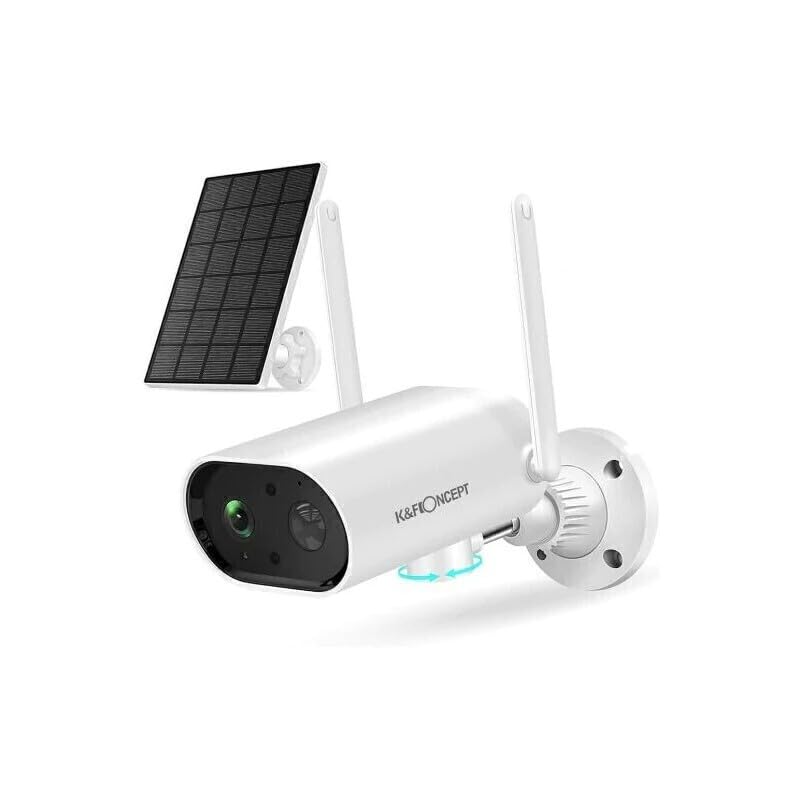
Figure 3.1: K&F Concept Wireless Outdoor Security Camera GW50.0035 with its accompanying solar panel. The camera features a white casing, a lens, and an antenna, while the solar panel is a compact black rectangle designed for outdoor power.
3.1 Key Features
- 100% Cable-Free Setup: Utilizes Wi-Fi for data and a solar panel for power, eliminating the need for power and data cables.
- Solar Powered: Includes a compact solar panel (12 x 17.5cm) with a 2.9m Micro-USB cable to charge the built-in 14400mAh battery.
- Long Battery Life: Internal battery lasts approximately 300 days on a full charge (based on 10 wake-ups/day, 15 seconds each).
- 2K Resolution (1920x1080): High-definition video capture with a 2MP progressive scan CMOS sensor.
- Motorized Pan-Tilt-Zoom (PTZ): Remotely control horizontal pan (0-336°) and vertical tilt (0-108°) via the CloudEdge App. Digital zoom available.
- Advanced Night Vision: Equipped with two 850nm infrared LED lights for clear night vision up to 8 meters.
- Two-Way Audio: Built-in microphone and speaker for real-time communication.
- Motion Detection: PIR sensor with adjustable sensitivity up to 10m to minimize false alerts.
- Local Storage: Supports MicroSD cards up to 128GB for recorded footage (approximately 300 hours in SD setting). Cloud storage option available via the app.
- Weatherproof Design: IP66 rated for outdoor use, resistant to dust and water.
- Wi-Fi Connectivity: Supports 2.4GHz Wi-Fi networks.
4. Setup Guide
4.1 Initial Charging
Before initial use, it is recommended to fully charge the camera's internal battery using the provided Micro USB cable and a DC 5V 2A USB power adapter (not included). This ensures optimal performance from the start. The solar panel will maintain the charge once installed.
4.2 CloudEdge App Installation
The camera operates via the CloudEdge mobile application. Follow these steps to install and set up the app:
- Download the "CloudEdge" app from your device's app store (App Store for iOS or Google Play Store for Android).
- Open the app and register for a new account or log in if you already have one.
- Follow the on-screen prompts to add a new device. Select the appropriate camera type.
4.3 Wi-Fi Connection
Ensure your camera is within range of a stable 2.4GHz Wi-Fi network. The camera does not support 5GHz Wi-Fi.
- Power on the camera. It will enter pairing mode (indicated by a flashing LED, refer to app instructions for specific indicator).
- In the CloudEdge app, select "Add Device" and follow the instructions to connect the camera to your Wi-Fi network. This typically involves scanning a QR code displayed on your phone with the camera's lens.
- Once connected, the camera's LED indicator will change (refer to app for specific status).
4.4 MicroSD Card Installation (Optional)
To enable local video recording, install a MicroSD card (up to 128GB, not included) into the camera's designated slot. Ensure the camera is powered off before inserting or removing the card.
4.5 Mounting the Camera and Solar Panel
Choose a suitable location for installation, considering Wi-Fi signal strength and solar panel exposure.
- Camera Placement: Mount the camera at a height that provides optimal viewing coverage. Use the provided screws and wall plugs to secure the camera bracket to a wall or other stable surface.
- Solar Panel Placement: The solar panel should be mounted in a location that receives maximum direct sunlight throughout the day. The 2.9m cable allows for flexible placement, even on an adjacent wall or roof, independent of the camera's position.
- Connect Solar Panel: Plug the Micro USB cable from the solar panel into the camera's charging port.
- Adjust Angle: Once mounted, adjust the camera's physical angle if necessary, and then use the app for fine-tuning with the PTZ function.
5. Operating Instructions
This section details the primary functions and controls available through the CloudEdge app.
5.1 Live View and PTZ Control
- Open the CloudEdge app and select your camera from the device list to access the live video feed.
- Use the on-screen joystick or directional controls within the app to pan (horizontal 0-336°) and tilt (vertical 0-108°) the camera lens.
- Pinch the screen to digitally zoom in or out on the live feed.
- Switch between Standard Definition (SD) and High Definition (HD) video quality as needed for bandwidth optimization or clearer viewing.
5.2 Two-Way Audio
To use the two-way intercom function:
- While in live view, press and hold the microphone icon in the app to speak. Release to listen.
- Ensure your phone's microphone is enabled for the CloudEdge app.
5.3 Motion Detection and Alerts
- Access the camera settings in the CloudEdge app to configure motion detection.
- Adjust the PIR sensor sensitivity to minimize false alarms caused by environmental factors.
- Set up an "Alert Plan" to define specific days and times when you wish to receive push notifications for motion events.
- The camera can also trigger a night alarm with flashing LEDs and a siren upon detection.
5.4 Video Recording and Playback
- Manual Recording: During live view, tap the record button to manually start and stop video recording directly to your phone.
- Event Recording: When motion is detected, the camera automatically records footage to the installed MicroSD card.
- Playback: Access recorded footage via the "Playback" section in the CloudEdge app. You can search by date and time to review events.
- Cloud Storage: An optional cloud-based subscription service is available through the CloudEdge app for off-site storage of recorded footage.
5.5 Battery Monitoring
The CloudEdge app displays the current battery level of your camera, allowing you to monitor its charge status, especially if not consistently using the solar panel.
6. Maintenance
6.1 Cleaning
- Regularly clean the camera lens and solar panel surface with a soft, damp cloth to ensure clear image quality and efficient solar charging.
- Do not use harsh chemicals or abrasive cleaners.
6.2 MicroSD Card Management
- If the MicroSD card becomes full, older footage will be overwritten automatically.
- You can format or delete specific recordings from the MicroSD card directly through the CloudEdge app settings.
- Periodically check the card's health and consider replacing it if you experience frequent recording errors.
7. Troubleshooting
Refer to the table below for common issues and their solutions.
| Problem | Possible Cause | Solution |
|---|---|---|
| Camera fails to connect to Wi-Fi. | Incorrect Wi-Fi password; 5GHz Wi-Fi network; weak Wi-Fi signal; camera too far from router. | Ensure correct 2.4GHz Wi-Fi password. Confirm router is broadcasting 2.4GHz. Move camera closer to router or use a Wi-Fi extender. Reset camera and try pairing again. |
| Camera frequently disconnects. | Weak Wi-Fi signal; network interference. | Improve Wi-Fi signal strength. Reduce interference from other devices. |
| Poor image quality. | Dirty lens; low light conditions; network bandwidth issues. | Clean the camera lens. Ensure adequate lighting or check night vision settings. Switch to HD mode in the app if bandwidth allows. |
| Battery not charging or draining quickly. | Solar panel not receiving enough sunlight; faulty solar panel connection; excessive motion detection events. | Relocate solar panel to an area with more direct sunlight. Check solar panel cable connection. Reduce motion detection sensitivity or frequency of alerts. Charge manually via USB if solar is insufficient. |
| Motion alerts are too frequent or not triggering. | Incorrect sensitivity settings; environmental factors (e.g., moving branches, pets). | Adjust motion detection sensitivity in the CloudEdge app. Review the camera's field of view to minimize irrelevant triggers. |
| MicroSD card not recording. | Card not inserted correctly; card full; faulty card; card not formatted. | Ensure card is inserted correctly. Format the card via the app. Try a different MicroSD card. |
8. Specifications
| Feature | Detail |
|---|---|
| Model Number | GW50.0035 |
| Sensor Type | GC2063 (2MP 1/2.9" Progressive Scan CMOS) |
| Resolution | 1920x1080 (Pixel Interpolation 3MP) |
| Video Format | H.264 |
| Wi-Fi Support | 2.4GHz Wi-Fi only (not 5GHz) |
| Pan Rotation | 0-336° Horizontal |
| Tilt Rotation | 0-108° Vertical |
| Microphone | Full Duplex Sensitive (≥-32±3dBm), IP66 Waterproof |
| Speaker | 8Ω/2W, IP66 Waterproof |
| MicroSD Card Support | Max up to 128GB |
| Battery | 14400mAh / 3.7V |
| Working Time | Approx. 300 days (10 wakeups/day at 15s/each) |
| Power Supply | DC 5V 2A USB connection (power supply not included) |
| Operating Temperature | -20 ~ 50 ℃ |
| Operating Humidity | <95% |
| Solar Panel Cable Length | 2.9m built-in Micro USB cable |
| Waterproof Rating | IP66 |
| Item Dimensions | 10.3 x 5 x 17.9 cm |
| Item Weight | 0.66 kg |
9. Warranty and Support
K&F CONCEPT products are designed and manufactured to the highest quality standards. For information regarding warranty coverage, technical support, or service inquiries, please refer to the warranty card included with your product or visit the official K&F CONCEPT website. Please have your model number (GW50.0035) and purchase details ready when contacting support.