
1. Introduction
This user manual provides essential information for the safe and efficient installation, operation, and maintenance of your LuxeBath Luxe-462 Single Layer Panel Radiator. Please read these instructions carefully before installation and retain them for future reference.
The LuxeBath Luxe-462 radiator is designed to provide efficient heating for various spaces, including bathrooms, living rooms, and wardrobes. Its flat, vertical tube design and anthracite finish offer a modern aesthetic while ensuring high thermal conductivity and reliable performance.

A full view of the LuxeBath single layer panel radiator in anthracite color, showcasing its sleek, modern design.
2. Safety Instructions
Observe the following safety precautions to prevent injury and damage to the product:
- Ensure the radiator is installed by a qualified professional in accordance with local building and plumbing regulations.
- Before installation, verify that the wall structure can support the weight of the radiator when filled with water.
- Do not cover the radiator with clothing or other materials, as this can impede heat dissipation and pose a fire hazard.
- Keep children and pets away from the hot surface of the radiator to prevent burns.
- Turn off the central heating system and allow the radiator to cool completely before performing any maintenance or cleaning.
- Do not use abrasive cleaners or solvents on the radiator's surface, as this can damage the finish.
3. Package Contents
Carefully unpack the box and ensure all components are present and undamaged. If any parts are missing or damaged, contact your supplier immediately.
- 1x LuxeBath Design Radiator (300x600 mm, Anthracite)
- 4x Wall Brackets
- 8x Dowels
- 8x Bracket Screws
- 8x Washers
- 4x Covers

A visual representation of the complete wall mounting kit included with the radiator, featuring wall brackets, dowels, bracket screws, washers, and covers. Optional connection types are also shown.
4. Specifications
| Feature | Specification |
|---|---|
| Model Number | Luxe-462 |
| Color | Anthracite |
| Dimensions (L x H) | 300 x 600 mm |
| Product Dimensions (L x W x H) | 30 x 8 x 60 cm |
| Material | Powder-coated Steel |
| Thread Connection | G1/2" |
| Distance to Wall | Approx. 50 mm |
| Number of Tubes | 4 |
| Operation Type | Hot Water (Central Heating) |
| Thermal Power | 200 W |
| Thermal Capacity | 714 BTU |
| Connection Type | Bottom Center (Central Connection) |
| Weight | 6.3 kg |

A detailed technical drawing providing precise dimensions of the radiator, including width (300mm), height (600mm), tube spacing, and connection points (G1/2 inch thread), along with wall mounting measurements.
5. Installation (Setup)
Installation should be performed by a qualified professional. Ensure the central heating system is turned off and depressurized before beginning installation.
5.1 Wall Mounting
- Choose a suitable location on a solid wall, ensuring adequate clearance around the radiator for heat circulation and maintenance.
- Using the provided wall brackets as a template, mark the drilling points on the wall. Refer to the technical drawing for precise measurements.
- Drill holes at the marked points and insert the dowels.
- Attach the wall brackets to the wall using the bracket screws and washers, ensuring they are securely fastened and level.
- Carefully lift the radiator and hang it onto the installed wall brackets. Ensure it is seated correctly and stable.
- Place the covers over the bracket connections for a neat finish.
5.2 Plumbing Connection
The radiator features a G1/2" threaded connection at the bottom center, suitable for central heating systems.
- Connect the flow and return pipes from your central heating system to the radiator's G1/2" connections. Use appropriate sealing materials to ensure a watertight connection.
- Ensure all connections are tightened securely but do not overtighten.
- The radiator includes a drain valve for easy venting.

A diagram illustrating various connection options for the radiator, including wall connection, floor connection, universal connection, and electric heater connection. It also shows the G1/2 inch thread and 50mm distance for hot water input and a drain valve for venting.
6. Operation
Once installed and connected to your central heating system, the radiator operates in conjunction with your home's heating controls.
6.1 Filling and Venting
- After installation, slowly refill your central heating system with water, ensuring all valves are open.
- Once the system is pressurized, use a radiator key to open the bleed valve (usually located at the top corner of the radiator) to release any trapped air. Close the valve once water begins to emerge steadily.
- Check the system pressure and top up if necessary according to your boiler manufacturer's instructions.
6.2 Heating Control
The heat output of the radiator is controlled by your central heating thermostat and any individual thermostatic radiator valves (TRVs) if installed. Adjust these controls to achieve your desired room temperature.

The 300x600 mm anthracite radiator installed in a modern room, illustrating its compact size and high thermal conductivity with an arrow diagram.
7. Maintenance
Regular maintenance ensures optimal performance and longevity of your radiator.
7.1 Cleaning
- Clean the radiator regularly with a soft, damp cloth.
- For stubborn marks, use a mild, non-abrasive household cleaner.
- Do not use abrasive pads, harsh chemicals, or solvents, as these can damage the powder-coated finish.
- Ensure the radiator is cool before cleaning.
7.2 Annual Checks
- Periodically check all connections for any signs of leaks.
- Bleed the radiator annually, or whenever you notice cold spots, to remove trapped air and maintain heating efficiency.
- Ensure the central heating system is adequately dosed with corrosion inhibitor as recommended by your boiler manufacturer to protect the radiator and system components.
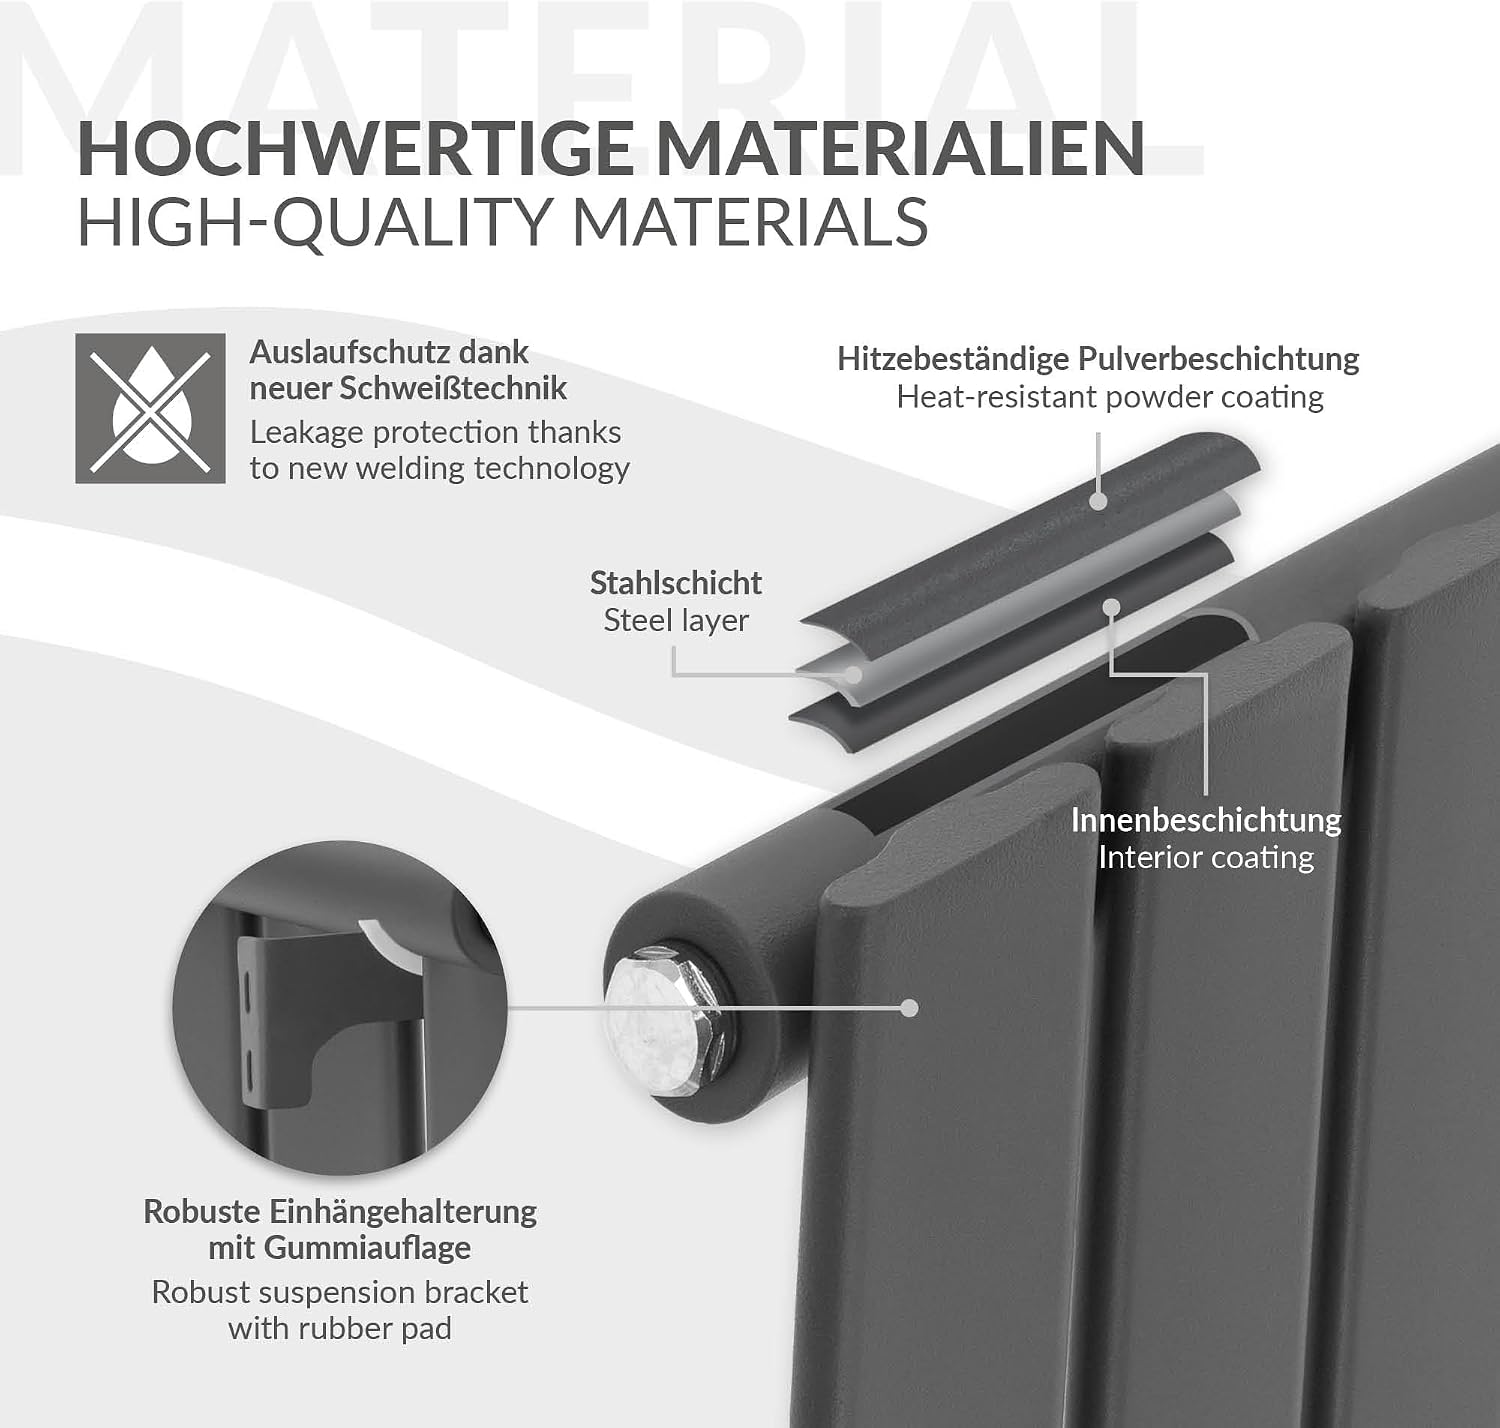
An exploded view diagram detailing the high-quality materials used in the radiator's construction, including the steel layer, interior coating, heat-resistant powder coating, and robust suspension bracket with rubber pad. It also highlights leakage protection through new welding technology.
8. Troubleshooting
If you experience issues with your radiator, consult the following table before contacting a professional.
| Problem | Possible Cause | Solution |
|---|---|---|
| Radiator is cold at the top, warm at the bottom | Trapped air in the system | Bleed the radiator using a radiator key until water flows steadily. |
| Radiator is completely cold | Central heating system off, low system pressure, or faulty valve | Check if the central heating is on. Check boiler pressure and top up if needed. Ensure radiator valves are open. |
| Radiator is not heating efficiently | Sludge build-up in the system, or incorrect sizing | Consider a power flush of the heating system by a professional. Ensure the radiator size is appropriate for the room. |
| Water leaking from connections | Loose connections or worn seals | Turn off heating and drain system. Tighten connections or replace seals. If unsure, contact a plumber. |
9. Warranty and Support
Specific warranty details for the LuxeBath Luxe-462 radiator are not provided in this manual. Please refer to your purchase documentation or contact your retailer for information regarding warranty coverage and terms.
For technical support or assistance with installation and operation, please contact LuxeBath customer service or your authorized installer.