1. Introduction
This user manual provides detailed instructions for the installation, operation, and maintenance of your XTRONS IX82MTV Android 12 Car Stereo GPS Navigation System. This unit is specifically designed for various Volkswagen models, offering advanced features such as an 8-inch HD display, Android 12 operating system, 8-core CPU, 8GB RAM, 128GB ROM, dual-band Wi-Fi, 4G connectivity, Apple CarPlay, Android Auto, Bluetooth 5.0, and a built-in CD/DVD player. Please read this manual thoroughly before using the product to ensure proper function and safety.
2. Safety Information
- Professional Installation Recommended: Due to the complexity of car electrical systems, professional installation is highly recommended to prevent damage to the unit or vehicle.
- Power Supply: Ensure the unit is connected to a 12V DC power supply with negative grounding.
- Driving Safety: Do not operate the unit's complex functions or watch videos while driving. Always prioritize road safety.
- Temperature: Avoid exposing the unit to extreme temperatures or direct sunlight for prolonged periods.
- Moisture: Keep the unit away from water and excessive moisture.
- Ventilation: Ensure adequate ventilation around the unit to prevent overheating.
3. Package Contents
Upon unpacking, please verify that all items are present and in good condition. The package should typically include:
- XTRONS IX82MTV Head Unit
- Power Cable Harness
- GPS Antenna
- USB Cables
- External Microphone
- CANbus Decoder
- User Manual (this document)
- Installation Tools (if included by manufacturer)
4. Product Overview
The XTRONS IX82MTV is a feature-rich car stereo designed to enhance your driving experience with advanced connectivity and entertainment options.

Figure 4.1: Front view of the XTRONS IX82MTV car stereo displaying the Android 12 interface with key feature icons including Octa-core processor, 8GB RAM, 128GB ROM, Wireless CarPlay, Wireless Android Auto, DSP, RDS, 4G LTE, IPS screen, and DVD Drive.
Key Features:
- Operating System: Android 12
- Processor: 8-Core CPU (Cortex A75 2.0GHz x 2, Cortex A55 2.0GHz x 6)
- Memory: 8GB DDR4 RAM
- Storage: 128GB SSD ROM
- Display: 8-inch HD IPS Screen
- Connectivity: Dual-band Wi-Fi, 4G (via Six.M Card), Bluetooth 5.0
- Smartphone Integration: Wireless Apple CarPlay & Android Auto
- Audio: Built-in DSP Equalizer (ROHM DSP)
- Navigation: GPS, BDS, GLONASS support
- Media: CD/DVD Player, USB, SD Card (up to 128GB)
- Vehicle Integration: Dual CANbus for steering wheel controls and vehicle information display

Figure 4.2: The unit displaying the navigation interface alongside a radio application, demonstrating multi-tasking capabilities.
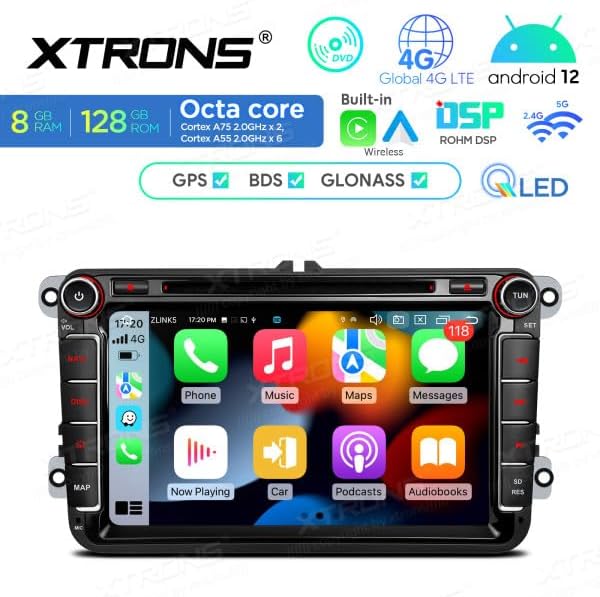
Figure 4.3: The main application launcher screen, showcasing various pre-installed Android applications for communication, media, and navigation.
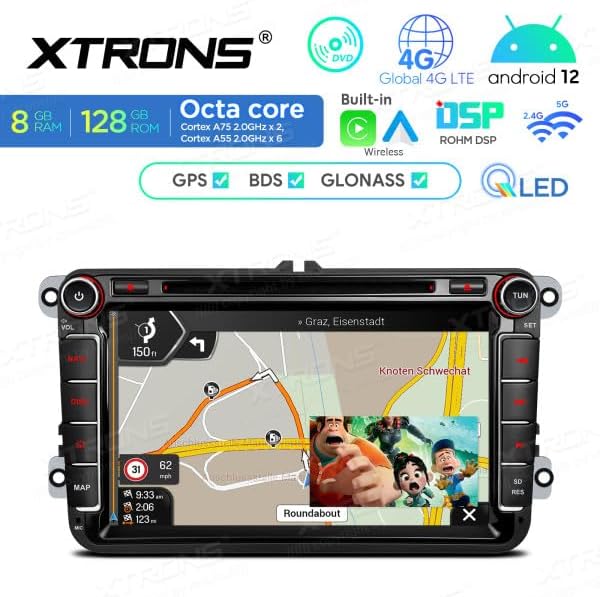
Figure 4.4: Another view of the Android interface, displaying more applications such as Calendar, Gamesnacks, News, and Settings, indicating the system's versatility.

Figure 4.5: The unit actively displaying a GPS navigation map, providing turn-by-turn directions and route information.
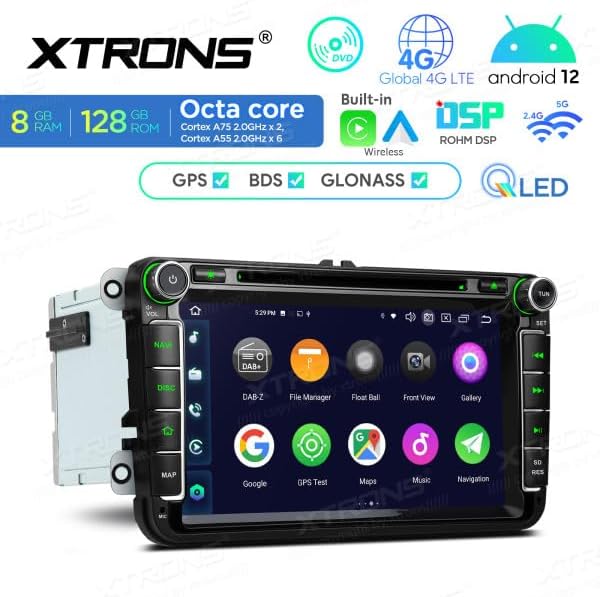
Figure 4.6: Side view of the XTRONS IX82MTV unit, illustrating the various connection ports and the DVD drive slot.
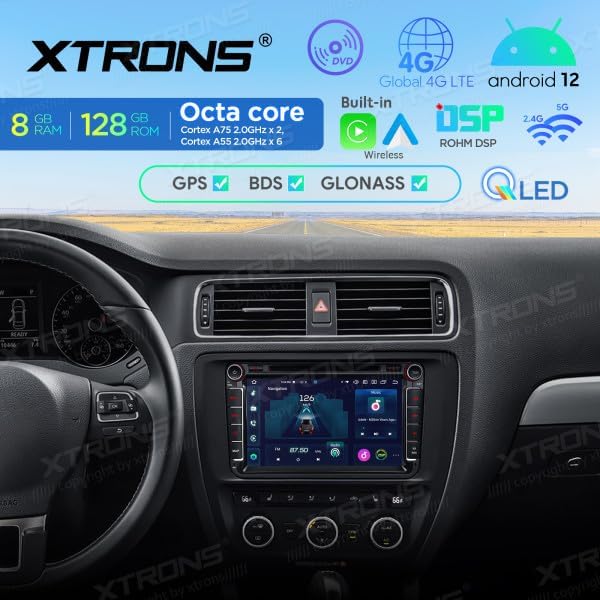
Figure 4.7: The XTRONS IX82MTV unit seamlessly integrated into a Volkswagen vehicle's dashboard, showing its fit and appearance.
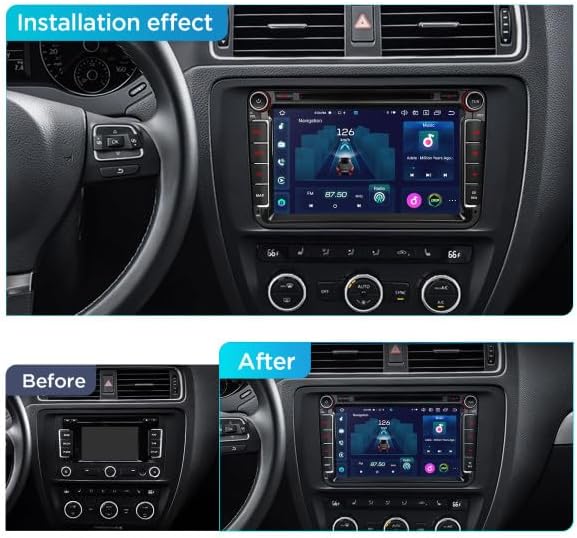
Figure 4.8: A comparison image showing the vehicle's dashboard before and after the installation of the XTRONS IX82MTV car stereo, highlighting the visual upgrade.
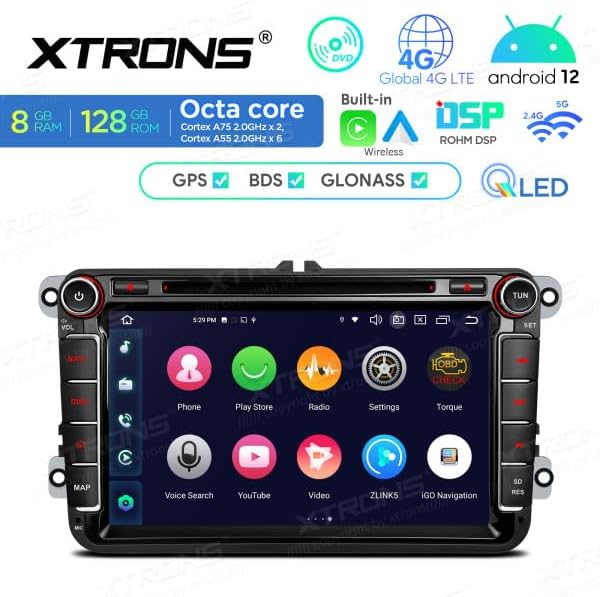
Figure 4.9: The unit displaying a comprehensive array of applications, including Play Store, Radio, Settings, Torque, Voice Search, YouTube, and iGO Navigation.
5. Installation Guide
This section provides general guidelines for installing the XTRONS IX82MTV unit. Due to variations in vehicle models and electrical systems, professional installation is strongly recommended.
5.1 Pre-Installation Checks
- Disconnect the vehicle's negative battery terminal before starting any electrical work.
- Ensure the unit is compatible with your specific Volkswagen model.
- Verify all components listed in the "Package Contents" section are present.
5.2 Wiring Connections
Refer to the wiring diagram provided with your unit for specific connections. General connections include:
- Power Harness: Connect to the vehicle's power, ground, and accessory wires. The CANbus decoder should be integrated here for steering wheel controls and vehicle data.
- GPS Antenna: Connect the GPS antenna and mount it in a location with a clear view of the sky (e.g., dashboard, under the windshield).
- USB Cables: Route USB cables to a convenient location for connecting external devices.
- Radio Antenna: Connect the vehicle's radio antenna.
- External Microphone: Connect the external microphone for improved call quality and voice commands.
- Optional Connections: Connect any additional cameras (reverse, front), external amplifiers, or monitors as required.
5.3 Mounting the Unit
- Carefully remove the factory radio or trim panel from your Volkswagen.
- Connect all necessary wiring harnesses to the XTRONS unit.
- Slide the XTRONS unit into the dashboard opening, ensuring all wires are clear and not pinched.
- Secure the unit using the provided mounting brackets and screws.
- Reinstall any removed trim panels.
5.4 Post-Installation Check
- Reconnect the vehicle's negative battery terminal.
- Turn on the vehicle ignition and power on the unit.
- Test all functions: radio, GPS, Bluetooth, CD/DVD, USB, steering wheel controls, and any connected cameras.
6. Initial Setup
After successful installation, follow these steps for initial configuration:
- First Boot: The unit will boot up to the Android 12 home screen.
- Language Selection: Navigate to "Settings" > "System" > "Languages & input" to select your preferred language.
- Date & Time: Go to "Settings" > "System" > "Date & time" to set the correct date, time, and time zone. You can enable "Automatic date & time" for network synchronization.
- Wi-Fi Connection: Access "Settings" > "Network & internet" > "Wi-Fi" to connect to an available Wi-Fi network. This is essential for app updates, online navigation, and internet browsing.
- Google Account: Sign in with your Google account in "Settings" > "Accounts" to access the Google Play Store and synchronize services.
- GPS Calibration: Ensure the GPS antenna is properly installed. The system should automatically acquire satellite signals. You can check GPS status in the navigation app or system settings.
7. Operating Instructions
7.1 Android 12 Interface
- Home Screen: Swipe left/right to access different home screens. Customize widgets and app shortcuts.
- App Drawer: Tap the app icon (usually a grid of dots) to view all installed applications.
- Notification Panel: Swipe down from the top of the screen to access notifications and quick settings.
- Recent Apps: Tap the square icon (or swipe up and hold) to view and switch between recently used applications.
7.2 GPS Navigation
The unit supports various navigation applications. Pre-installed maps or downloadable apps from the Google Play Store can be used.
- Launching Navigation: Tap the "NAV" button on the unit or the navigation app icon on the screen.
- Entering Destination: Use the on-screen keyboard or voice input to enter your destination.
- Route Guidance: Follow the voice prompts and on-screen map for turn-by-turn directions.
7.3 Apple CarPlay & Android Auto
The unit supports both wireless Apple CarPlay and Android Auto for seamless smartphone integration.
- Connection: Ensure your phone's Bluetooth and Wi-Fi are enabled. Open the "CarPlay" or "Android Auto" app on the head unit. Follow the on-screen instructions to pair your phone.
- Functions: Access navigation, music, calls, messages, and other compatible apps directly from the unit's screen, controlled by your phone.
7.4 Bluetooth 5.0
- Pairing: Go to "Settings" > "Connected devices" > "Bluetooth". Enable Bluetooth on your phone and search for the unit (e.g., "XTRONS IX82MTV"). Select it and confirm the pairing code.
- Hands-Free Calling: Make and receive calls directly from the unit. Access your phonebook and call history.
- Audio Streaming: Play music from your paired phone through the car speakers.
7.5 CD/DVD Player
- Inserting Disc: Gently insert a CD or DVD into the disc slot until it is pulled in automatically.
- Playback: The unit will automatically switch to the CD/DVD player interface. Use the on-screen controls for playback, pause, skip, etc.
7.6 USB & SD Card Media
- Connecting: Insert a USB drive into the USB port or an SD card into the SD card slot.
- Accessing Media: Open the "File Manager" or a media player app to browse and play audio, video, or image files.
7.7 Radio (RDS)
- Tuning: Open the "Radio" app. Use the scan function to find available stations or manually tune to a frequency.
- Saving Presets: Long-press a preset button to save the current station.
- RDS: Radio Data System (RDS) displays station information like program type and song titles where available.
7.8 DSP Equalizer
The built-in Digital Sound Processor (DSP) allows for advanced audio customization.
- Accessing DSP: Open the "DSP" app or navigate through "Settings" > "Sound".
- Adjustments: Customize equalizer settings, balance, fader, subwoofer output, and sound field effects to optimize your audio experience.
7.9 Steering Wheel Controls & Dual CANbus
The integrated CANbus decoder ensures compatibility with your Volkswagen's steering wheel controls and displays vehicle information.
- Configuration: In most cases, steering wheel controls will be automatically recognized. If not, go to "Settings" > "Car settings" > "Steering wheel controls" to manually map buttons.
- Vehicle Info: Access vehicle information such as door status, climate control, or parking sensor data through dedicated apps or system menus, depending on your vehicle's capabilities.
8. Maintenance
- Cleaning the Screen: Use a soft, lint-free cloth slightly dampened with water or a screen cleaner. Avoid abrasive materials or harsh chemicals.
- Software Updates: Periodically check for system updates via Wi-Fi in "Settings" > "About device" > "System update". Keeping the software updated ensures optimal performance and security.
- Disc Drive Cleaning: If using the CD/DVD player frequently, consider using a specialized disc drive cleaning kit to maintain optimal playback quality.
- General Care: Avoid placing heavy objects on the unit or exposing it to extreme vibrations.
9. Troubleshooting
| Problem | Possible Cause | Solution |
|---|---|---|
| Unit does not power on. | Loose power connection, blown fuse, incorrect wiring. | Check power cables, vehicle fuse box, and wiring connections. Consult a professional if unsure. |
| No sound. | Volume too low, mute activated, incorrect audio settings, speaker wiring issues. | Increase volume, check mute status, verify audio output settings in DSP, inspect speaker connections. |
| GPS signal lost or inaccurate. | GPS antenna not properly connected or obstructed, outdated map data. | Ensure GPS antenna is securely connected and has a clear view of the sky. Update navigation software/maps. |
| Bluetooth connection issues. | Bluetooth not enabled, device not paired, interference. | Ensure Bluetooth is enabled on both devices. Re-pair the device. Move closer to the unit. |
| Steering wheel controls not working. | CANbus not connected or configured, incorrect wiring. | Check CANbus connection. Go to "Steering wheel controls" in settings to configure. |
| Unit freezes or crashes. | Software glitch, too many apps running, overheating. | Restart the unit. Close unnecessary apps. Check for software updates. If persistent, perform a factory reset (backup data first). |
If the problem persists after attempting these solutions, please contact XTRONS customer support or a qualified technician.
10. Specifications
| Brand | XTRONS |
| Model Number | IX82MTV |
| Operating System | Android 12 |
| Processor | 8-Core CPU (Cortex A75 2.0GHz x 2, Cortex A55 2.0GHz x 6) |
| RAM | 8GB DDR4 |
| ROM | 128GB SSD |
| Display Size | 8-inch HD IPS |
| Connectivity | Wi-Fi (Dual-band), 4G (via Six.M Card), Bluetooth 5.0, HDMI, USB |
| Navigation | GPS, BDS, GLONASS |
| Smartphone Integration | Wireless Apple CarPlay, Wireless Android Auto |
| Audio Features | Built-in DSP Equalizer (ROHM DSP), Stereo output, 2.0 Surround Sound Channel Configuration |
| Media Support | CD/DVD, USB (up to 128GB), SD Card (up to 128GB) |
| Compatible Devices | Volkswagen vehicles |
| Video Encoding | H.264, H.265/HEVC, MPEG-4 |
11. Warranty and Support
XTRONS products are covered by a manufacturer's warranty. Please refer to the warranty card included with your product or visit the official XTRONS website for detailed warranty terms and conditions.
For technical support, troubleshooting assistance, or inquiries regarding parts and service, please contact XTRONS customer service through their official website or the contact information provided in your product packaging. When contacting support, please have your product model number (IX82MTV) and purchase details readily available.


