
1. Introduction
This manual provides detailed instructions for the safe and efficient operation, setup, and maintenance of your SINGER SC220 Sewing Machine. The SC220 is a versatile computerized sewing machine featuring 200 stitch applications, built-in lettering, a one-step buttonhole, and a built-in needle threader, designed to enhance your sewing projects.
2. Safety Instructions
- Always unplug the machine from the electrical outlet immediately after using, before cleaning, or when making any user servicing adjustments mentioned in this instruction manual.
- Keep fingers away from all moving parts. Special care is required around the sewing machine needle.
- Use the proper needle plate. The wrong plate can cause the needle to break.
- Do not pull or push fabric while stitching. This may deflect the needle, causing it to break.
- Always use genuine SINGER accessories and parts to ensure optimal performance and safety.
- Never operate the machine with any air openings blocked. Keep ventilation openings of the sewing machine and foot controller free from lint, dust, and loose cloth.
3. Parts Identification
Familiarize yourself with the main components of your SINGER SC220 sewing machine.
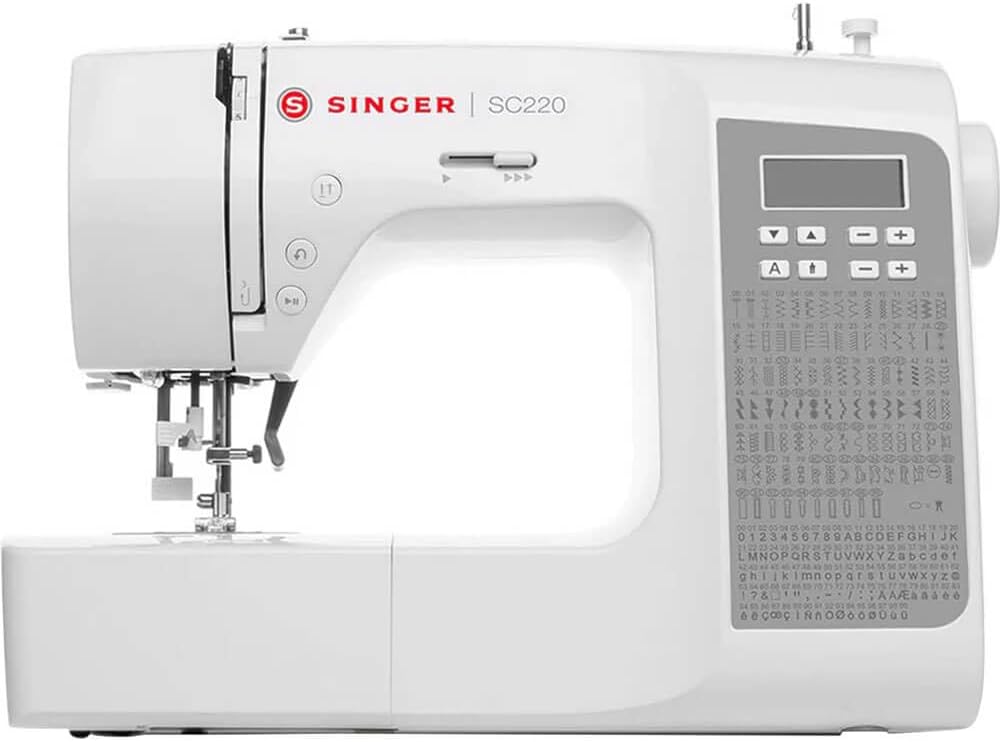
Figure 3.1: Front view of the SINGER SC220 Sewing Machine, showing the main body, needle area, control panel, and extension table.
- Spool Pins: Holds the thread spool.
- Thread Guides: Directs the thread path.
- Tension Dial: Adjusts upper thread tension.
- Needle Clamp: Secures the needle.
- Presser Foot: Holds fabric against the feed dogs.
- Needle Plate: Metal plate under the needle, with seam guidelines.
- Feed Dogs: Moves fabric under the presser foot.
- Bobbin Cover: Transparent cover for the top drop-in bobbin.
- Control Panel: Digital display and buttons for stitch selection and adjustments.
- Handwheel: Manually raises and lowers the needle.
- Power Switch: Turns the machine on/off.
- Foot Controller Jack: Connects the foot controller.
4. Setup
4.1 Unpacking and Placement
Carefully remove the machine from its packaging. Place the machine on a stable, level surface. Ensure there is adequate space around the machine for comfortable operation.
4.2 Power Connection
Insert the machine plug into the machine's power socket and then into a suitable electrical outlet. Connect the foot controller plug into the foot controller jack on the machine.
4.3 Attaching Accessories
Your SINGER SC220 comes with various accessories to enhance your sewing experience. These include different presser feet, bobbins, needles, and tools.

Figure 4.1: Various accessories included with the SINGER SC220, such as different presser feet, bobbins, needles, and a seam ripper.
To attach a presser foot, align the pin on the foot with the groove on the presser foot holder and lower the presser foot lever until it snaps into place.
5. Operating Instructions
5.1 Winding the Bobbin
- Place an empty bobbin onto the bobbin winder spindle.
- Place a spool of thread on the spool pin.
- Guide the thread through the bobbin winding thread guide.
- Wrap the thread clockwise around the bobbin a few times.
- Push the bobbin winder spindle to the right.
- Press the foot controller or start/stop button to begin winding. The machine will stop automatically when the bobbin is full.
- Cut the thread and push the bobbin winder spindle back to the left.
5.2 Inserting the Top Drop-In Bobbin

Figure 5.1: Close-up view of the top drop-in bobbin area, showing the transparent cover and the bobbin in place.
- Remove the transparent bobbin cover plate.
- Insert the full bobbin into the bobbin case with the thread running counter-clockwise.
- Guide the thread through the tension spring and into the thread guide channel.
- Replace the bobbin cover plate.
5.3 Threading the Upper Thread
The SINGER SC220 features a built-in needle threader for convenience.

Figure 5.2: Close-up of the needle and presser foot area, highlighting the needle threader mechanism.
- Raise the presser foot lever.
- Place a spool of thread on the spool pin.
- Follow the numbered thread path guides on the machine, ensuring the thread is securely seated in each guide.
- Pass the thread through the take-up lever from right to left.
- Thread the needle using the built-in needle threader. If threading manually, thread from front to back.
- Pull the bobbin thread up through the needle plate opening by turning the handwheel towards you to lower and raise the needle.
5.4 Stitch Selection and Adjustments
The SC220 offers 200 stitch applications, including utility, decorative, and lettering stitches. Use the control panel to select your desired stitch.

Figure 5.3: Detailed view of the control panel with digital display and stitch selection buttons, alongside the comprehensive stitch chart.
- Stitch Selection: Use the arrow buttons on the control panel to navigate through the stitch options displayed on the LCD screen. Refer to the stitch chart on the machine for available patterns.
- Stitch Length/Width: Adjust stitch length and width using the dedicated buttons on the control panel. The maximum adjustable stitch width is 7mm.
- Built-In Lettering: Select the lettering function from the stitch menu to sew letters and numbers.
- One-Step Buttonhole: Attach the buttonhole foot and select the buttonhole stitch. The machine will automatically size and sew the buttonhole.
5.5 Sewing

Figure 5.4: A user sewing fabric on the SINGER SC220, demonstrating the machine in active use.
- Speed Control: Use the speed control slider to adjust the sewing speed.
- Start/Stop Button: Press to start or stop sewing without the foot controller.
- Reverse Button: Press to sew in reverse, useful for securing stitches.
- Tie-Off Button: Automatically ties off stitches at the beginning or end of a seam.
- Drop Feed: Engage the drop feed lever for free-motion sewing or darning.
- Extra High Pressure Foot Lifter: Provides additional clearance for thicker fabrics or multiple layers.
- Variable Needle Positions: Adjust the needle position for precise topstitching or zipper insertion.
- Twin-Needle Function: Use a twin needle for decorative stitching or hemming. Ensure to select the appropriate stitch and reduce stitch width to prevent needle breakage.
6. Maintenance
6.1 Cleaning
- Lint Removal: Regularly remove lint and dust from the bobbin area and feed dogs using the brush provided. Unplug the machine before cleaning.
- Machine Surface: Wipe the exterior of the machine with a soft, dry cloth. Do not use harsh chemicals or abrasive cleaners.
6.2 Needle Replacement
Replace the needle regularly, especially after sewing thick fabrics or if it becomes bent or dull. Use only SINGER brand needles suitable for your machine.
- Turn off the machine and unplug it.
- Loosen the needle clamp screw.
- Remove the old needle.
- Insert a new needle with the flat side facing the back of the machine, pushing it up as far as it will go.
- Tighten the needle clamp screw securely.
7. Troubleshooting
This section addresses common issues you might encounter during operation.
| Problem | Possible Cause | Solution |
|---|---|---|
| Skipped Stitches | Incorrect needle, bent needle, improper threading. | Replace needle with correct type/size. Re-thread machine correctly. |
| Thread Breakage (Upper) | Incorrect threading, too much upper tension, damaged needle, poor quality thread. | Check threading path. Adjust tension. Replace needle. Use good quality thread. |
| Thread Breakage (Bobbin) | Improperly wound bobbin, bobbin inserted incorrectly, lint in bobbin case. | Re-wind bobbin evenly. Re-insert bobbin correctly. Clean bobbin area. |
| Fabric Not Feeding | Presser foot not lowered, feed dogs lowered, lint under needle plate. | Lower presser foot. Raise feed dogs. Clean under needle plate. |
| Machine Not Starting | Power cord not plugged in, foot controller not connected, power switch off. | Check all power connections. Ensure power switch is ON. |
8. Specifications
- Model: SC220
- Brand: SINGER
- Stitch Applications: 200
- Stitch Width: Adjustable, up to 7mm
- Bobbin Type: Top Drop-In
- Needle Threader: Built-In
- Buttonhole Type: One-Step
- Feed System: Drop Feed capability
- Speed Control: Slider
- Weight: Approximately 15.15 pounds
- Color: White
- Manufacturer: SINGER
- UPC: 840163302159
9. Warranty and Support
For warranty information and customer support, please refer to the warranty card included with your product or visit the official SINGER website. You can also find additional resources, FAQs, and contact information for technical assistance there.
SINGER Official Website: www.singer.com


