1. Introduction
This user manual provides comprehensive instructions for the operation, maintenance, and troubleshooting of your SINGER® C9920 Computerized Sewing Machine. Designed for both beginners and advanced users, the C9920 offers intuitive controls and powerful features to help achieve professional results in various sewing projects, including fashion sewing, quilting, home décor, and crafting.
The SINGER® C9920 is equipped with advanced features such as 1,163 stitch applications, five built-in lettering fonts, mirror imaging, an ergonomic LCD screen, speed control, and an automatic thread cutter. Its heavy-duty metal frame ensures stability and durability.
2. Important Safety Information
Please read all instructions before using this sewing machine to ensure safe operation and to prevent injury or damage. Keep this manual in a safe place for future reference.
- Always unplug the machine from the electrical outlet immediately after using and before cleaning, removing covers, or performing any user servicing.
- Do not allow children to operate the machine unsupervised.
- Use this product only for its intended use as described in this manual.
- Never operate this machine if it has a damaged cord or plug, if it is not working properly, or if it has been dropped or damaged.
- Keep fingers away from all moving parts. Special care is required around the sewing machine needle.
- Always use the proper needle plate. The wrong plate can cause the needle to break.
- Do not pull on the power cord to disconnect. Grasp the plug, not the cord.
3. Machine Components Overview
Familiarize yourself with the main parts of your SINGER® C9920 sewing machine.
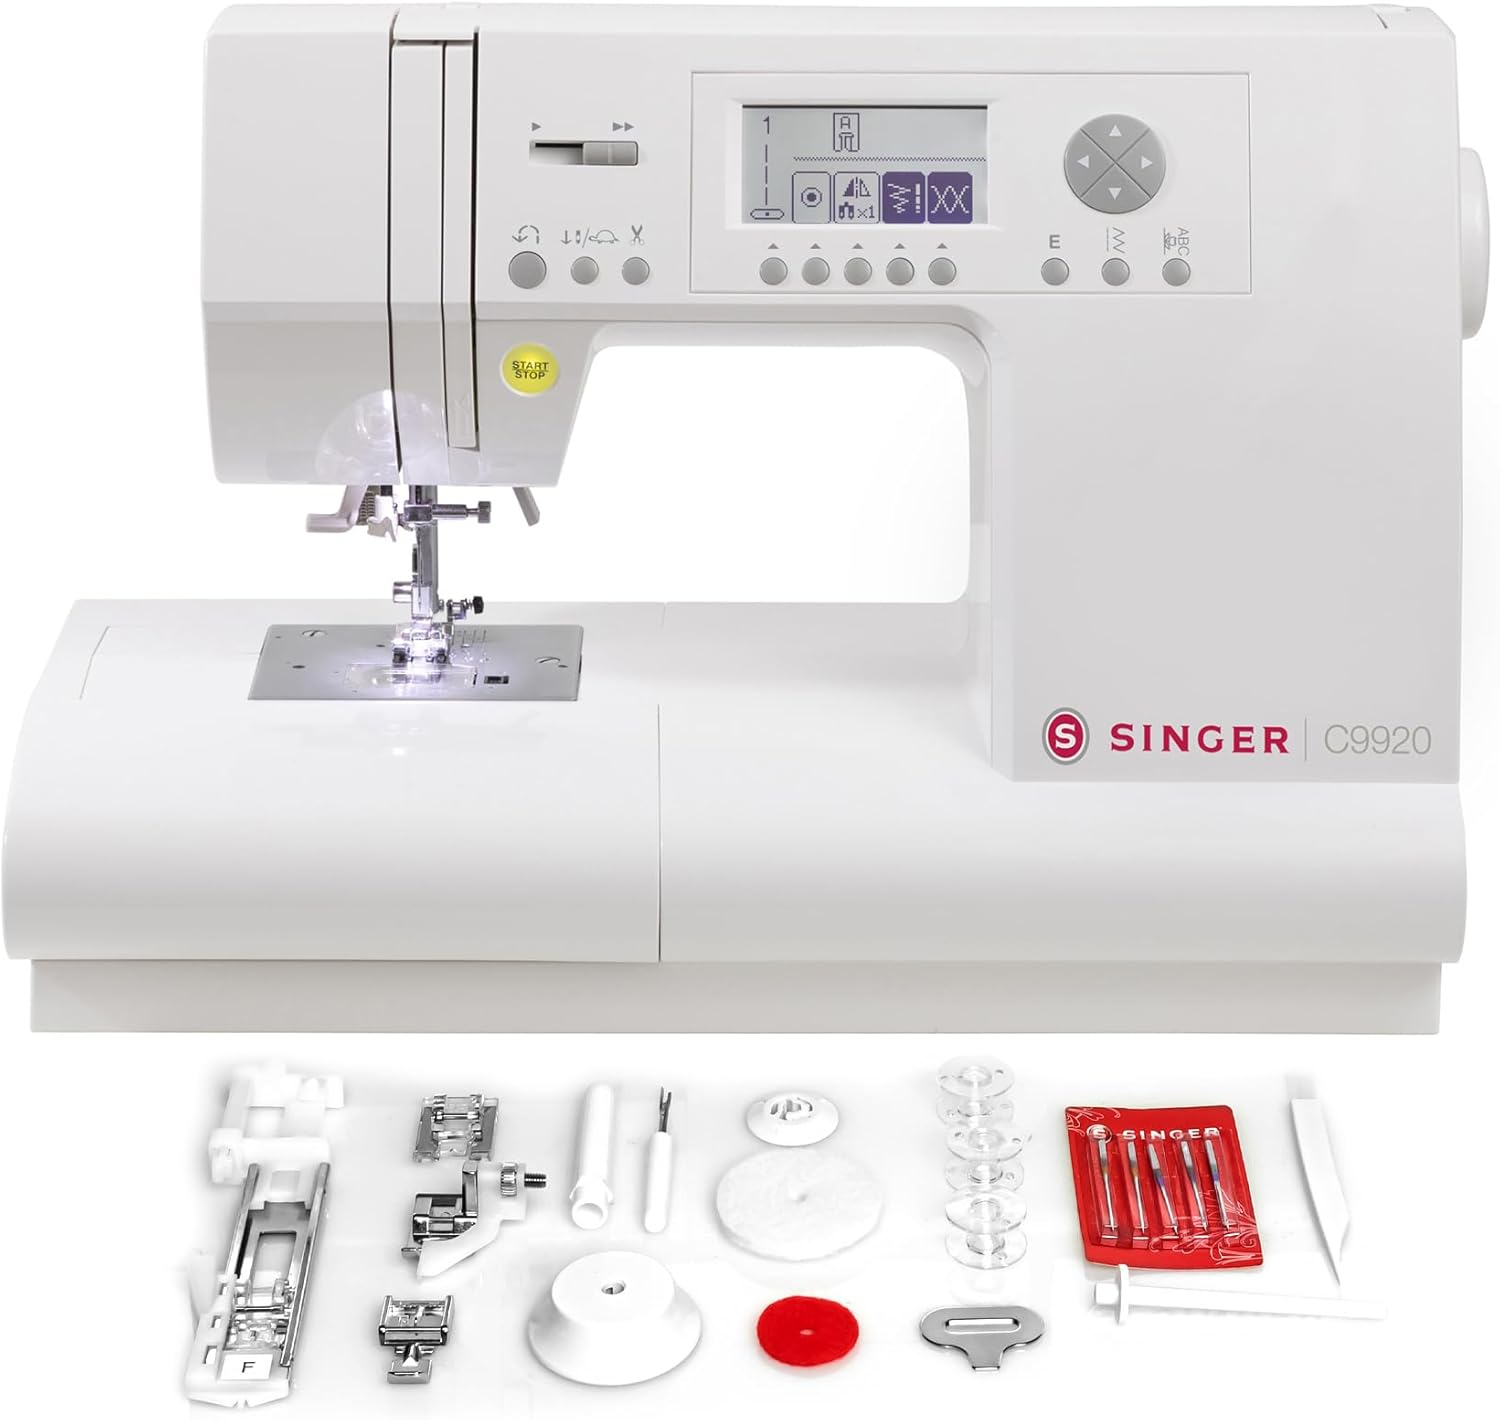
Figure 3.1: Front view of the SINGER C9920 Computerized Sewing Machine, showing the needle area, presser foot, LCD screen, and control buttons.

Figure 3.2: Back view of the SINGER C9920 Computerized Sewing Machine, highlighting the power input and model information label.

Figure 3.3: Close-up of the ergonomic LCD screen and control panel, showing stitch selection buttons and display for stitch numbers and settings.

Figure 3.4: Detailed view of the needle and presser foot area, illuminated by the built-in sewing light, ready for fabric placement.
4. Setup and Initial Use
4.1. Power Connection
Connect the power cord to the machine and then to a suitable electrical outlet. Ensure the machine is placed on a stable, flat surface.
4.2. Winding the Bobbin
The SINGER® C9920 features a top drop-in bobbin system for easy insertion and monitoring. Follow the winding path indicated on the machine for proper bobbin winding.
4.3. Threading the Machine
Proper threading is crucial for good stitch quality. Follow the numbered threading guides on the machine. The built-in needle threader simplifies the process of threading the needle.

Figure 4.1: Demonstrating the use of the built-in needle threader for quick and easy upper thread setup.
5. Operating the Machine
5.1. Stitch Selection
The C9920 offers 1,163 stitch applications. Use the ergonomic LCD screen and navigation buttons to select your desired stitch. The screen clearly displays stitch numbers and settings.

Figure 5.1: The comprehensive stitch chart, conveniently located on the machine, showing all available stitch patterns and lettering fonts.

Figure 5.2: The LCD screen showing various stitch options and settings, allowing for quick and easy selection.
5.2. Sewing Basics
Place your fabric under the presser foot. Use the Start/Stop button to begin and end sewing, or connect the foot pedal (if included). Adjust the sewing speed using the speed control slider.

Figure 5.3: The SINGER C9920 actively sewing blue fabric, demonstrating the machine's operation.
5.3. Advanced Features
- Lettering Fonts: Personalize projects with five built-in lettering fonts. Combine letters and stitches to create unique patterns.
- Buttonholes: Create perfect buttonholes in one easy step with 13 different styles.
- Mirror Imaging and Elongation: Expand creative possibilities by mirroring and elongating stitch patterns.
- Automatic Thread Cutter: Press the thread cut button to automatically trim both upper and lower threads, saving time.
- Feed Teeth Control: Easily lower the feed teeth for specialized techniques like button sewing or free-motion quilting.
6. Maintenance
Regular maintenance ensures the longevity and optimal performance of your sewing machine.
- Cleaning: Regularly clean the bobbin area and feed teeth using the lint brush provided. Remove the needle plate and clean any lint or thread buildup.
- Needle Replacement: Replace needles frequently, especially when sewing different fabric types or if the needle becomes dull or bent.
- Storage: When not in use, cover the machine to protect it from dust.
7. Troubleshooting Common Issues
If you encounter issues with your machine, refer to the following common problems and solutions before contacting support.
| Problem | Possible Cause | Solution |
|---|---|---|
| Skipped Stitches | Incorrect needle, improperly threaded, bent needle. | Replace needle, re-thread machine, ensure correct needle for fabric. |
| Thread Breaking | Improper tension, poor quality thread, burr on needle plate. | Adjust tension, use good quality thread, check for burrs. |
| Fabric Not Feeding | Feed teeth lowered, lint in feed teeth. | Raise feed teeth, clean feed teeth area. |
8. Product Specifications
| Feature | Detail |
|---|---|
| Brand | SINGER |
| Model Number | 230368112 (C9920) |
| Stitch Applications | 1,163 |
| Lettering Fonts | 5 Built-in |
| Buttonhole Styles | 13 One-step |
| Bobbin Type | Top Drop-in (Class 15) |
| Frame Material | Full Metal Frame |
| Dimensions (D x W x H) | 17.5"D x 8.2"W x 11.8"H |
| Item Weight | 20 pounds |
| Color | White |
9. Included Accessories
Your SINGER® C9920 comes with a comprehensive set of accessories to get you started on various projects.
Figure 9.1: All included accessories laid out, featuring various presser feet, needles, bobbins, and maintenance tools.
- Presser Feet: General/All Purpose Foot, Zipper Foot, Blind Hem Foot, Satin Stitch Foot, Buttonhole Foot.
- Needles: Assorted needles for different fabric types.
- Bobbins: Class 15 bobbins.
- Spool Caps: Large and Small Spool Caps to secure thread spools.
- Auxiliary Spool Pin: For using larger spools or twin needle sewing.
- Felt Washer: For smooth thread feeding.
- Needle Plate Screwdriver: For removing the needle plate for cleaning.
- Seam Ripper: For removing stitches.
- Lint Brush: For cleaning lint and dust from the machine.
10. Warranty and Support
For warranty information, technical support, or service inquiries, please refer to the warranty card included with your product or visit the official SINGER website. You can also contact SINGER customer service for assistance.
Online Resources: www.singer.com


