1. Introduction
This manual provides essential information for the installation, operation, and maintenance of your First Alert SMCO100V-AC Combination Smoke and Carbon Monoxide Alarm. This device is designed to provide early warning of both smoke and carbon monoxide presence in your home, enhancing safety through advanced detection technology, voice alerts, and hardwire interconnectivity.
Please read this manual thoroughly before installation and retain it for future reference. Proper installation and regular maintenance are crucial for the effective operation of this safety device.
2. Important Safety Information
WARNING: This unit is designed to detect smoke and carbon monoxide. It is not designed to detect fire, heat, or other gases. It will not prevent a fire or carbon monoxide poisoning. For maximum protection, ensure proper installation and regular testing.
- Never ignore any alarm. Responding to an alarm can save lives.
- Do not paint the alarm. Paint can clog the sensing chambers and prevent the unit from operating correctly.
- Do not remove the battery unless replacing it. The battery provides backup power during outages.
- Test the alarm weekly to ensure proper function.
- Ensure all household members know the alarm sounds and how to respond.
3. Product Features
The First Alert SMCO100V-AC alarm incorporates several features designed for enhanced home safety:
- Precision Detection Technology: Advanced sensing technology complies with new industry standards, reducing nuisance alarms from cooking while providing early warning for actual fire emergencies.
- Voice & Location Alerts: When an alarm is triggered, the unit provides clear voice announcements indicating the type of danger (smoke or carbon monoxide) and its location, aiding in safe escape.
- Interconnect Hardwire Capability: Allows multiple compatible alarms to be wired together. If one interconnected alarm sounds, all connected alarms will sound, providing early warning throughout the home.
- Battery Backup: A built-in battery provides continuous protection during power outages, ensuring the alarm remains operational even when household electricity is interrupted.
- Quick Connect Plug: Facilitates easy installation without the need for extensive rewiring, simplifying the setup process.

Image: The First Alert SMCO100V-AC alarm highlighting its Voice & Location Alerts feature, which verbally identifies the type and location of danger.
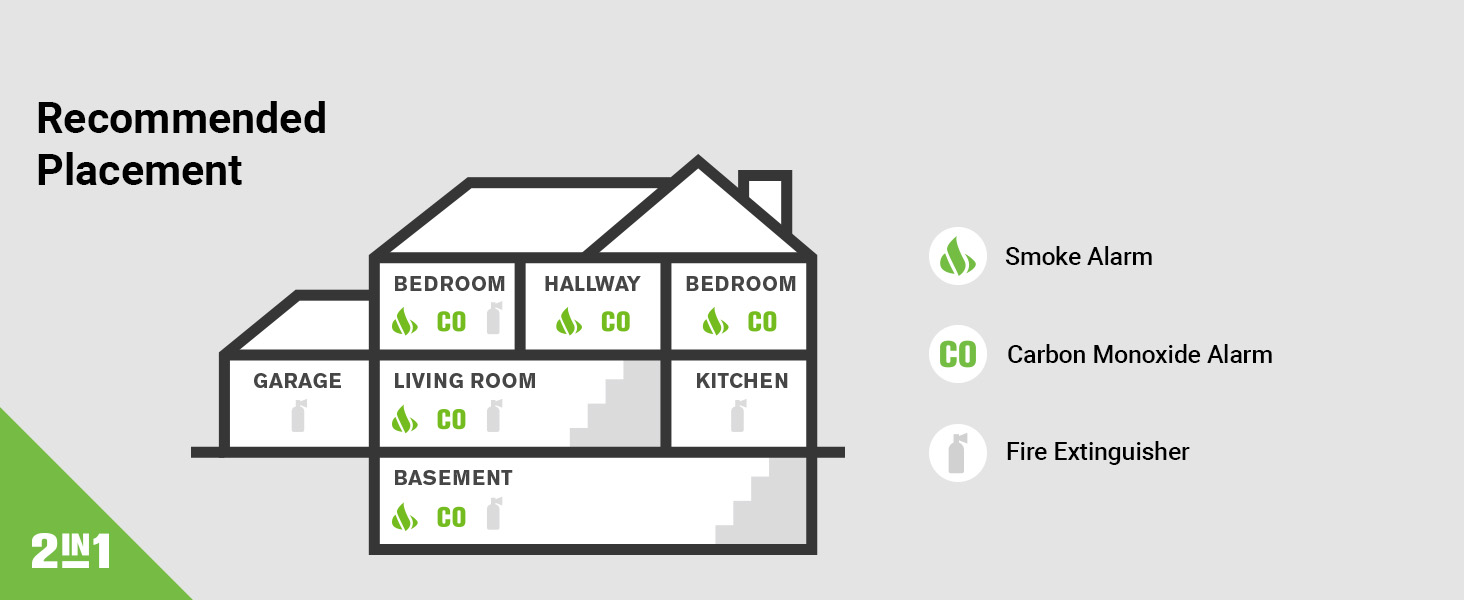
Image: Graphic illustrating Precision Detection Advanced Sensing Technology, emphasizing early warning and reduced nuisance alarms.
4. Setup and Installation
4.1 Package Contents
Before beginning installation, verify that your package contains the following items:
- First Alert SMCO100V-AC Combination Smoke and Carbon Monoxide Alarm
- Mounting Bracket
- AA Batteries (for backup)
- Easy Adapter Plug / Wiring Harness

Image: Components of the First Alert SMCO100V-AC alarm, including the main unit with its battery compartment open, the wiring harness, and mounting screws.
4.2 Recommended Placement
For optimal protection, install alarms on every level of your home and in every bedroom. Consider placing alarms in hallways leading to bedrooms and in living areas. Avoid placing alarms in kitchens directly above cooking appliances or in bathrooms where steam can cause nuisance alarms.

Image: A diagram illustrating recommended locations for smoke alarms, carbon monoxide alarms, and fire extinguishers within a typical home layout.
4.3 Installation Steps
- Turn Off Power: Before beginning any electrical work, ensure the power to the circuit where you will install the alarm is turned off at the main fuse or circuit breaker box.
- Mounting Bracket Installation: Secure the mounting bracket to the ceiling or wall using the provided screws. If replacing an existing alarm, you may be able to use the existing bracket if compatible, but it is recommended to use the new one.
- Wiring Connection: Connect the alarm's wiring harness to your household electrical wiring. The Quick Connect Plug simplifies this process. Ensure proper polarity (black to black, white to white, and red/orange to red/orange for interconnect).
- Battery Installation: Open the battery compartment and insert the AA batteries provided, observing the correct polarity. The battery provides backup power.
- Attach Alarm to Bracket: Align the alarm with the mounting bracket and twist clockwise until it locks securely into place.
- Restore Power: Turn the power back on at the main fuse or circuit breaker box.
- Test the Alarm: Press and hold the 'Test/Silence' button for a few seconds until the alarm sounds. This confirms the unit is receiving power and functioning correctly.

Image: A First Alert SMCO100V-AC alarm installed on a ceiling, demonstrating its hardwired setup.
5. Operating Instructions
5.1 Normal Operation
During normal operation, the green LED indicator will flash approximately once every minute, indicating that the alarm is receiving power and functioning correctly. The alarm will remain silent unless smoke or carbon monoxide is detected, or the test button is pressed.
5.2 Alarm Conditions
- Smoke Alarm: If smoke is detected, the alarm will sound a loud, intermittent horn pattern (three beeps, pause, three beeps). The voice alert will announce "FIRE! FIRE!" and indicate the location if programmed. The red LED will flash rapidly.
- Carbon Monoxide (CO) Alarm: If carbon monoxide is detected, the alarm will sound four quick beeps, pause, four quick beeps. The voice alert will announce "WARNING! CARBON MONOXIDE!" and indicate the location if programmed. The red LED will flash rapidly.
- Low Battery Warning: The alarm will chirp approximately once every minute, accompanied by a voice announcement "LOW BATTERY." This indicates the battery backup needs replacement.
- Malfunction/End-of-Life Warning: The alarm will chirp twice every 30 seconds, accompanied by a voice announcement "MALFUNCTION" or "REPLACE ALARM." This indicates a fault with the unit or that it has reached the end of its operational life and needs replacement.
5.3 Test/Silence Button
The large 'Test/Silence' button on the front of the alarm serves two primary functions:
- Testing: Press and hold the button for a few seconds to test the alarm's electronic circuitry, horn, and battery. The alarm will sound, and voice alerts will activate. Test weekly.
- Silencing: In the event of a nuisance alarm (e.g., from cooking smoke), pressing the button will temporarily silence the alarm for several minutes. The alarm will automatically reset after the silence period if the smoke or CO concentration has cleared. If the danger persists, the alarm will reactivate.
6. Maintenance
6.1 Regular Testing
Test your alarm weekly by pressing and holding the 'Test/Silence' button until the alarm sounds. This ensures the unit is functioning correctly.
6.2 Battery Replacement
When the alarm chirps once every minute and announces "LOW BATTERY," it is time to replace the backup batteries. Use only the specified AA batteries. To replace:
- Twist the alarm counter-clockwise to remove it from the mounting bracket.
- Open the battery compartment.
- Remove the old batteries and dispose of them properly.
- Insert new AA batteries, ensuring correct polarity.
- Close the battery compartment and reattach the alarm to the mounting bracket by twisting clockwise.
- Test the alarm after battery replacement.
6.3 Cleaning Your Alarm
Clean your alarm at least once a month to remove dust and debris. Use a soft brush attachment on your vacuum cleaner to gently vacuum the alarm's cover and vents. Do not use cleaning solvents or spray cleaners directly on the alarm.
6.4 Alarm Replacement
Smoke and carbon monoxide alarms have a limited lifespan. This alarm should be replaced at least every 10 years from the date of manufacture. The alarm will indicate an end-of-life warning with specific chirps and voice announcements. Refer to the date code on the back of the alarm for the manufacture date.
7. Troubleshooting
If your alarm is not functioning as expected, refer to the table below for common issues and solutions.
| Problem | Possible Cause | Solution |
|---|---|---|
| Alarm chirps once every minute with "LOW BATTERY" voice. | Backup batteries are low. | Replace the AA batteries immediately. |
| Alarm chirps twice every 30 seconds with "MALFUNCTION" or "REPLACE ALARM" voice. | Unit malfunction or end-of-life. | Replace the entire alarm unit. |
| Alarm sounds frequently without apparent smoke or CO. | Nuisance alarm (e.g., cooking smoke, steam, dust). | Press the 'Silence' button. Clean the alarm. Relocate if consistently triggered by normal activities. |
| Alarm does not sound during test. | No power, dead batteries, or unit malfunction. | Check household power. Replace batteries. If still no sound, replace the unit. |
| Interconnected alarms do not all sound. | Wiring issue or incompatible units. | Verify interconnect wiring. Ensure all interconnected units are compatible models. Consult an electrician if necessary. |
8. Specifications
- Model: SMCO100V-AC
- Brand: First Alert
- Power Source: Corded Electric with Battery Backup
- Battery Type: AA Alkaline (included)
- Alarm Type: Combination Smoke and Carbon Monoxide
- Dimensions: 5.1"D x 5.1"W x 2.4"H
- Item Weight: 11.2 ounces
- Color: White
- Interconnect: Hardwire Interconnect
- Manufacturer: Resideo
- UPC: 029054022097
9. Warranty Information
This First Alert SMCO100V-AC Combination Smoke and Carbon Monoxide Alarm comes with a 10 Years Limited Warranty. For detailed terms and conditions, please refer to the warranty documentation included with your product or visit the official First Alert website.
10. Customer Support
If you have any questions regarding the installation, operation, or maintenance of your First Alert alarm, or if you require technical assistance, please contact First Alert customer support. Contact information can typically be found on the product packaging or the official First Alert website.
Website: www.firstalert.com


