1. Introduction and Overview
Thank you for choosing the sygonix Traveler Mobile EV Charging Station. This versatile charging station is designed for universal use, featuring a comprehensive set of power adapters with various plug formats and a Type 2 male connector. The charger automatically detects the connected adapter and adjusts the corresponding current limit, ensuring safe and efficient charging.
With a maximum charging power of 11 kW, this station provides robust performance for your electric vehicle. It is operated via an intuitive LCD touchscreen, allowing you to monitor the current charging status and adjust settings. LED indicators provide additional visual feedback on the charging process.
2. Package Contents
Please check the package for the following items:
- EV Charging Station
- 3 Plug Adapters (various formats)
- Mounting Bracket
- Accessories for Mounting Bracket
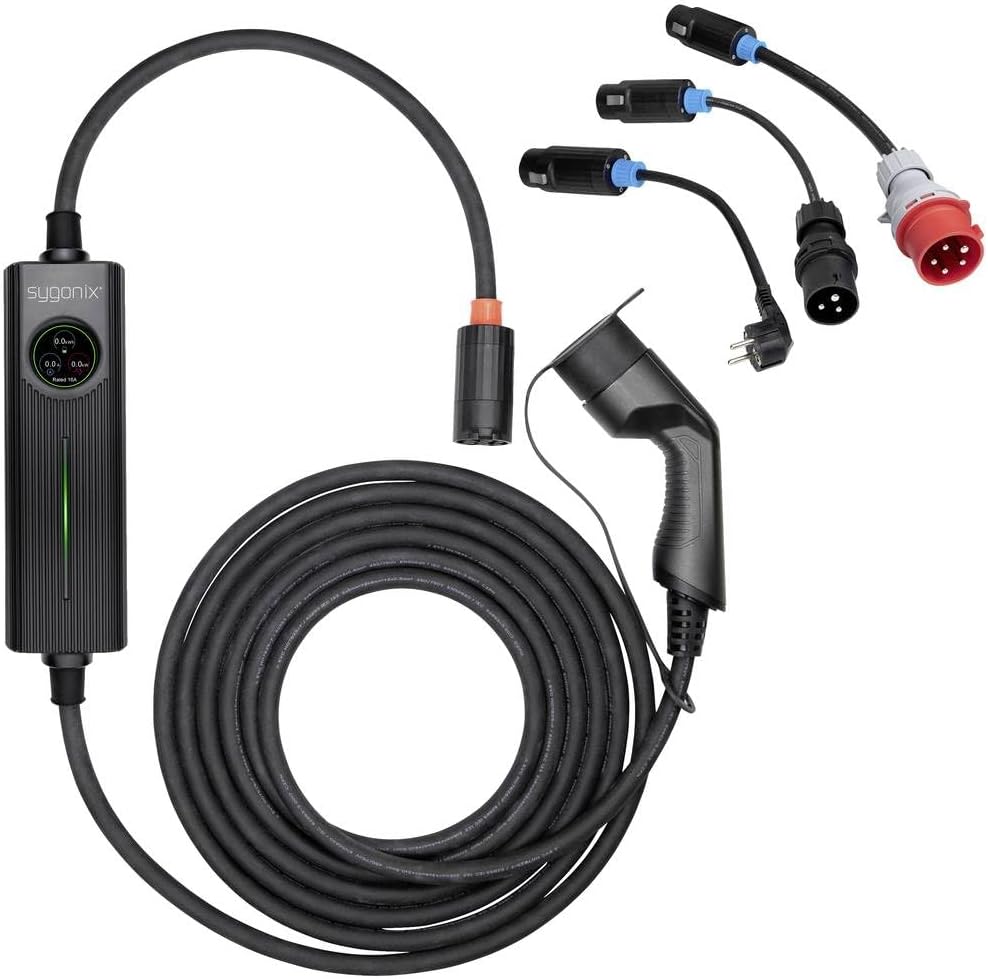
Figure 2.1: Complete sygonix EV Charging Station package contents, including the main charging unit, Type 2 connector, coiled cable, three different power adapters, and the mounting bracket.
3. Safety Instructions
Read all safety instructions carefully before using the charging station. Failure to follow these instructions may result in electric shock, fire, or serious injury.
- Electrical Safety: Ensure the power outlet used is properly grounded and rated for the charging station's power requirements. Do not use extension cords or adapters that are not supplied with the product.
- Environmental Conditions: Do not expose the charging station to extreme temperatures, direct sunlight for prolonged periods, or moisture. Avoid using it in rain or wet conditions unless explicitly designed for such use.
- Cable Inspection: Regularly inspect the charging cable and connectors for any signs of damage, wear, or corrosion. Do not use the station if any part is damaged.
- Children and Pets: Keep the charging station and cables out of reach of children and pets.
- Ventilation: Ensure adequate ventilation around the charging station during operation to prevent overheating.
- Emergency Stop: Familiarize yourself with the emergency stop procedure for your electric vehicle and the charging station.
4. Setup
Follow these steps to set up your sygonix EV Charging Station:
- Unpack: Carefully remove all components from the packaging and verify against the package contents list.
- Mounting (Optional): If desired, use the provided mounting bracket and accessories to secure the charging station to a suitable wall or surface. Ensure the mounting location is dry, stable, and allows for easy access to the power outlet and vehicle.
- Select Adapter: Choose the appropriate power adapter from the supplied set that matches your available power outlet.
- Connect Adapter: Firmly connect the selected power adapter to the charging station's input cable. Ensure a secure connection.
- Connect to Power: Plug the power adapter into a suitable, grounded electrical outlet. The charging station will power on, and the LCD screen will activate. The charger will automatically detect the connected adapter and set the appropriate current limit.
5. Operating Instructions
Once the charging station is set up and powered on, follow these steps to charge your electric vehicle:
- Connect to Vehicle: Take the Type 2 charging connector and firmly insert it into your electric vehicle's charging port. Ensure it clicks into place.

Figure 5.1: The Type 2 charging connector, ready to be inserted into the vehicle's charging port.
- Monitor LCD Screen: The LCD touchscreen on the charging station will display real-time charging information, including current, voltage, power, and charging duration.
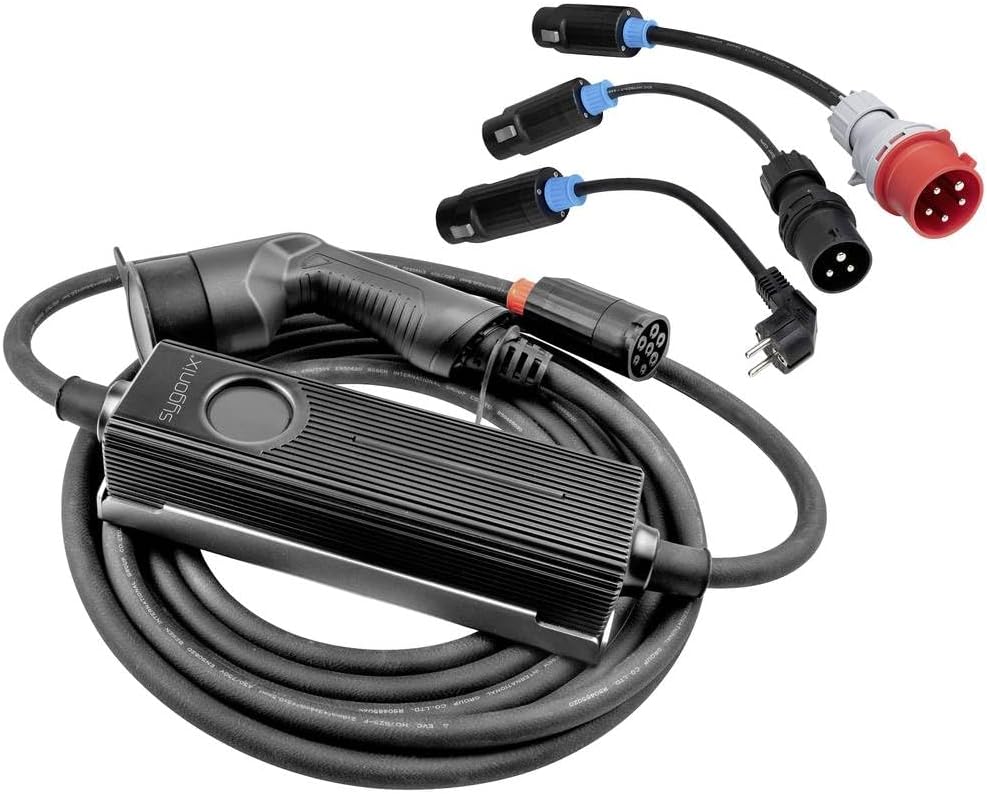
Figure 5.2: The control unit of the sygonix EV charging station, showing the LCD display and LED indicators.
- Adjust Settings (if applicable): Use the touchscreen interface to adjust settings such as charging phase, current limit, charging time, or to set a delayed start, if these features are available and desired. The charger automatically detects the adapter and sets a default current limit, but manual adjustments may be possible within safe parameters.
- Start Charging: Charging will typically begin automatically once the Type 2 connector is securely plugged into the vehicle and the station is powered. Confirm the charging status on the LCD screen and via the LED indicators.
- End Charging: To stop charging, either disconnect the Type 2 connector from your vehicle (following your vehicle's instructions) or stop the charging process via the charging station's interface if an option is available. Always disconnect from the vehicle first before unplugging the station from the power outlet.
6. Maintenance
Proper maintenance ensures the longevity and safe operation of your charging station.
- Cleaning: Clean the charging station and cables with a soft, dry cloth. Do not use abrasive cleaners, solvents, or immerse any part in water. Ensure the station is unplugged before cleaning.
- Cable and Connector Inspection: Periodically inspect the charging cable, connectors, and adapters for any signs of damage, fraying, cracks, or discoloration. If any damage is found, discontinue use immediately and contact customer support.
- Storage: When not in use, store the charging station in a dry, cool place, away from direct sunlight and extreme temperatures. Coil the cable neatly to prevent kinks or damage.
7. Troubleshooting
If you encounter issues with your charging station, refer to the following common problems and solutions:
- Charging Not Starting:
- Ensure the charging station is properly plugged into a live power outlet.
- Verify that the Type 2 connector is fully inserted into the vehicle's charging port.
- Check the LCD screen for any error messages.
- Ensure the vehicle's charging settings are correctly configured.
- No Power to Charging Station:
- Check the power outlet with another device to confirm it is functional.
- Ensure the selected power adapter is securely connected to the charging station and the wall outlet.
- Check your household circuit breaker.
- Error Message on LCD:
- Note down the error code or message.
- Try disconnecting and reconnecting the charging station from both the power source and the vehicle.
- If the error persists, consult the manufacturer's website or contact customer support with the error details.
- Slow Charging:
- Ensure the correct power adapter is used and fully connected.
- Check the charging station's settings on the LCD screen to ensure the current limit is not set too low.
- Verify that your vehicle is capable of accepting the full 11 kW charge.
8. Specifications
| Feature | Specification |
|---|---|
| Manufacturer | Sygonix |
| Brand | sygonix |
| Model Number | SY-5479632 |
| Item Weight | 7.5 Kilograms |
| Product Dimensions (L x W x H) | 600 x 30 x 6.6 cm |
| ASIN | B0CV4ZG858 |
| Maximum Charging Power | 11 kW (3 phases) |
| Connector Type | Type 2 |
| Operating Interface | LCD Touchscreen, LED Indicators |
9. Warranty and Support
For warranty information, please refer to the documentation included with your purchase or visit the official sygonix website. If you require technical support, troubleshooting assistance beyond this manual, or have questions regarding your product, please contact sygonix customer service through their official channels.


