Introduction
This manual provides essential information for the safe and efficient operation of your Anern 10.2KW Hybrid Solar Inverter. Please read all instructions carefully before installation and use to ensure proper functionality and longevity of the device. This inverter is designed to convert DC power from solar panels and batteries into AC power for various applications.
Safety Instructions
Adherence to these safety guidelines is crucial to prevent injury and damage to the equipment.
- Inductive Load Consideration: Ensure the starting power of inductive loads is at least three times the rated power of the inverter to prevent overload.
- Correct Wiring: Connect all circuits correctly according to the provided instructions and install a circuit breaker for each circuit. Incorrect wiring can lead to severe damage or electrical hazards.
- Startup Sequence: Always follow the correct startup sequence: connect the battery first, then start the inverter, then connect the PV (photovoltaic) array, grid, and load circuit breakers.
- Shutdown Sequence: Power off the system in the reverse order of startup.
- Power Disconnection: Always disconnect all power sources (PV, grid, battery) before performing any maintenance, cleaning, or wiring adjustments.
- Professional Installation: Installation and servicing should only be performed by qualified and trained personnel. Do not attempt to repair the unit yourself.
- Ventilation: Ensure adequate ventilation around the inverter to prevent overheating. Keep ventilation openings clear of dust and debris.
Product Overview
Key Features
- Dual PV Input / Dual AC Output: Features two PV inputs sharing a common MPPT for simplified solar module wiring and dual AC outputs for primary and secondary loads. The secondary output conserves energy when PV or grid power is unavailable and battery voltage is low.
- Remote Monitoring: Supports WIFI/GPRS remote monitoring, allowing data retrieval and control via a mobile application (WiFi module included).
- Pure Sine Wave Output: Provides stable, high-quality AC current to protect electronic devices and extend their lifespan.
- Battery Compatibility: Compatible with lead-acid, gel, and lithium batteries (requires custom setting for lithium batteries).
- Comprehensive Protection: Includes 360-degree protection against short-circuits, under-voltage, overloads, overcharges, backfill, overheating, overcurrents, and overvoltages.
Components
The following image illustrates the main components and interfaces of the inverter:

This image displays the front and rear panels of the Anern 10.2KW Hybrid Solar Inverter, highlighting key components such as the LCD display, status indicators, touch function keys, AC input/output ports, PV inputs, battery input, communication ports, and the anti-dust kit. It also illustrates the WiFi monitoring module connection.
- LCD-Display
- Status display
- Load indicator
- Error indicator
- Touch function keys
- On/Off Switch
- AC input
- Main output
- Second output
- PV1 and PV2 input
- Communication port
- Remove RS-232/WIFI/LCD
- Battery input
- Anti-dust kit
Specifications
| Specification | Value |
|---|---|
| Brand | Anern |
| Model Name | AN-SCI-MAX-10200W |
| Power | 10.2 KW |
| Input Voltage | 48 Volts (DC) |
| Battery Capacity | 160 Ampere-hours (Max MPPT Charge Current) |
| Product Dimensions | 69.5L x 53.5W x 26.5H centimeters |
| Recommended Use | Home |
| Power Source | Solar Powered, Battery Powered |

This image provides a visual representation of the inverter's dimensions, showing its length, width, and height in both inches and millimeters.
Installation
Wiring Diagram
The following diagram illustrates the recommended wiring connections for the hybrid solar inverter system, including solar panels, battery, AC input, and AC output loads.
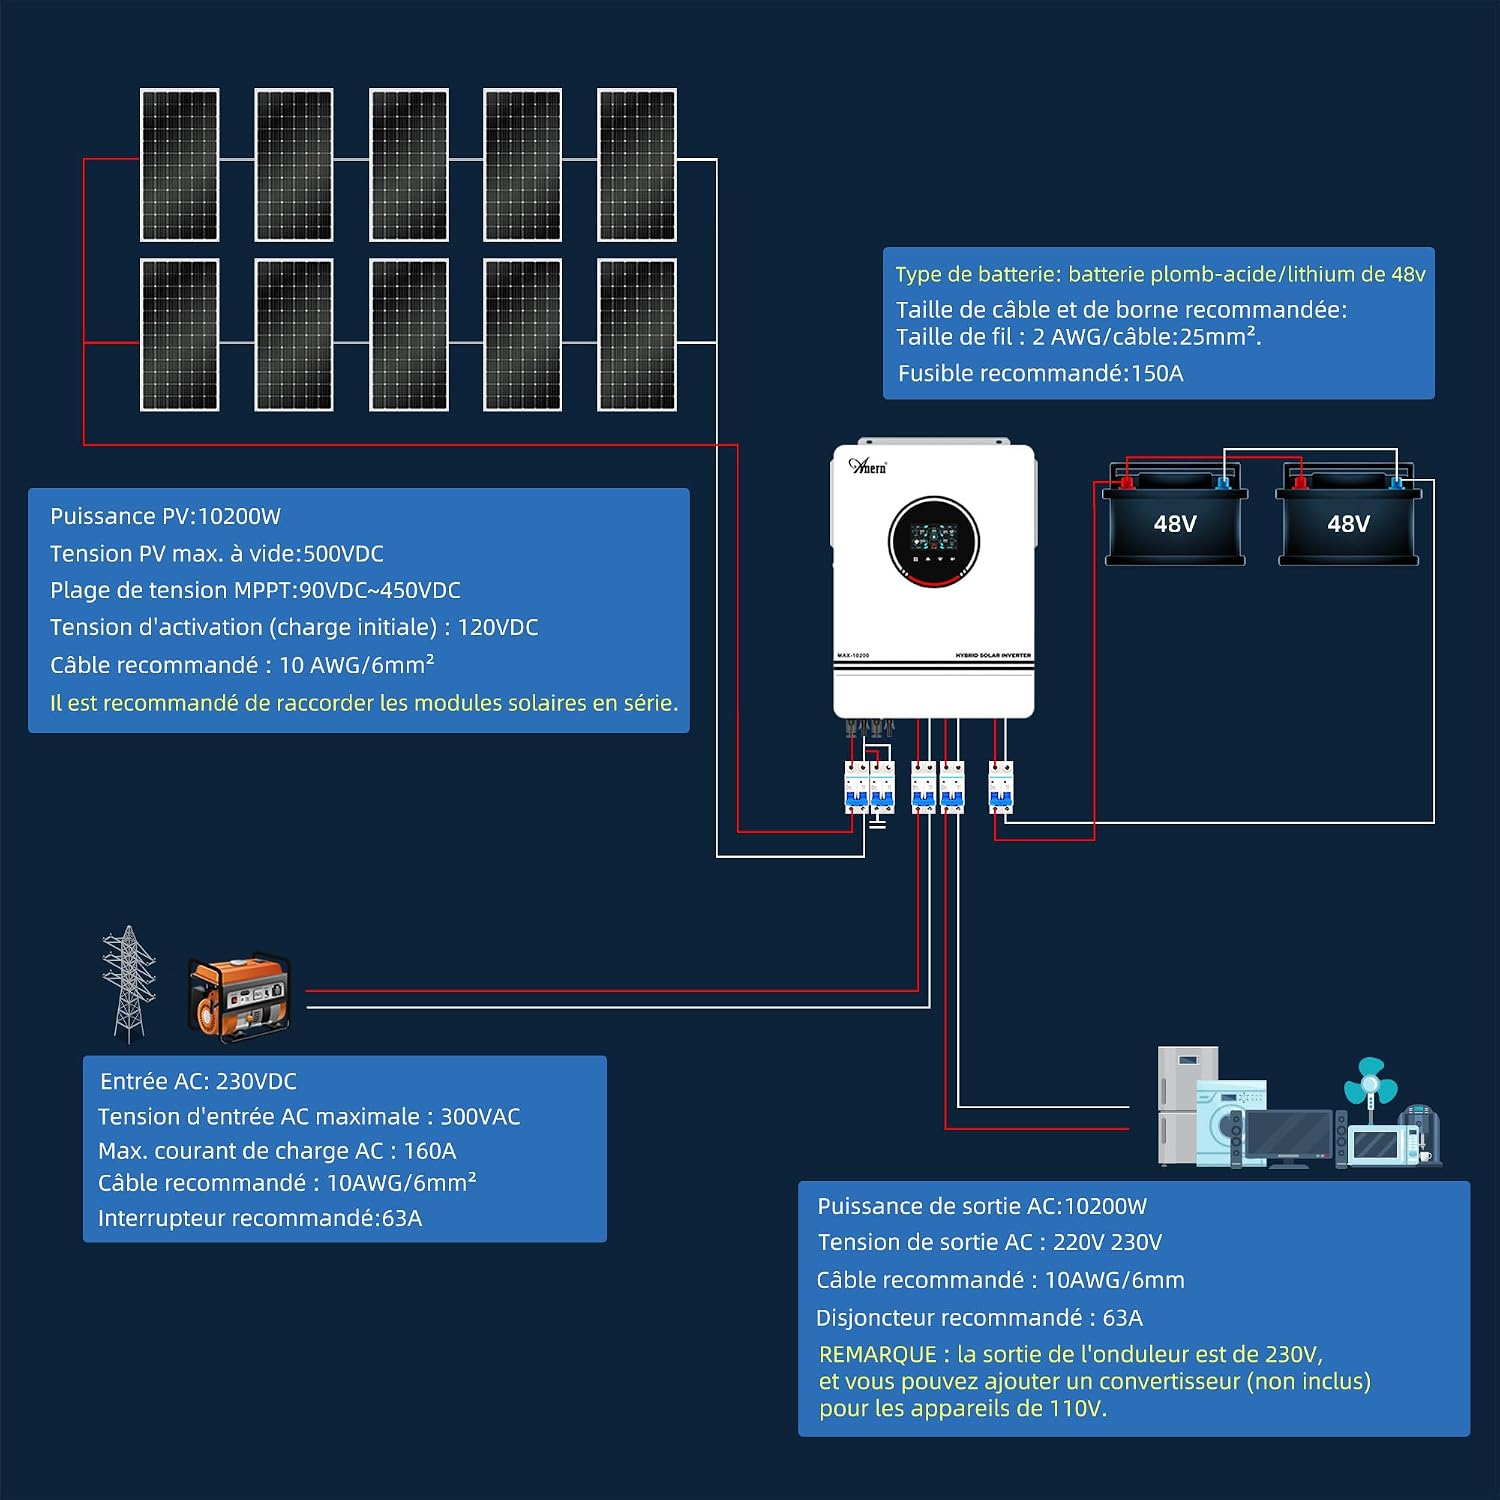
This diagram shows the connections for solar PV input (up to 10200W, 500VDC max), 48V battery bank (recommended 2 AWG/25mm² cable, 150A fuse), AC input (230VDC, 300VAC max, 160A max charge current, 10AWG/6mm² cable, 63A breaker), and AC output (10200W, 220V/230V, 10AWG/6mm² cable, 63A breaker). Note that the inverter's output is 230V, and a converter (not included) is needed for 110V appliances.
Battery and Inverter Communication Setup
This video demonstrates the steps to establish communication between the lithium battery and the inverter, ensuring proper data exchange and synchronized operation.
This video guide shows how to connect the communication cables between the lithium battery and the inverter, set the inverter's item '05' to 'LIP' mode, and activate the first DIP switch on the battery. It also demonstrates how to observe the inverter and battery data to confirm successful communication.
- Connect the communication cables of the lithium battery and the inverter.
- Set the 'Item 05' on the inverter to 'LIP' mode.
- Turn on the first DIP switch of the battery.
- Observe the inverter and lithium battery data. After successful communication, the State of Charge (SOC) displayed on the inverter will change according to the SOC of the battery pack.
WiFi Monitoring Setup
This video provides instructions on how to set up the WiFi monitoring feature for your inverter using the SmartESS mobile application.
This video demonstrates the process of downloading the SmartESS app, creating an account, adding the datalogger by scanning its PN or manual input, connecting the Wi-Fi Datalogger to your phone's WLAN (using initial password 12345678), and configuring the network settings with your home WiFi information.
- Download APP: Scan the QR Code provided in the manual or on the device to download the SmartESS application.
- Create Account: Open the APP, tap the 'Register' button, and complete the registration process by providing the required information.
- Add Datalogger: Tap the '+' button in the app. Scan the PN (Product Number) on the Wi-Fi Plug Pro or input it manually. Follow the prompts to add the datalogger.
- Connect Wi-Fi Datalogger: Tap 'Network tools' in the app, then 'Wi-Fi network'. Select the Wi-Fi network corresponding to the Wi-Fi Plug Pro PN on your phone's WLAN settings. The initial password is '12345678'.
- Network Setting: Type in your home WiFi information (network name and password) to finalize the network setting. Ensure you connect to your home WiFi.
Operating Modes
The inverter offers various charging and output modes to optimize energy usage based on your preferences and available power sources.

This diagram illustrates the different charge modes (Solar First, Solar Only, Solar and Utility) and output modes (Utility First, PV First, SBU Priority, SUB-Solar First) available on the inverter, showing how power is prioritized from solar, battery, and utility sources.
Charge Modes
- CSO (Solar First): Solar energy is prioritized to charge the battery. The utility grid charges the battery only if solar energy is not available.
- OSO (Solar Only): Solar energy is the sole source for charging the battery, regardless of its availability.
- SNU (Solar and Utility): Both solar energy and the utility grid charge the battery simultaneously.
Output Modes
- USB (Utility First): Connected loads are primarily powered by the utility grid. Solar energy and battery power are used only when the utility grid cannot provide electricity.
- APL (PV First): Solar energy is prioritized to power the loads. If solar energy is insufficient, the loads are simultaneously powered by the utility grid. Batteries provide backup power only.
- SUB (SBU Priority): If solar energy is insufficient to power all connected loads, the battery will power the loads simultaneously. The utility grid will not power the loads unless the battery voltage drops to the warning level or below the procedure 12 setting.
- SUB-Solar First (Standard): If solar energy is insufficient to power all connected loads, the battery will power the loads simultaneously. The battery will only power the loads when solar energy and the utility grid are not available.
Maintenance
Regular maintenance ensures the optimal performance and longevity of your Anern Hybrid Solar Inverter.
- Visual Inspection: Periodically inspect the inverter for any visible signs of damage, loose connections, or corrosion.
- Cleaning: Keep the inverter's ventilation openings and exterior surfaces clean and free of dust and debris. Use a dry, soft cloth for cleaning. Do not use liquid cleaners.
- Connection Checks: Ensure all electrical connections (PV, battery, AC input/output) are secure and tightened to the recommended torque specifications.
- Environmental Conditions: Verify that the inverter is operating within its specified temperature and humidity ranges.
- Firmware Updates: Check the manufacturer's website or the SmartESS app for any available firmware updates to ensure your inverter has the latest features and bug fixes.
- Professional Check: It is recommended to have a qualified technician perform a comprehensive system check at least once a year.
Troubleshooting
If you encounter issues with your inverter, refer to the following general troubleshooting steps. For specific error codes or complex problems, consult the full product manual or contact customer support.
- No Power/Display Off: Check all power connections, including battery, PV, and AC input. Ensure the ON/OFF switch is in the 'ON' position. Verify that the battery voltage is within the operating range.
- No AC Output: Check if the inverter is in an error state (refer to the error indicator on the LCD). Verify that the AC output circuit breaker is not tripped. Ensure the load is not exceeding the inverter's rated power.
- PV Input Issues: Check solar panel connections and ensure they are receiving adequate sunlight. Verify PV input voltage and current on the display.
- Battery Not Charging: Check battery connections and ensure the battery type setting is correct (especially for lithium batteries). Verify PV input and AC input (if charging from grid) are present.
- Communication Errors: For WiFi or battery communication issues, re-check communication cable connections and review the setup steps in the 'Installation' section. Ensure the WiFi module is properly installed and configured.
- Overload/Overheat Protection: If the inverter shuts down due to overload or overheating, reduce the connected load or ensure proper ventilation. Allow the unit to cool down before restarting.
Warranty and Support
The Anern 10.2KW Hybrid Solar Inverter comes with a 3-year warranty. This warranty covers defects in materials and workmanship under normal use and service conditions.
For warranty claims, technical support, or further assistance, please contact Anern customer service. You can typically reach support via the Amazon platform where the product was purchased or through the official Anern website. Please have your product model number (AN-SCI-MAX-10200W) and purchase details ready when contacting support.


