
1. Product Overview
The LuxeBath Steel Bathroom Radiator is designed for efficient heating in bathrooms and other living spaces. Constructed from high-quality steel with high thermal conductivity, this radiator features a straight form and a white finish. It is designed for hot water operation and includes all necessary wall mounting hardware for installation.
Key Features:
- High-quality steel construction for efficient heat transfer.
- Leak protection through advanced welding techniques.
- Designed for hot water central heating systems.
- Maximum operating pressure: 10 bar.
- Includes bleed valve, blanking plug, and wall mounting kit.

Figure 1: Front view of the LuxeBath Steel Bathroom Radiator.
2. Installation Instructions
Before beginning installation, ensure you have all components and tools required. Installation should be performed by a qualified professional if you are unsure about any steps.
2.1. Package Contents
Verify that all items listed below are present in your package:
- 1 x LuxeBath Bathroom Radiator
- 1 x 1/2 inch Bleed Valve
- 1 x 1/2 inch Blanking Plug
- 1 x Wall Mounting Kit, including:
- 4 x Wall Brackets
- 4 x Screws and Wall Plugs
- 4 x Support Screws
- 4 x Washers
- Installation Instructions (this manual)
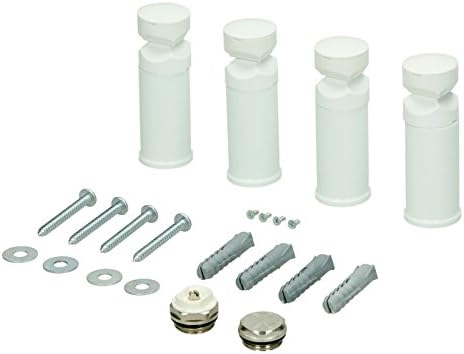
Figure 2: Wall mounting kit and accessories.
2.2. Mounting the Radiator
- Select Location: Choose a suitable wall location, ensuring adequate space for the radiator and access for connections. Consider the distance to the wall, approximately 6.5 cm.
- Mark Drilling Points: Use the provided wall brackets to mark the drilling points on the wall. Refer to the technical drawing for precise dimensions and hub distances (500 mm for this model).
- Drill Holes: Drill holes at the marked points and insert the wall plugs.
- Attach Brackets: Secure the wall brackets to the wall using the screws and washers.
- Mount Radiator: Carefully lift the radiator and position it onto the installed wall brackets. Ensure it is level and securely seated.
- Connect to Heating System: Connect the radiator to your hot water central heating system. The radiator features side connections. Ensure all connections are sealed properly to prevent leaks.
- Install Bleed Valve and Blanking Plug: Install the 1/2 inch bleed valve and blanking plug into the designated ports on the radiator.

Figure 3: Technical drawing showing radiator dimensions (500mm width, 1200mm height, 500mm hub distance).

Figure 4: Detail of the side connection for the heating system.
3. Operating Instructions
The LuxeBath radiator operates as part of a hot water central heating system. Once installed and connected, it functions by circulating hot water to emit heat into the room.
3.1. Initial Start-up
- Fill System: Ensure your central heating system is filled with water and pressurized according to your system's requirements.
- Bleed Radiator: Before first use, and periodically thereafter, bleed the radiator to release any trapped air. Use a radiator key to open the bleed valve until water starts to come out, then close it. This ensures efficient heating.
- Check for Leaks: After filling and bleeding, carefully inspect all connections for any signs of water leakage.
3.2. Normal Operation
- The radiator will heat up when your central heating system is active.
- The maximum operating pressure for this radiator is 10 bar (1 MPa). Do not exceed this pressure.
- For optimal performance, ensure the room thermostat is set to your desired temperature.
4. Maintenance
Regular maintenance ensures the longevity and efficient operation of your LuxeBath radiator.
- Cleaning: Clean the radiator regularly with a soft, damp cloth. Avoid abrasive cleaners or harsh chemicals, as these can damage the white powder-coated finish.
- Bleeding: Periodically bleed the radiator (e.g., once a year before the heating season) to remove any accumulated air, which can reduce heating efficiency.
- Inspection: Annually inspect the radiator and its connections for any signs of corrosion, damage, or leaks. Address any issues promptly.
5. Troubleshooting
This section addresses common issues you might encounter with your radiator.
| Problem | Possible Cause | Solution |
|---|---|---|
| Radiator not heating up fully (cold spots) | Trapped air in the system. | Bleed the radiator using the bleed valve until water flows steadily. |
| Radiator not heating at all | Central heating system off, low system pressure, or valve closed. | Check if the central heating is on. Verify system pressure. Ensure radiator valves are open. |
| Water leakage from connections | Loose connections or faulty seals. | Tighten connections. If leakage persists, replace seals or consult a professional. |
If you encounter problems not listed here or if solutions do not resolve the issue, please contact a qualified heating engineer or LuxeBath customer support.
6. Technical Specifications
| Feature | Specification |
|---|---|
| Brand | LuxeBath |
| Model Number | Luxe-381 |
| Material | Steel |
| Color | White |
| Width | 500 mm |
| Height | 1200 mm |
| Hub Distance | 500 mm |
| Connections | Side connections (255 mm) |
| Tube Diameter | Ø 22.5 mm |
| Number of Tubes | 17 |
| Vertical Profiles | D-shaped 40 x 30 x 1.5 mm |
| Horizontal Tubes | Round 22.5 x 1.2 mm |
| Weight | 8.31 kg |
| Thermal Output | 410 W (1392 BTU) |
| Maximum Operating Pressure | 10 bar (1 MPa) |
| Test Pressure | 12 bar (1.2 MPa) |
| Distance to Wall | Approx. 6.5 cm |
| Radiator Model | Straight |
7. Warranty and Support
For information regarding warranty coverage, please refer to the purchase documentation or contact your retailer. LuxeBath is committed to providing high-quality products.
If you require technical assistance or have questions about your LuxeBath radiator, please contact the seller or manufacturer's customer support. Keep your purchase receipt and model number (Luxe-381) handy when contacting support.