Introduction
Thank you for choosing the Homsee White Wardrobe Armoire Wooden Closet. This manual provides essential information for the safe and efficient assembly, operation, and maintenance of your new furniture. Please read all instructions carefully before beginning assembly and retain this manual for future reference.
This wardrobe features a spacious design with three doors, five internal storage compartments, and two hanging rods, offering versatile storage solutions for your bedroom or dressing area.

Image: The Homsee White Wardrobe Armoire, closed, positioned in a bedroom with blue walls and a bed.
Safety Information
- Two-Person Assembly: For safety and ease of assembly, it is highly recommended that two adults assemble this wardrobe.
- Small Parts: Keep all small parts and packaging materials away from children and pets to prevent choking hazards.
- Wall Anchoring: To prevent tipping, it is crucial to securely anchor the wardrobe to a wall using the provided anti-tip hardware. Failure to do so can result in serious injury or death.
- Weight Limits: Do not overload shelves or hanging rods. Distribute weight evenly to maintain stability.
- Stable Surface: Assemble and place the wardrobe on a flat, level, and stable surface.
- Tool Use: Use appropriate tools as instructed. Do not overtighten screws, as this may damage the material.
Package Contents
Before beginning assembly, please verify that all components and hardware are present and undamaged. If any parts are missing or damaged, please contact customer support immediately.
- Wardrobe panels (e.g., side panels, back panels, top/bottom panels, shelves, doors)
- Hardware pack (screws, dowels, hinges, handles, hanging rods, anti-tip kit)
- Assembly instructions manual
Setup and Assembly
Assembly of this wardrobe is required. Please follow the detailed step-by-step instructions provided in the separate assembly guide included in your package. Ensure you have ample space and the necessary tools (e.g., screwdriver, hammer) before starting.
- Unpack and Identify: Carefully unpack all components and lay them out on a clean, soft surface to prevent scratches. Identify each part using the labels and diagrams in the assembly guide.
- Assemble Frame: Begin by assembling the main frame of the wardrobe according to the instructions. Ensure all connections are secure.
- Install Shelves and Rods: Insert the shelves and hanging rods into their designated positions.
- Attach Doors: Mount the three doors using the provided hinges. Adjust hinges as needed for proper alignment.
- Install Handles: Attach the decorative handles to the doors.
- Secure to Wall: Crucially, use the anti-tip kit to secure the wardrobe to a sturdy wall stud. This step is vital for safety.
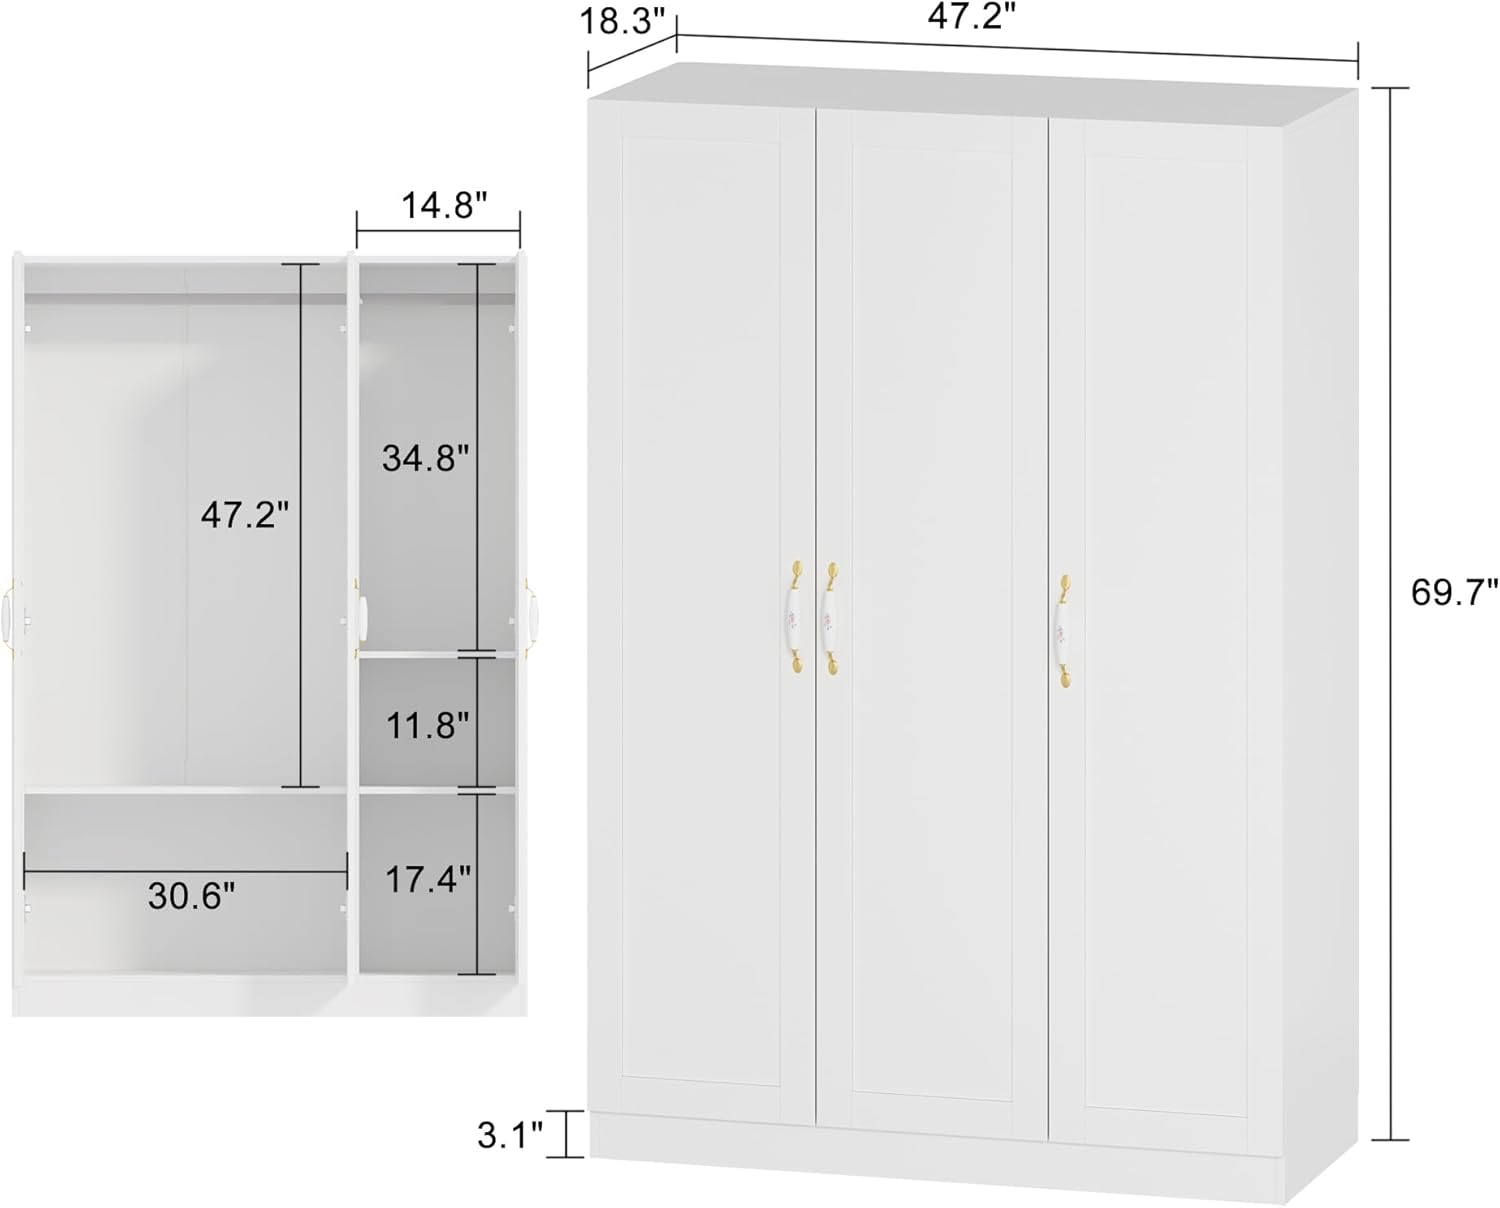
Image: A diagram illustrating the external and internal dimensions of the wardrobe, including shelf and hanging space measurements.

Image: A composite image showing the wardrobe from the front (closed), side, and with its doors open revealing the interior layout.
Operation
The Homsee White Wardrobe Armoire is designed for convenient storage of clothing and accessories.
- Opening/Closing Doors: Use the decorative handles to gently open and close the three wardrobe doors. Avoid forcing the doors.
- Utilizing Hanging Rods: The two hanging rods are suitable for coats, dresses, shirts, and other garments that require hanging. Distribute weight evenly across the rods.
- Using Storage Compartments: The five internal compartments provide space for folded clothes, blankets, bags, and other items. Place heavier items on lower shelves for better stability.

Image: The wardrobe with its three doors open, displaying clothes hanging on rods and various items neatly folded on the shelves.

Image: A detailed view of the interior hanging section of the wardrobe, showing various garments on hangers.
Maintenance and Care
Proper care will extend the life and appearance of your wardrobe.
- Cleaning: Wipe surfaces with a soft, damp cloth. Avoid using abrasive cleaners, harsh chemicals, or solvents, as these can damage the finish. Dry immediately with a clean cloth.
- Hardware Check: Periodically check all screws and fasteners to ensure they remain tight. Retighten if necessary to maintain stability and structural integrity.
- Avoid Moisture: Protect the wardrobe from excessive moisture and direct sunlight, which can cause warping or discoloration.
- Door Hinges: If doors become misaligned, adjust the hinges as per the assembly guide.

Image: A close-up of a door hinge, illustrating the hardware used for door attachment.

Image: A close-up of the elegant gold and white handles with a floral pattern, attached to the wardrobe doors.
Troubleshooting
| Problem | Possible Cause | Solution |
|---|---|---|
| Wardrobe feels unstable or wobbly. | Loose fasteners; uneven floor; not anchored to wall. | Ensure all screws are tightened. Place on a level surface or use shims. Securely attach to the wall using the anti-tip kit. |
| Doors do not align or close properly. | Hinges are loose or improperly adjusted; frame not square. | Adjust the hinges as per the assembly guide. Check that the wardrobe frame is assembled squarely. |
| Missing parts or damaged components upon arrival. | Shipping damage or packaging error. | Do not proceed with assembly. Contact Homsee customer service immediately for replacement parts. |
| Difficulty during assembly. | Instructions not followed correctly; incorrect parts used. | Review the assembly instructions carefully. Ensure you are using the correct hardware for each step. Consider having a second person assist. |
Specifications
| Feature | Detail |
|---|---|
| Brand | Homsee |
| Model Number | B0CTZR9JDV |
| Color | White |
| Product Dimensions | 18.3"D x 47.2"W x 69.7"H |
| Material | Engineered Wood |
| Number of Doors | 3 |
| Number of Shelves | 5 |
| Number of Hanging Rods | 2 |
| Assembly Required | Yes |
| Mounting Type | Wall Mount (Anti-tip kit included) |
| Handle Material | Metal |
Warranty and Customer Support
For any questions regarding assembly, missing parts, or product issues, please contact Homsee customer service. Refer to the contact information provided in your purchase documentation or visit the official Homsee website for support.
Please have your model number (B0CTZR9JDV) and purchase date available when contacting support to expedite assistance.


