Introduction
Thank you for choosing the Yes4All Dip Stand V7WI. This manual provides essential information for the safe and effective assembly, operation, and maintenance of your new fitness equipment. Please read all instructions carefully before use and retain this manual for future reference.
Important Safety Information
- Consult a physician before starting any exercise program.
- Ensure all bolts and nuts are securely tightened before each use.
- Do not exceed the maximum weight capacity of 500 lbs (226 kg).
- Place the dip stand on a flat, stable, non-slip surface.
- Keep children and pets away from the equipment during use.
- Inspect the equipment for wear or damage before each workout. Do not use if damaged.
- Use proper form and technique to avoid injury.
Package Contents
Please verify that all components are present before beginning assembly:
- Dip stand station components
- Instruction Manual (this document)
- Wrench support (assembly tools)
If any parts are missing or damaged, please contact Yes4All customer support.
Assembly Instructions
Follow these steps to assemble your Yes4All Dip Stand. It is recommended to have the included wrench support available.
- Unpack Components: Carefully remove all parts from the packaging and lay them out. Verify against the "Package Contents" section.
- Attach Base Stabilizers: Secure the horizontal base stabilizers to the vertical uprights using the provided bolts and nuts. Ensure they are firmly attached.
- Install Rubber Foot Bases: Slide the rubber foot bases onto the ends of the base stabilizers to protect your floor and enhance stability.
- Connect Crossbar: Insert the adjustable crossbar between the two vertical uprights. Align the holes for your desired width.
- Secure Crossbar (Width Adjustment):
- Insert the first hand screw through the outer upright and the crossbar, aligning it with a pre-drilled hole to set the desired width.
- Tighten the second hand screw (set screw) firmly against the inner metal shaft of the crossbar. This screw is designed to press directly into the metal for enhanced stability and does not require alignment with a hole.
- Insert Dip Handles: Slide the dip handles into the top of the vertical uprights.
- Adjust Height: Select your desired height for the dip handles by aligning the holes and securing them with the hand screws. Ensure both handles are at the same height.
- Final Check: Before first use, double-check all connections to ensure they are tight and secure.

Image 1: Key components of the Yes4All Dip Stand, illustrating the triangle design for stability, NBR foam dip handles, adjustable hand screws, support bars, rubber foot bases, and push-up handles.
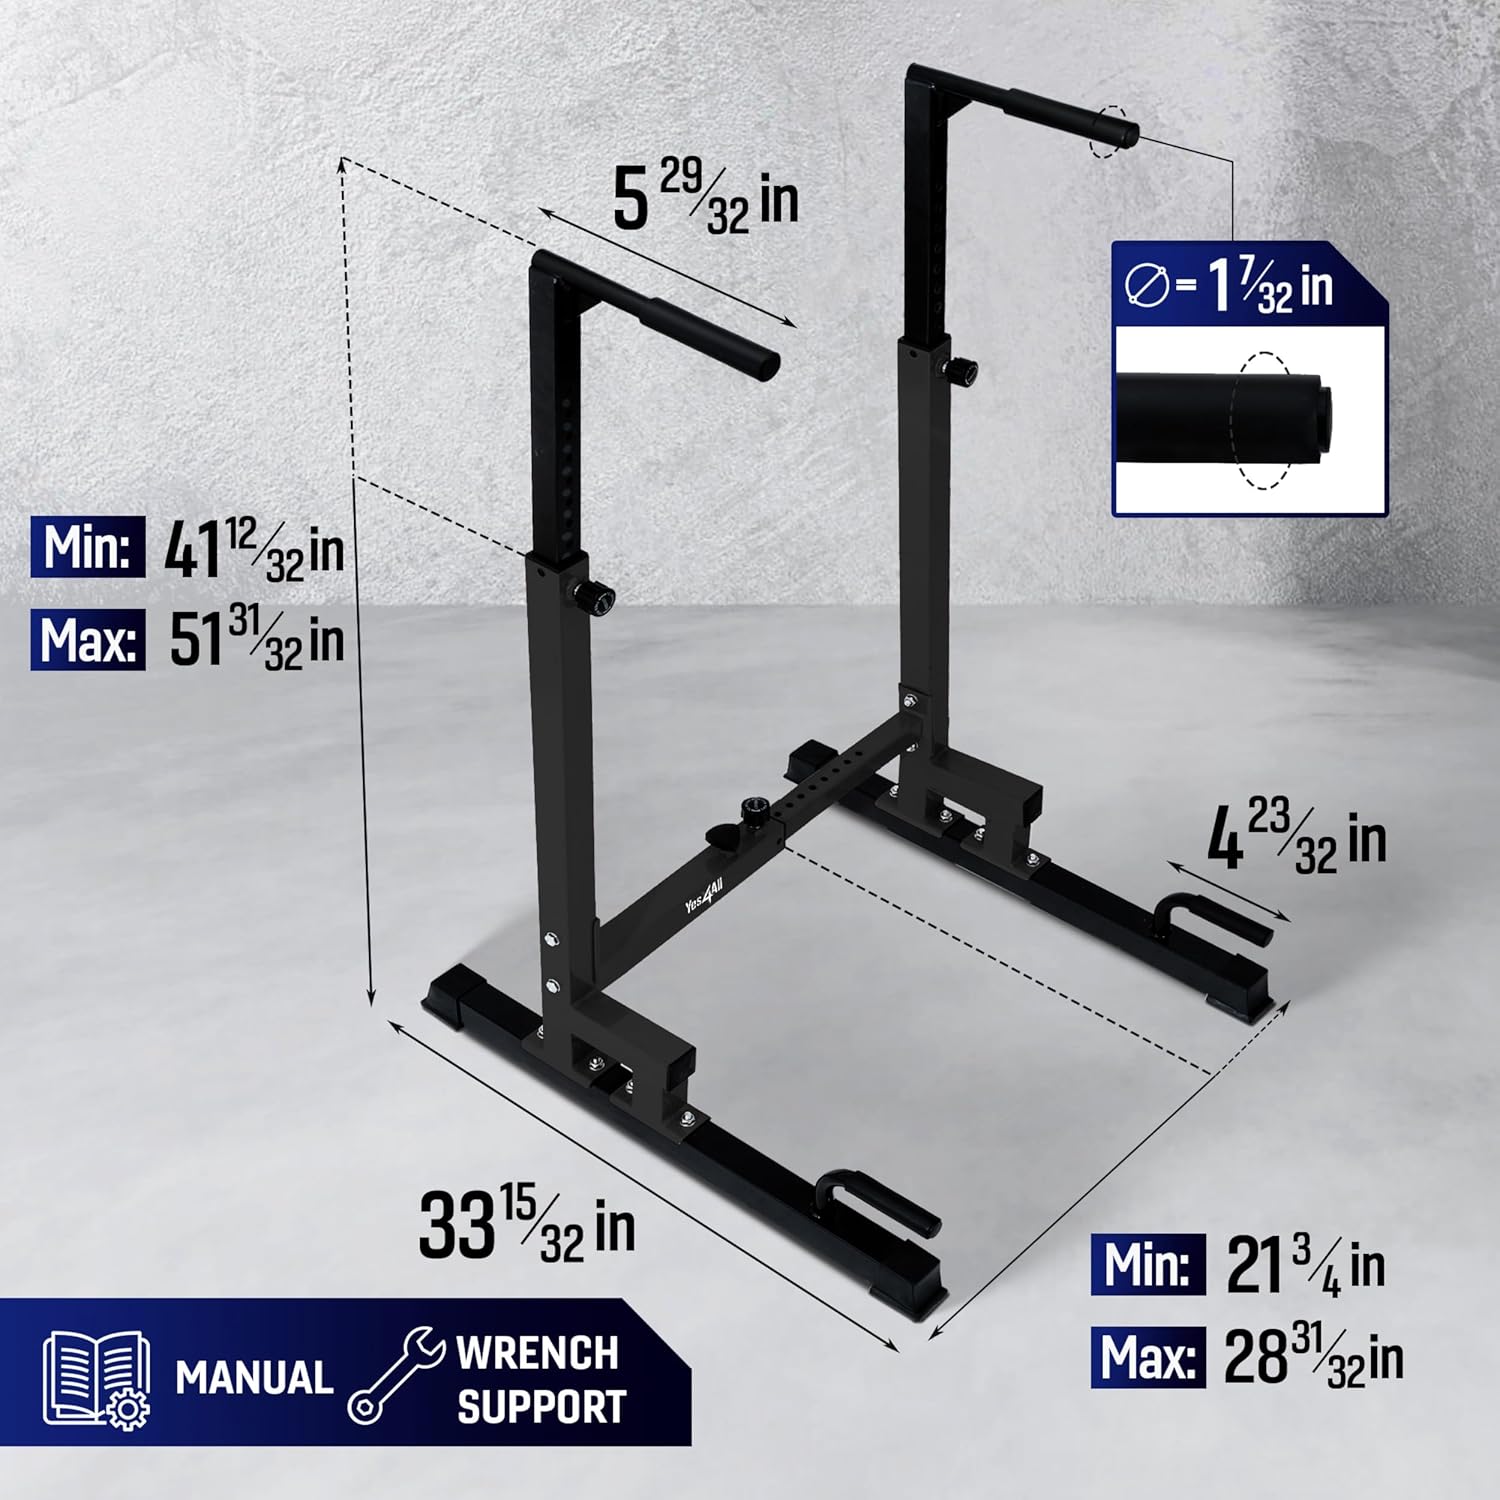
Image 2: Dimensional overview of the Yes4All Dip Stand, indicating minimum and maximum adjustable height (41 12/32 in - 51 31/32 in) and width (21 3/4 in - 28 31/32 in), along with overall depth and handle diameter.
Operation and Adjustments
The Yes4All Dip Stand is designed for versatility, offering multiple adjustment options to suit various users and exercises.
Height Adjustment
The dip handles can be adjusted to 8 different height levels. To adjust the height:
- Loosen the hand screws on both vertical uprights.
- Raise or lower the dip handles to the desired height.
- Align the holes and re-insert the hand screws, tightening them securely. Ensure both sides are at the same height for stability.
Adjustable Height Range: Minimum 41 3/8 inches to Maximum 52 inches.
Width Adjustment
The crossbar allows for 10 different width adjustment levels. To adjust the width:
- Loosen both hand screws on the crossbar.
- Slide the uprights inward or outward to achieve the desired width.
- Align the first hand screw with a pre-drilled hole to set the width.
- Tighten the second hand screw (set screw) firmly against the inner metal shaft of the crossbar to secure the position.
Adjustable Width Range: Minimum 21 3/4 inches to Maximum 28 3/4 inches.

Image 3: Visual guide to the adjustable height and width features of the dip stand, highlighting the range of adjustments and the 500 lbs weight capacity.
Exercise Guide
The Yes4All Dip Stand supports a variety of bodyweight exercises. Always ensure the stand is stable and properly adjusted before beginning any exercise.
- Dips (Tricep Dips, Chest Dips): Position yourself between the bars, gripping the handles. Lower your body by bending your elbows, keeping your core engaged. Push back up to the starting position. Adjust width for different muscle emphasis.
- L-Sit Holds: Sit on the floor between the bars, grip the handles, and lift your body and legs off the ground, forming an 'L' shape with your body. Hold this position.
- Leg Raises: From an L-sit or hanging position (if applicable), raise your legs towards your chest.
- Inverted Rows: Position yourself under the bars, gripping them with an overhand grip. Keep your body straight and pull your chest towards the bars.
- Push-ups: Utilize the lower push-up handles for a deeper range of motion or varied grip push-ups.
- Mountain Climbers: Use the lower push-up handles for stability while performing mountain climbers.

Image 4: Demonstrations of various exercises possible with the Yes4All Dip Stand, including L-sits, dips, and push-ups, showcasing its versatility.

Image 5: Detailed visual examples of Tricep Dips, L-Sit Holds, Push-ups, and Mountain Climbers, illustrating proper form and use of the dip stand for a full-body workout.
Maintenance
Regular maintenance ensures the longevity and safe operation of your dip stand.
- Daily Check: Before each use, visually inspect the stand for any loose parts, wear, or damage.
- Tighten Fasteners: Periodically check and tighten all bolts, nuts, and hand screws to ensure stability.
- Cleaning: Wipe down the frame and handles with a damp cloth after use to remove sweat and dirt. Avoid abrasive cleaners.
- Storage: Store the dip stand in a dry environment, away from direct sunlight and extreme temperatures.
Troubleshooting
| Problem | Possible Cause | Solution |
|---|---|---|
| Stand feels wobbly or unstable. | Loose bolts or screws; uneven surface. | Ensure all assembly bolts and hand screws are securely tightened. Move the stand to a flat, level surface. Check that the rubber foot bases are properly installed. |
| Difficulty adjusting height or width. | Hand screws not fully loosened; parts misaligned. | Fully loosen the relevant hand screws. Ensure the inner tubes are not obstructed. For width adjustment, remember to loosen both screws on the crossbar. |
| Squeaking noises during use. | Friction between metal parts. | Check and tighten all connections. A small amount of silicone lubricant can be applied to contact points if necessary, but avoid getting it on grip surfaces. |
If you encounter issues not listed here, please contact Yes4All customer support for assistance.
Specifications
| Brand | Yes4All |
| Model Number | V7WI |
| Material | Metal |
| Color | Black |
| Handle Type | NBR Foam |
| Maximum Weight Recommendation | 500 Pounds (226 kg) |
| Adjustable Height Range | Approx. 41 3/8 in - 52 in (8 levels) |
| Adjustable Width Range | Approx. 21 3/4 in - 28 3/4 in (10 levels) |
| Item Weight | 15 kg 400 g (Approx. 33.95 lbs) |
| UPC | 810151677392 |
Warranty and Support
Yes4All stands behind the quality of its products. For specific warranty details, please refer to the warranty card included with your purchase or visit the official Yes4All website.
If you have any questions, require technical assistance, or need to report missing/damaged parts, please contact Yes4All customer support through their official channels.


