1. Introduction
This manual provides essential information for the safe and efficient operation, setup, and maintenance of your Coway Airmega Icon and Airmega 230 True HEPA Air Purifiers. Please read these instructions thoroughly before using the product and retain them for future reference.
2. Safety Information
Always follow basic safety precautions when using electrical appliances to reduce the risk of fire, electric shock, and injury.
- Do not operate any air purifier with a damaged cord or plug.
- Keep the cord away from heated surfaces.
- Do not use the air purifier outdoors or on wet surfaces.
- Always unplug the air purifier before moving it, cleaning it, or replacing filters.
- Do not block air openings.
- Use only as described in this manual.
3. Product Overview
Coway Airmega Icon Air Purifier
The Airmega Icon is designed for spaces up to 649 sq. ft. and features a sleek design with integrated wireless device charging. It utilizes a HyperCaptive Filtration System for comprehensive air purification.

Image: The Coway Airmega Icon air purifier, showcasing its beige finish and modern design with wooden legs and top panel.
Coway Airmega 230 Air Purifier
The Airmega 230 is suitable for spaces up to 403 sq. ft. in 12.5 minutes or up to 975 sq. ft. in 30 minutes. It features a 3-stage HyperCaptive filtration system and smart technology for real-time air quality monitoring.

Image: The Coway Airmega 230 air purifier, presented in a clean white finish with a perforated front panel.
HyperCaptive Filtration System
Both models feature a multi-stage HyperCaptive Filtration System designed to capture ultra-fine particles and reduce odors.
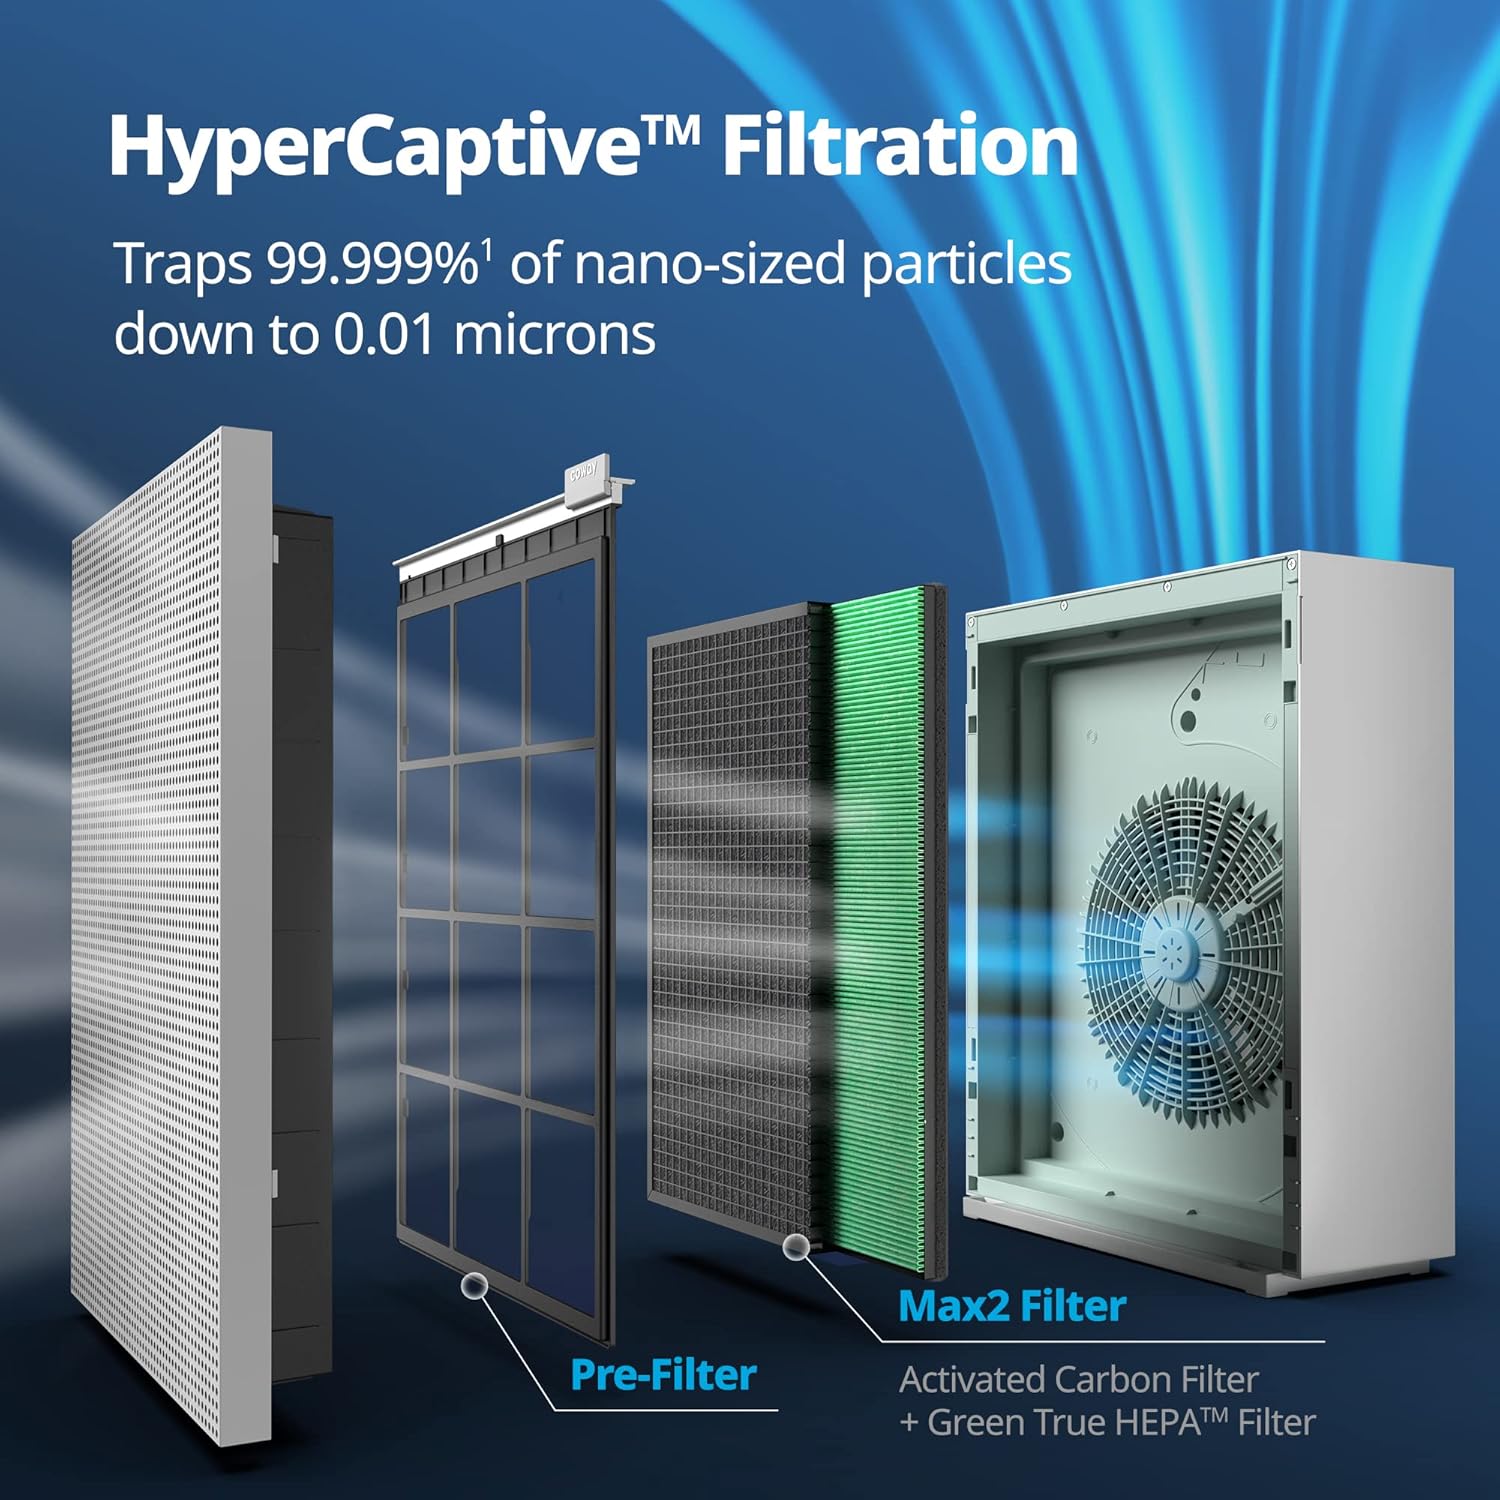
Image: An exploded diagram illustrating the components of the HyperCaptive Filtration System, including the outer casing, pre-filter, activated carbon filter, and Green True HEPA filter.
The system typically includes:
- Washable Pre-filter: Captures larger dust particles, pet dander, and hair.
- Activated Carbon Filter: Reduces volatile organic compounds (VOCs) and odors.
- Green True HEPA Filter: Traps 99.999% of 0.01-micron particles, including pollen, allergens, bacteria, and viruses.

Image: A close-up view of the All-In-One Max2 Filter, showing the combined Green True HEPA and Activated Carbon filter elements.
4. Setup
- Unpack: Carefully remove the air purifier from its packaging.
- Filter Installation: Open the filter cover (refer to your specific model's diagram for location). Remove all plastic packaging from the filters. Insert the filters in the correct order (pre-filter, activated carbon filter, HEPA filter). Ensure they are securely seated.
- Placement: Place the air purifier on a flat, stable surface. Ensure there is adequate space around the unit (at least 6-12 inches) for proper airflow. Avoid placing it near heat sources or in direct sunlight.
- Power Connection: Plug the power cord into a grounded electrical outlet.
5. Operating Instructions
Control Panel
Both models feature an easy-touch display for control.
Power On/Off
Press the power button to turn the unit on or off.
Fan Speed Adjustment
Cycle through fan speeds (Low, Medium, High, Turbo) using the fan speed button.
Smart Mode / Auto Mode
The air purifier automatically adjusts fan speeds based on the detected air quality, optimizing energy efficiency and purification effectiveness.
Air Quality Indicator
A real-time air quality indicator provides visual feedback on the current air purity level in your space. The indicator color changes to reflect air quality (e.g., blue for good, yellow for moderate, red for poor).

Image: A diagram illustrating the powerful purification capabilities, showing air changes per hour (ACH) in different room sizes for effective air circulation.
Timer Settings (Airmega 230)
The Airmega 230 offers 1, 4, and 8-hour timer settings for scheduled operation.
Wireless Device Charger (Airmega Icon)
The Airmega Icon features an integrated wireless charging pad on its top surface. Place compatible devices on the pad to charge.
6. Maintenance
Filter Replacement Indicator
Both models are equipped with a filter replacement indicator that illuminates when it is time to check or replace the filters.
Cleaning the Pre-filter
The pre-filter is washable. Remove it from the unit and rinse it under running water. Allow it to air dry completely before reinserting. Clean the pre-filter regularly, typically every 2-4 weeks, depending on usage and air quality.
Replacing Activated Carbon and HEPA Filters
The activated carbon and True HEPA filters are not washable and must be replaced periodically. The replacement frequency depends on usage, but typically every 6-12 months. Refer to the filter replacement indicator and your specific model's guidelines.
For the Airmega 230, the cartridge design simplifies filter replacement, allowing for easier and cleaner removal and insertion of filters.
Cleaning the Exterior
Wipe the exterior of the air purifier with a soft, dry cloth. Do not use abrasive cleaners or solvents.
7. Troubleshooting
- Unit does not turn on: Ensure the power cord is securely plugged into a working outlet. Check if the filter cover is properly closed.
- Poor air purification: Check if filters are installed correctly and free from excessive dust. Replace filters if the filter indicator is on. Ensure air inlets and outlets are not blocked.
- Unusual noise: Check for any foreign objects inside the unit. Ensure filters are properly seated.
- Air quality indicator always red/yellow: Ensure the air quality sensor is clean. If the issue persists in a clean environment, contact customer support.
8. Specifications
| Specification | Value |
|---|---|
| Brand | Coway |
| Models | Airmega Icon, Airmega 230 |
| Power Source | Corded Electric |
| Control Method | Touch |
| Filter Type | Activated Carbon, True HEPA |
| Airmega Icon Coverage | Up to 649 sq. ft. (30 minutes) |
| Airmega 230 Coverage | Up to 403 sq. ft. (12.5 minutes) / 975 sq. ft. (30 minutes) |
| Airmega Icon Color | Beige |
| Airmega 230 Color | Dove White |
9. Warranty and Support
For warranty information, product registration, or technical support, please refer to the warranty card included with your product or visit the official Coway website. Do not attempt to repair the unit yourself.


