Introduction
This document is a full-color reprint of the original instruction manual for the Singer 44S Sewing Machine. It provides essential information for the proper setup, operation, and maintenance of your sewing machine, ensuring optimal performance and longevity. Please read through this manual carefully before using your machine.

Image: The front cover of the reprinted Singer 44S Instruction Manual, featuring an illustration of the sewing machine and the manual's title.
Important Safety Instructions
When using an electrical appliance, basic safety precautions should always be followed to reduce the risk of fire, electric shock, and injury to persons. Always unplug the machine from the electrical outlet immediately after use and before cleaning or maintenance.
- Do not allow children to operate the machine without supervision.
- Always unplug the machine when making adjustments, changing needles, or performing maintenance.
- Keep fingers away from all moving parts.
- Do not operate if the cord or plug is damaged.
- Use only accessories specified by the manufacturer.

Image: A page from the manual displaying critical safety instructions and a congratulatory message to the user.
Accessories
The Singer 44S sewing machine comes with a set of standard accessories designed to enhance its functionality. Optional accessories may also be available to expand your sewing capabilities.
Standard Accessories:
- All-purpose foot
- Zipper foot
- Buttonhole foot
- Button sewing foot
- Seam ripper/brush
- Edge/quilting guide
- Pack of needles
- Spool holders
- Bobbins
- L-screwdriver
- Auxiliary spool pin
- Spool pin felt
- Soft cover

Image: A manual page illustrating various standard and optional accessories, including different presser feet and tools.
Setup and Threading
Winding the Bobbin:
- Place thread and corresponding spool holder on to spool pin.
- Draw thread into thread guide.
- Wind thread clockwise around bobbin winder tension disc.
- Thread bobbin as illustrated and place on spindle.
- Push bobbin spindle to right.
- Hold thread end securely.
- Step on foot control pedal.
- Turn thread close to the bobbin & then continue winding until bobbin is full.
- Cut thread, push bobbin spindle to left and remove.
Raising the Bobbin Thread:
To raise the bobbin thread, hold the upper thread with your left hand. Turn the handwheel towards you (counter-clockwise) lowering, then raising the needle. Gently pull on the upper thread to bring the bobbin thread up through the needle plate hole. Lay both threads to the back under the presser foot.

Image: Manual pages detailing the steps for automatic needle threading and the process of raising the bobbin thread, accompanied by clear diagrams.
Operating the Machine
Stitch Width and Length Dial:
The stitch width dial controls the width of your stitches, particularly for zigzag or decorative patterns. The stitch length dial adjusts the length of each stitch. For normal work, a stitch length of 2.5mm is recommended. For basting, set the stitch length to 4 (longest).
Choosing Stretch Stitch Patterns:
The Singer 44S offers various stretch stitch patterns, indicated by a blue color on the pattern selector dial. These stitches are ideal for sewing knit fabrics or for creating strong, flexible seams.
Sewing on Buttons:
To sew on buttons, attach the button sewing foot. Lower the feed dogs if necessary. Position the button under the foot and use the zigzag stitch to secure it, ensuring the needle passes through both holes of the button.
Installing the Removable Extension Table:
The removable extension table provides a larger work surface and can be easily installed by sliding it horizontally into place. The inside of the extension table can also be used for accessory storage.

Image: A manual page illustrating the functions of the three needle position dial and the stitch width and length dials, with corresponding stitch diagrams.

Image: A manual page detailing how to select stretch stitch patterns and providing instructions for creating a blind hem, complete with visual guides.
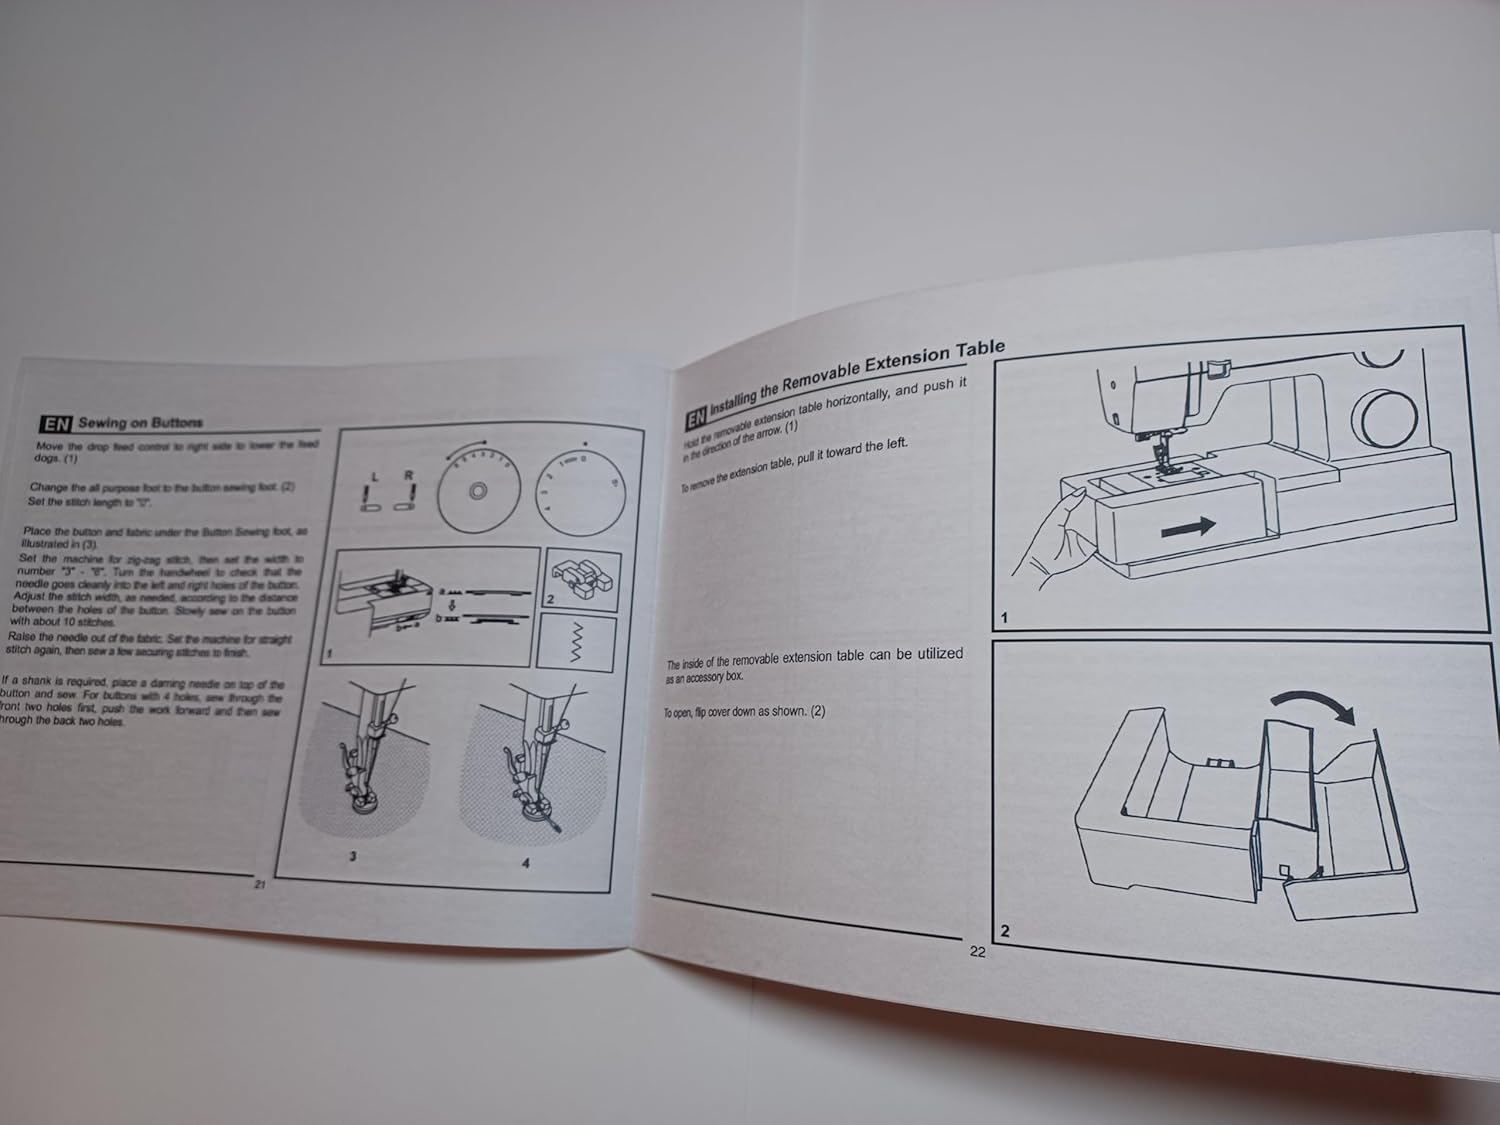
Image: A manual page illustrating the process of sewing on buttons and the steps for installing the removable extension table, with clear diagrams.
Maintenance
Regular maintenance is crucial for the longevity and optimal performance of your Singer 44S sewing machine. Always unplug the machine before performing any cleaning or maintenance tasks.
- Cleaning: Regularly clean lint and dust from the bobbin case area and feed dogs using a small brush.
- Oiling: Refer to the original manual for specific oiling points and frequency. Use only high-quality sewing machine oil.
- Needle Replacement: Replace the needle frequently, especially when starting a new project or if it becomes bent or dull. Use only needles designed for home sewing machines.
- Light Bulb: If the LED lamp requires replacement, contact a qualified service technician.
Troubleshooting
This section provides solutions to common issues you might encounter with your Singer 44S sewing machine. For more complex problems, consult a qualified service technician.
| Problem | Possible Cause | Solution |
|---|---|---|
| Skipped Stitches | Incorrect needle, bent needle, improper threading. | Replace needle with correct type, check needle insertion, re-thread machine. |
| Thread Breaking | Incorrect tension, poor quality thread, bent needle, improper threading. | Adjust tension, use good quality thread, replace needle, re-thread machine. |
| Machine Not Feeding Fabric | Feed dogs lowered, lint accumulation. | Raise feed dogs, clean feed dog area. |
| No Power | Machine unplugged, power switch off, damaged cord. | Check power connection, ensure switch is on, inspect cord for damage. |
Specifications
- Model: Singer 44S
- Manual Publisher: TabSynth Design
- Manual Format: Full color reprint, 28 Pages, Heavy cardstock cover
- Manual Item Weight: Approximately 2 ounces
Warranty and Support
This document is a reprint of the original Singer 44S Instruction Manual by TabSynth Design. For specific warranty information regarding your Singer 44S sewing machine, please refer to the original manufacturer's documentation that came with your machine or contact Singer customer support directly. For inquiries regarding this specific manual reprint, please contact TabSynth Design.
For additional support and resources related to your Singer 44S sewing machine, you may visit the official Singer website or consult authorized Singer service centers.


