1. Introduction
This manual provides detailed instructions for the proper installation, operation, and maintenance of your Spider SR-W122D 12-inch Dual Voice Coil Subwoofer. To ensure optimal performance and longevity of your product, please read this manual thoroughly before use and retain it for future reference.
2. Safety Information
- Always disconnect the vehicle's battery negative terminal before beginning any electrical work.
- Ensure all wiring is properly insulated to prevent short circuits.
- Use appropriate gauge wiring for power and speaker connections to handle the subwoofer's power requirements.
- Mount the subwoofer securely to prevent movement during vehicle operation, which could cause damage or injury.
- Avoid exposing the subwoofer to excessive moisture or extreme temperatures.
- Do not operate the subwoofer beyond its rated power specifications to prevent damage.
3. Package Contents
Upon unpacking, please verify that the following item is included:
- 1x Spider SR-W122D 12-inch Dual Voice Coil Subwoofer
4. Product Overview
The Spider SR-W122D is a high-performance 12-inch subwoofer designed for car audio applications, featuring a dual voice coil for flexible wiring options and robust power handling.

Figure 4.1: Spider SR-W122D 12-inch Subwoofer shown with its retail packaging.

Figure 4.2: Top view of the subwoofer, highlighting the cone and surround.

Figure 4.3: Side view of the subwoofer, illustrating the voice coil wiring and basket structure.
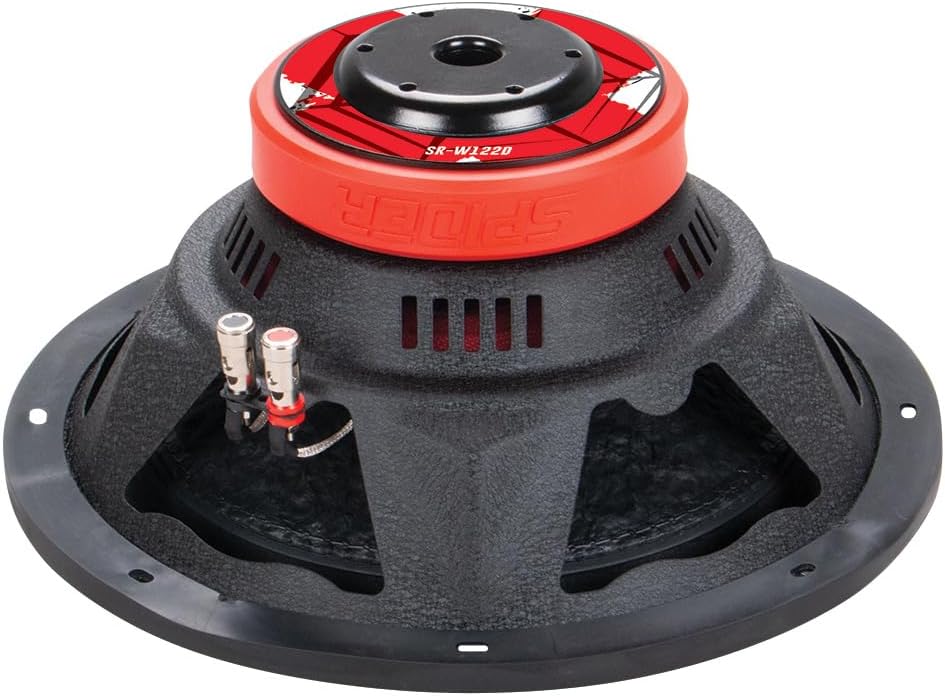
Figure 4.4: Bottom view of the subwoofer, displaying the magnet assembly and speaker terminals.
5. Setup and Installation
5.1 Pre-installation Checks
- Ensure your amplifier is compatible with a 4 Ohm load (or 2 Ohm/8 Ohm depending on wiring configuration).
- Verify that the mounting location and enclosure are suitable for a 12-inch subwoofer.
- Gather all necessary tools and wiring materials.
5.2 Wiring Configurations (Dual 4 Ohm Voice Coils)
The SR-W122D features dual 4 Ohm voice coils, offering flexibility in wiring to achieve different impedance loads for your amplifier.
- Parallel Wiring (2 Ohm Load): Connect the positive terminals of both voice coils together, and the negative terminals of both voice coils together. Then connect the combined positive to the amplifier's positive output and the combined negative to the amplifier's negative output. This configuration presents a 2 Ohm load to the amplifier.
- Series Wiring (8 Ohm Load): Connect the positive terminal of one voice coil to the negative terminal of the other voice coil. Then connect the remaining positive terminal to the amplifier's positive output and the remaining negative terminal to the amplifier's negative output. This configuration presents an 8 Ohm load to the amplifier.
Always ensure your amplifier is stable at the chosen impedance load. Consult your amplifier's manual for compatibility.
5.3 Enclosure and Mounting
- Install the subwoofer into a suitable enclosure (sealed or ported) designed for a 12-inch driver.
- Ensure the enclosure is robust and free from air leaks.
- Secure the subwoofer to the enclosure using appropriate screws, ensuring a tight seal.
5.4 Connecting to Amplifier
- Connect the subwoofer's wired output (from your chosen impedance configuration) to the amplifier's subwoofer output terminals.
- Ensure correct polarity (+ to + and - to -) to avoid phase issues.
- Double-check all connections before powering on the system.
6. Operating Instructions
6.1 Initial Power-Up and Settings
- Start with the amplifier's gain control set to minimum.
- Turn on your audio system and play music with a good bass range.
- Slowly increase the amplifier's gain until the desired bass level is achieved without distortion.
- Adjust the low-pass filter (LPF) on your amplifier to blend the subwoofer's output with your main speakers (typically between 80Hz and 120Hz).
- Adjust the phase control (if available on your amplifier) to ensure optimal bass response.
6.2 Break-in Period
Allow a break-in period of approximately 10-20 hours of moderate listening before operating the subwoofer at high volumes. This allows the suspension components to loosen up, leading to improved performance and longevity.
7. Maintenance
- Cleaning: Use a soft, dry cloth to wipe down the subwoofer cone and surround. Avoid using harsh chemicals or excessive moisture.
- Inspection: Periodically check all wiring connections for tightness and signs of corrosion. Inspect the subwoofer's cone and surround for any tears or damage.
- Storage: If storing the subwoofer for an extended period, ensure it is kept in a cool, dry place, away from direct sunlight and extreme temperatures.
8. Troubleshooting
| Problem | Possible Cause | Solution |
|---|---|---|
| No sound from subwoofer |
|
|
| Distorted or unclear bass |
|
|
| Subwoofer gets hot |
|
|
9. Specifications
| Feature | Detail |
|---|---|
| Model Name | SR-W122D |
| Speaker Type | Subwoofer |
| Subwoofer Diameter | 12 Inches |
| Impedance | Dual Voice Coil 4 Ohms (can be wired to 2 or 8 Ohms) |
| Maximum Power Output | 1500W |
| RMS Power | 750W |
| Voice Coil Size | 2.5 inches |
| Voice Coil Winding | 15mm |
| Magnet Weight | 40 oz |
| Material | Metallic |
| Color | Red |
| Product Dimensions | 35.5cm (Depth) x 35.5cm (Width) x 21.3cm (Height) |
| Product Weight | 6 Kilograms |
| Recommended Use | Car Audio |
| Compatible Devices | Amplifier |
| Connectivity Technology | RCA (for amplifier input, not subwoofer direct) |
| Amplification Type | Passive |
10. Warranty Information
This product is covered by a standard manufacturer's warranty against defects in materials and workmanship. The duration and terms of the warranty may vary by region and retailer. Please retain your proof of purchase for any warranty claims. Damage resulting from improper installation, abuse, or unauthorized modifications is not covered under warranty.
11. Support
For technical assistance, troubleshooting beyond this manual, or warranty inquiries, please contact your retailer or the manufacturer's customer support. Refer to your purchase documentation for specific contact details.


