1. Introduction
This manual provides comprehensive instructions for the installation, operation, and maintenance of your CORSAIR iCUE Link 2500X RGB Small-Tower PC Case. Designed for micro-ATX systems, this dual-chamber case features tempered glass panels and integrates with the iCUE LINK ecosystem for simplified building and cable management.
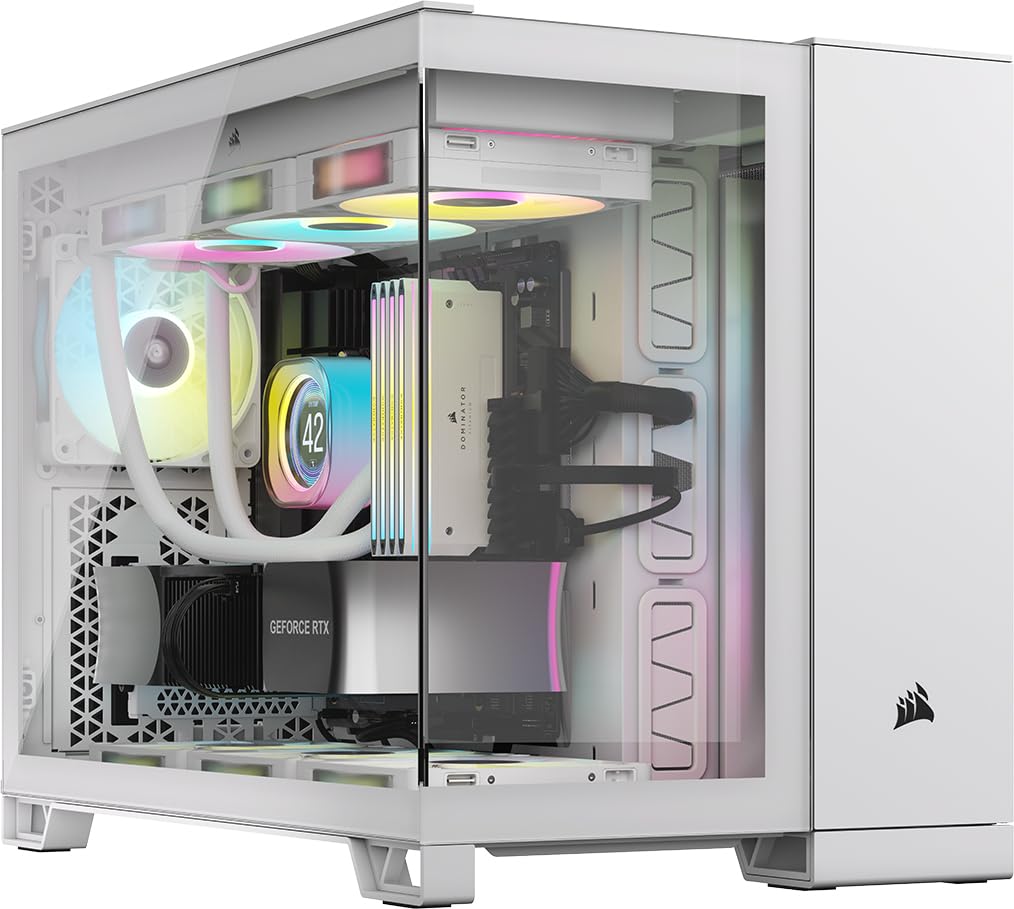
Figure 1.1: CORSAIR iCUE Link 2500X RGB Small-Tower PC Case, White.
The 2500X RGB case is engineered to showcase your small-form-factor build with its dual tempered glass panels. It includes two pre-installed RX120 RGB fans and an iCUE LINK System Hub, facilitating an easy start within the iCUE LINK ecosystem. Its dual-chamber design promotes efficient cooling and a clean aesthetic by separating components from cable routing and power supply.
2. Setup and Installation
2.1 Unpacking
Carefully remove the PC case from its packaging. Inspect the case for any signs of damage. Retain the packaging for future transport or storage.
2.2 Dual Chamber Design Overview
The 2500X RGB features a dual-chamber layout. One chamber houses the motherboard, CPU, GPU, and cooling components, while the other is dedicated to cable routing, storage drives, and the power supply unit (PSU). This design optimizes airflow and simplifies cable management.

Figure 2.1: Dual Chamber Design. The left chamber (yellow outline) is for PSU and cables, the right (blue outline) for main components.
2.3 Motherboard Installation
The case supports Micro ATX motherboards. It is also compatible with reverse connection motherboards (e.g., ASUS BTF, MSI Project Zero), which route connections to the back of the board for a cleaner interior view.
- Remove the side tempered glass panel by gently pulling it off.
- Install the necessary motherboard standoffs if not pre-installed.
- Carefully place your Micro ATX motherboard into the case, aligning it with the standoffs and I/O shield opening.
- Secure the motherboard with screws.

Figure 2.2: Reverse Connection Motherboard Compatibility. Cables are routed behind the motherboard tray.
2.4 Fan and Radiator Installation
The 2500X RGB offers extensive cooling options:
- Up to 9x 120mm fans or 4x 140mm fans.
- Radiator support: up to 360mm in the roof and bottom, and 240mm on the side.
The case comes with two pre-installed CORSAIR RX120 RGB fans.

Figure 2.3: Cooling Options. Illustrates fan and radiator placement for optimal airflow.
2.5 Storage Drive Installation
The case accommodates up to 2x 3.5-inch or 2x 2.5-inch storage drives using tool-free drive mounts located in the secondary chamber.
2.6 Power Supply Unit (PSU) Installation
Install your PSU in the dedicated compartment within the secondary chamber. This separation helps maintain a clean main compartment and improves thermal performance.
2.7 Cable Management
Utilize the ample space and routing options in the secondary chamber to organize cables. This ensures unobstructed airflow and a visually appealing build.
3. Operating Instructions
3.1 Front Panel I/O
The front panel provides convenient access to essential ports and controls:
- Power Button: To turn the system on or off.
- Reset Button: To restart the system.
- 2x USB 3.2 Gen 1 Type-A Ports: For connecting USB devices.
- 1x USB 3.2 Gen 2 Type-C Port: For high-speed USB-C devices.
- 1x 3.5mm Combo Audio Jack: For headphones or headsets.

Figure 3.1: Front Panel I/O. Details of available ports and buttons.
3.2 iCUE LINK System
The included iCUE LINK System Hub and pre-installed RX120 RGB fans are part of the CORSAIR iCUE LINK ecosystem. This system simplifies fan and RGB lighting control with fewer cables.
- Connect compatible iCUE LINK devices to the hub.
- Install the CORSAIR iCUE software on your PC to customize fan speeds, RGB lighting effects, and monitor system temperatures.

Figure 3.2: iCUE LINK RX120 RGB Fans and System Hub. The hub simplifies connections for multiple iCUE LINK devices.
4. Maintenance
4.1 Cleaning
- Exterior: Use a soft, damp cloth to clean the exterior surfaces, including the tempered glass panels. Avoid abrasive cleaners.
- Dust Filters: Regularly remove and clean the dust filters located on the side and bottom panels to maintain optimal airflow and prevent dust buildup inside the case.
- Interior: Use compressed air to remove dust from internal components and fan blades. Ensure the system is powered off and unplugged before cleaning.
4.2 General Care
- Avoid placing heavy objects on the case.
- Keep the case in a well-ventilated area to prevent overheating.
- Do not expose the case to extreme temperatures or humidity.
5. Troubleshooting
If you encounter issues with your CORSAIR iCUE Link 2500X RGB case, consider the following:
- No Power: Ensure all power cables (PSU to wall, PSU to motherboard, front panel power switch) are securely connected. Verify the PSU switch is in the 'ON' position.
- Fans Not Spinning/RGB Not Lighting: Check iCUE LINK connections to the hub and ensure the hub is powered. Verify iCUE software settings.
- Overheating: Ensure all fans are correctly installed and spinning. Clean dust filters. Verify proper airflow within the case.
- USB Ports Not Working: Check the internal USB header connections from the front panel to the motherboard.
For more complex issues, refer to the CORSAIR support website or contact their customer service.
6. Specifications
| Feature | Specification |
|---|---|
| Model Name | iCUE LINK 2500X RGB |
| Item Model Number | CC-9011268-WW |
| Case Type | Small-Tower (mATX Dual Chamber) |
| Motherboard Compatibility | Micro ATX |
| Material | Tempered Glass |
| Color | White |
| Dimensions (LxWxH) | 18.46 x 11.97 x 14.8 inches (46.89 x 30.40 x 37.59 cm) |
| Item Weight | 26.2 pounds (11.88 kg) |
| Pre-installed Fans | 2x CORSAIR RX120 RGB Fans |
| Fan Support | Up to 9x 120mm or 4x 140mm |
| Radiator Support | Up to 360mm (Roof, Bottom), 240mm (Side) |
| Storage Drive Bays | 2x 3.5-inch or 2x 2.5-inch |
| Front I/O Ports | 2x USB 3.2 Gen 1 Type-A, 1x USB 3.2 Gen 2 Type-C, 1x 3.5mm Combo Audio, Power, Reset |
| Cooling Method | Air |
| Power Supply Mounting Type | Bottom Mount |
7. Warranty and Support
This CORSAIR product comes with a limited warranty. For detailed warranty terms and conditions, please refer to the official CORSAIR website or the warranty card included with your product.
For technical support, product registration, or to download the latest drivers and software (such as CORSAIR iCUE), please visit the official CORSAIR support page:


