1. Introduction
This user manual provides detailed instructions for the operation and maintenance of the Protmex PT6708 Digital Sound Level Meter. This device is designed for accurate measurement of sound levels in various environments, offering a range of 30 to 130 decibels with high precision. Please read this manual thoroughly before using the device to ensure proper function and safety.

Image: The Protmex PT6708 Digital Sound Level Meter, shown with its protective foam cover over the microphone and two AAA batteries.
2. Product Overview
The PT6708 Sound Level Meter is a compact and reliable instrument for noise measurement.
2.1 Components and Display
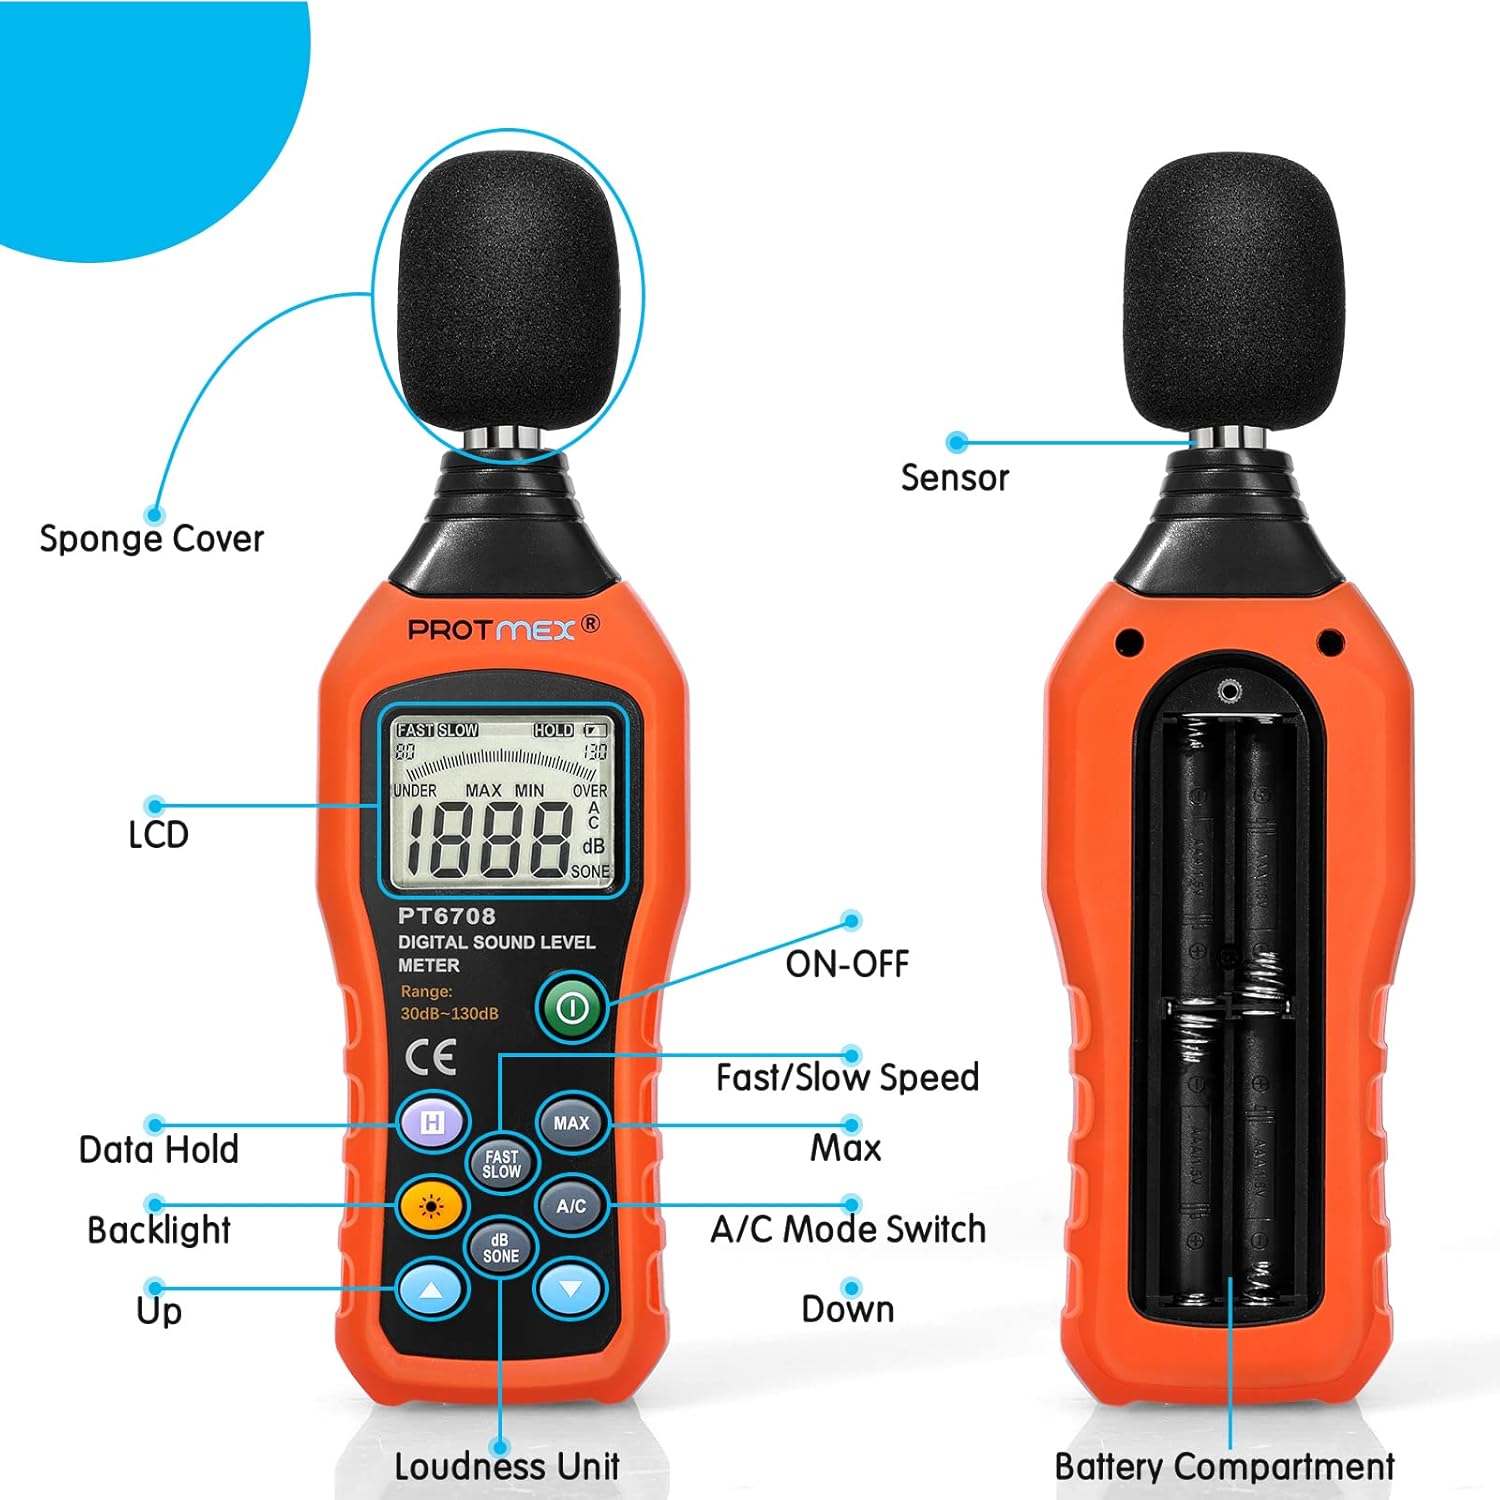
Image: A detailed diagram illustrating the various components of the PT6708 Sound Level Meter, including the sponge cover, LCD, ON-OFF button, data hold button, backlight button, up/down buttons, fast/slow speed button, max button, A/C mode switch, sensor, and battery compartment.
- Sponge Cover: Protects the microphone from wind noise and dust.
- Sensor: High-precision noise sensor for accurate sound detection.
- LCD Display: Large screen showing decibel readings, measurement modes, and battery status.
- ON-OFF Button: Powers the device on or off.
- Data Hold Button (H): Freezes the current measurement on the display.
- Backlight Button: Activates or deactivates the display backlight for visibility in low light.
- Up/Down Buttons: Used for adjusting settings or navigating menus (if applicable).
- Fast/Slow Speed Button: Toggles between fast and slow response times.
- MAX Button: Displays the maximum sound level recorded during a measurement session.
- A/C Mode Switch: Selects between A-weighting and C-weighting modes.
- Loudness Unit (dB/SONE): Button to switch between decibel and SONE units.
- Battery Compartment: Located at the rear, holds the AAA batteries.
3. Key Features
- Accurate and Sensitive Measurement: Utilizes a high-quality AD636 chip and an electric condenser microphone for precise sound level monitoring from 30 to 130 dB with an accuracy of +/-1.5 dB and 0.1 dB resolution.
- Fast and Slow Response Rates:
- Fast Response (0.125s): Ideal for general environmental measurements and quickly changing noise levels.
- Slow Response (1s): Suitable for environmental measurements with relatively stable noise levels or for averaging fluctuating sounds.
- A/C Weighting Network Selection:
- A-Weighting: Simulates human hearing characteristics, suitable for ambient noise detection.
- C-Weighting: Measures the actual sound level, suitable for sound pressure analysis of machine motors and mechanical noise.
- Data Hold and MAX Functions: Allows freezing the current reading and displaying the maximum recorded value.
- Backlit LCD Screen: Ensures clear visibility of readings in various lighting conditions, with an auto power-off function for energy saving.
- Anti-Slip Design: Composite material injection molding process with an anti-drop structure for durability and ease of handling.

Image: Visual representation of the meter's high-precision noise sensor, the clarity of its backlit LCD display, and the ergonomic anti-slip design of its casing.

Image: A composite image detailing the internal premium chip, the polarized capacitive microphone for excellent performance, the dynamic characteristics of sound pressure (Fast/Slow response times), and the A and C weighting mode selection for different types of noise measurement.
4. Setup
4.1 Unpacking Contents
Upon opening the package, verify that all components are present:

Image: The complete package contents, including the product box, carrying case, the PT6708 sound level meter, user manual, and AAA batteries.
- Protmex PT6708 Sound Level Meter
- Carrying Pouch
- User Manual
- AAA Batteries (4 included)
4.2 Battery Installation
- Locate the battery compartment on the back of the device.
- Use a small Phillips head screwdriver to loosen the screw securing the battery cover.
- Remove the battery cover.
- Insert four (4) AAA batteries, ensuring correct polarity (+/-).
- Replace the battery cover and tighten the screw.
Note: The device requires 4 AAA batteries. Ensure they are inserted correctly for proper operation.
5. Operating Instructions
5.1 Power On/Off
Press the ON-OFF button (green power symbol) to turn the meter on. Press it again to turn the meter off.
5.2 Basic Measurement
Once powered on, the meter will immediately begin displaying the current sound level in decibels (dB). Ensure the microphone is pointed towards the sound source.

Image: A visual chart illustrating different sound level ranges in decibels (dB) and their corresponding descriptions, from silence (1-15dB) to hearing impairment (above 100dB).
5.3 A/C Weighting Selection
Press the A/C button to toggle between A-weighting and C-weighting modes. The selected mode will be indicated on the LCD.
- A-Weighting Mode: Simulates the human ear's response to sound. Use this for general environmental noise measurements, such as in offices, residential areas, or for assessing noise exposure.

Image: A diagram illustrating A-weighting mode, which simulates the auditory characteristics of the human ear for environmental noise measurement.
- C-Weighting Mode: Provides a flatter frequency response, measuring the actual sound level without mimicking human hearing. Use this for analyzing mechanical noise, motor sounds, or when assessing peak sound pressure levels.

Image: A diagram illustrating C-weighting mode, which measures the actual sound level, suitable for mechanical noise analysis.
5.4 Fast/Slow Response Time
Press the FAST/SLOW button to switch between fast and slow response times.
- FAST: Responds quickly to changes in sound level (0.125 seconds). Useful for capturing transient noises or rapidly fluctuating sounds.
- SLOW: Provides a more stable reading by averaging the sound level over a longer period (1 second). Ideal for measuring average noise levels or sounds that are relatively constant.
5.5 Data Hold (H)
Press the H button to freeze the current reading on the display. Press it again to release the hold and resume live measurement.
5.6 Maximum (MAX) Measurement
Press the MAX button to display the maximum sound level recorded since the meter was powered on or since the MAX function was last reset. Press it again to exit MAX mode.
5.7 Backlight
Press the Backlight button (sun symbol) to turn the LCD backlight on or off. The backlight will automatically turn off after a period of inactivity to conserve battery power.
5.8 Unit Selection (dB/SONE)
Press the dB/SONE button to switch the display unit between decibels (dB) and SONE.

Image: A visual representation of the various function buttons on the meter, including A/C mode, Data Hold, Max/Min, Unit Change (dB/SONE), Fast/Slow, and Manual/Auto.
6. Applications
The Protmex PT6708 Sound Level Meter is suitable for a wide range of applications, including:
- Environmental noise assessment in residential areas, offices, and schools.
- Industrial noise measurement in factories and workshops.
- Traffic noise monitoring.
- Quality control in product manufacturing.
- Health and safety compliance.
- Audio equipment testing and calibration.

Image: The digital sound level meter depicted in various common environments where noise measurement is relevant, such as offices, factories, near road traffic, and in a bedroom.

Image: A child covering their ears, symbolizing the impact of loud noise and the need for sound level measurement.

Image: The sound level meter positioned in a concert setting, demonstrating its use for measuring crowd noise levels.

Image: A worker wearing ear protection in an industrial environment, with the sound level meter nearby, highlighting its application in occupational safety.
7. Maintenance
- Cleaning: Wipe the device with a soft, dry cloth. Do not use abrasive cleaners or solvents.
- Storage: Store the meter in its protective pouch in a cool, dry place away from direct sunlight and extreme temperatures.
- Battery Replacement: Replace batteries when the low battery indicator appears on the display. Remove batteries if the device will not be used for an extended period to prevent leakage.
- Microphone Care: Keep the microphone clean and free from dust or debris. Always use the sponge cover to protect the microphone.
8. Troubleshooting
| Problem | Possible Cause | Solution |
|---|---|---|
| Device does not power on. | Batteries are dead or incorrectly installed. | Check battery polarity and replace with new AAA batteries. |
| Inaccurate readings. | Microphone obstructed or damaged; incorrect weighting/response mode selected. | Ensure microphone is clear. Verify A/C weighting and Fast/Slow settings are appropriate for the measurement. |
| Display is dim or flickering. | Low battery power. | Replace batteries. |
| "OVER" or "UNDER" displayed. | Sound level is outside the measurement range (30-130 dB). | The device is operating as expected. The sound is either too loud or too quiet for the specified range. |
9. Specifications
| Parameter | Value |
|---|---|
| Model Number | PT6708 |
| Measurement Range | 30 - 130 dB |
| Accuracy | ±1.5 dB |
| Resolution | 0.1 dB |
| Frequency Weighting | A and C |
| Time Weighting | FAST (0.125s), SLOW (1s) |
| Microphone | Electric Condenser Microphone |
| Display | Large LCD with Backlight |
| Power Supply | 4 x AAA Batteries (included) |
| Material | Acrylonitrile Butadiene Styrene (ABS) |
| Dimensions (L x W x H) | 7.59 x 1.14 x 2.36 inches (19.28 x 2.90 x 5.99 cm) |
| Item Weight | 6.7 ounces (190 grams) |
| Compliance | IEC651 Type 2, SI.4 Type2, CE, RoHS |

Image: A diagram showing the physical dimensions of the PT6708 Sound Level Meter: 7.59 inches in length, 2.36 inches in width, and 1.14 inches in depth.
10. Warranty and Support
Protmex is committed to providing quality products and customer satisfaction.
10.1 Warranty Information
The PT6708 sound meter complies with IEC651 Type 2 and SI.4 Type2 standards, and is CE and RoHS approved. For specific warranty details, please refer to the documentation included with your purchase or contact Protmex customer support.
10.2 Customer Support
Protmex offers 24/7 online friendly support. For any inquiries, technical assistance, or support needs, please visit the official Protmex website or contact their customer service team.
You can find more information and contact details on the Protmex Store on Amazon.
For a digital copy of the user manual, you may also refer to the User Manual (PDF).


