1. Introduction
This user manual provides essential information for the safe and efficient operation of your new Hisense PureJet Eco Inverter Washer Dryer, model WDQY1514. Please read this manual thoroughly before using the appliance for the first time and keep it for future reference. It contains important details regarding installation, operation, maintenance, and troubleshooting to ensure optimal performance and longevity of your appliance.
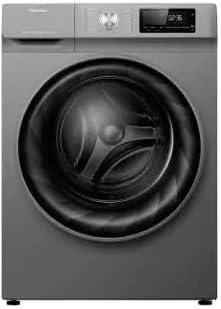
Figure 1: Front view of the Hisense PureJet Eco Inverter Washer Dryer.
2. Safety Information
Always adhere to the following safety precautions to prevent electric shock, fire, explosion, or injury.
- Electrical Safety: Ensure the appliance is connected to a properly grounded outlet with the correct voltage (127 Volts). Do not use extension cords or adapters.
- Water Safety: Ensure water hoses are securely connected to prevent leaks. Do not operate the machine if there is any visible water leakage.
- Children and Pets: Keep children and pets away from the appliance during operation. The appliance is not intended for use by persons with reduced physical, sensory or mental capabilities unless supervised.
- Flammable Materials: Do not wash or dry items that have been cleaned in, washed in, soaked in, or spotted with combustible or explosive substances such as gasoline, dry-cleaning solvents, or other flammable or explosive substances.
- Transit Bolts: Before first use, it is crucial to remove all transit bolts from the rear of the appliance. Failure to do so will result in excessive vibration and potential damage during operation. Refer to the 'Setup and Installation' section for detailed instructions.
- Maintenance: Disconnect the appliance from the power supply before performing any cleaning or maintenance.
3. Product Features
Your Hisense PureJet Eco Inverter Washer Dryer is equipped with advanced features designed for efficient and convenient laundry care:
- Large Capacity: Offers a maximum washing capacity of 15 kg and a drying capacity of 10 kg, suitable for large family loads.
- Eco Inverter Technology: The Inverter motor generates less heat, leading to energy savings, quieter operation, and increased durability.
- Touch Screen Display: Features an intuitive LED touch screen for easy program selection and control.
- Pure Steam & Allergy Steam: Utilizes steam technology to effectively remove odors and allergens from clothes, reducing the need for extensive ironing.
- Quick Wash Function: A convenient 15-minute quick wash program is available for small loads (approx. 1 kg) that require rapid cleaning.

Figure 2: Washer dryer with door open, revealing the spacious drum.
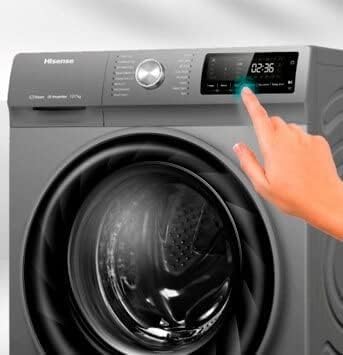
Figure 3: User interacting with the touch control panel.

Figure 4: The 15-minute quick wash feature.
4. Setup and Installation
Proper installation is crucial for the safe and efficient operation of your appliance.
4.1 Unpacking
Carefully remove all packaging materials. Inspect the appliance for any damage during transit. Report any damage to your retailer immediately.
4.2 Removing Transit Bolts
The appliance is secured for transport with transit bolts at the rear. These MUST be removed before use. Locate the bolts on the back panel and use a wrench to loosen and remove them. Keep the bolts for future transport if needed.
4.3 Leveling the Appliance
Place the appliance on a firm, level surface. Adjust the leveling feet at the bottom of the machine until it is perfectly stable and does not wobble. Use a spirit level to ensure proper leveling.
4.4 Water and Electrical Connections
- Connect the water inlet hose to a cold water tap. Ensure connections are tight to prevent leaks.
- Plug the power cord into a grounded 127 Volt electrical outlet.
4.5 Drain Hose Installation
Securely attach the drain hose to a suitable drain pipe or place it over the edge of a sink, ensuring it is properly secured to prevent displacement during operation.

Figure 5: Appliance dimensions (Height: 89cm, Width: 74cm, Depth: 67cm).
5. Operating Instructions
Follow these steps for typical operation of your washer dryer.
5.1 Control Panel Overview

Figure 6: Close-up view of the control panel with program dial and LED display.
The control panel features a program selection dial, an LED touch screen display, and various touch buttons for options like temperature, spin speed, delay start, and dry level.
5.2 Loading Laundry
Open the door and load laundry into the drum. Do not overload the machine; ensure there is enough space for clothes to tumble freely. For optimal drying, load less than the maximum wash capacity.
5.3 Adding Detergent and Softener
Pull out the detergent dispenser drawer. Add appropriate amounts of detergent to the main wash compartment and fabric softener to its designated compartment. Refer to your detergent packaging for recommended dosages.
5.4 Selecting a Program
Turn the program selection dial to choose the desired wash or wash & dry program. The LED display will show the default settings for the selected program. You can then adjust options like temperature, spin speed, and dry level using the touch buttons on the display.
5.5 Starting a Cycle
Press the 'Start/Pause' button to begin the selected cycle. The machine will automatically proceed through the washing and/or drying phases.
5.6 Ending a Cycle
Once the cycle is complete, the machine will signal with an audible alert and/or a message on the display. Open the door and remove your laundry promptly.
6. Maintenance
Regular maintenance ensures the longevity and optimal performance of your appliance.
6.1 Cleaning the Detergent Dispenser
Periodically remove and clean the detergent dispenser drawer to prevent residue buildup. Rinse it under running water and dry thoroughly before reinserting.
6.2 Cleaning the Drum
Run a drum clean cycle (if available) or a hot wash cycle with no laundry and a small amount of detergent or a specialized washing machine cleaner once a month to prevent odors and mold buildup.
6.3 Cleaning the Filter
Locate the drain pump filter, usually at the bottom front of the machine. Open the cover, place a shallow container underneath to catch any water, and carefully unscrew the filter. Remove any lint, debris, or foreign objects. Clean the filter under running water and reinsert it securely.
6.4 Exterior Cleaning
Wipe the exterior surfaces with a soft, damp cloth. Do not use abrasive cleaners or solvents.
7. Troubleshooting
If you encounter issues with your appliance, refer to the following common problems and solutions before contacting service.
| Problem | Possible Cause | Solution |
|---|---|---|
| Excessive Vibration/Noise | Transit bolts not removed; appliance not level; uneven load. | Ensure all transit bolts are removed. Adjust leveling feet. Redistribute laundry evenly in the drum. |
| Appliance Does Not Start | Power cord not plugged in; door not closed properly; program not selected. | Check power connection. Ensure door is firmly closed. Select a program and press Start. |
| Water Leakage | Loose hose connections; clogged drain filter. | Check and tighten water inlet and drain hose connections. Clean the drain pump filter. |
| Error Code (e.g., F08) | Specific internal fault. | Refer to the full manual for a list of error codes and their solutions. If the issue persists after following instructions, contact customer support. |
| Poor Drying Performance | Overloaded drum; incorrect dry level selected. | Reduce load size. Select a higher dry level setting. |
For issues not listed here or if problems persist, please contact Hisense customer support.
8. Specifications
Key technical specifications for the Hisense PureJet Eco Inverter Washer Dryer (Model WDQY1514):
- Model Number: WDQY1514
- Brand: Hisense
- Capacity (Wash): 15 Kilograms
- Capacity (Dry): 10 Kilograms (approximate, based on product description)
- Dimensions (D x W x H): 67 cm x 74 cm x 89 cm
- Weight: 89 Kilograms
- Voltage: 127 Volts
- Access Location: Front Load
- Drum Material: Plastic and Stainless Steel
- Special Features: Inverter Technology, Pure Steam, Allergy Steam, Quick Wash
- Number of Wash Cycles: 16
- Number of Dry Cycles: 16
9. Warranty and Support
Your Hisense PureJet Eco Inverter Washer Dryer is covered by a manufacturer's warranty. Please refer to the warranty card included with your purchase for specific terms, conditions, and duration. In case of any issues or for technical assistance, please contact Hisense customer support. Ensure you have your model number (WDQY1514) and proof of purchase ready when contacting support.
For the most up-to-date support information, visit the official Hisense website or contact their customer service line in your region.


