1. Introduction
Thank you for choosing the CREWORKS 38x38CM 8-in-1 Heat Press Machine. This versatile machine is designed for transferring designs onto various materials such as T-shirts, mugs, hats, and plates. This manual provides essential information for safe operation, setup, and maintenance to ensure optimal performance and longevity of your heat press.
2. Safety Instructions
Please read all safety warnings and instructions carefully before operating the machine. Failure to follow these instructions may result in electric shock, fire, or serious injury.
- Electrical Safety: Ensure the machine is connected to a grounded power outlet with the correct voltage (230V) and wattage (1400W). Do not operate with wet hands or in damp conditions. Disconnect power before cleaning or servicing.
- Heat Hazard: The heating platen and accessories reach high temperatures (up to 250°C). Avoid direct contact with hot surfaces. Use heat-resistant gloves when handling materials during and after pressing.
- Burn Prevention: The rubber-coated handle is designed to prevent accidental burns during operation. Always use the handle to open and close the press.
- Ventilation: Operate the machine in a well-ventilated area to dissipate any fumes that may be released during the heat transfer process.
- Automatic Shut-off: For added safety, the machine will automatically shut down after 30 minutes of inactivity.
- Children and Pets: Keep children and pets away from the machine during operation and when it is cooling down.
- Stable Surface: Place the heat press on a stable, heat-resistant surface capable of supporting its weight (approximately 18.4 kg / 40.5 lbs).
3. Package Contents
Verify that all items listed below are included in your package:
- 1 x Heat Press Machine (Main Unit)
- 1 x Cup Press Attachment
- 4 x Cup Accessories (for 275, 325, 350, 500ml cups)
- 2 x Plate Press Attachments (12.5 cm and 15.5 cm)
- 1 x Cap/Hat Press Attachment
- 1 x Instruction Manual

Image 3.1: The CREWORKS 8-in-1 Heat Press Machine with its included attachments for cups, hats, and plates.
4. Components Overview
Familiarize yourself with the main components of your heat press machine:
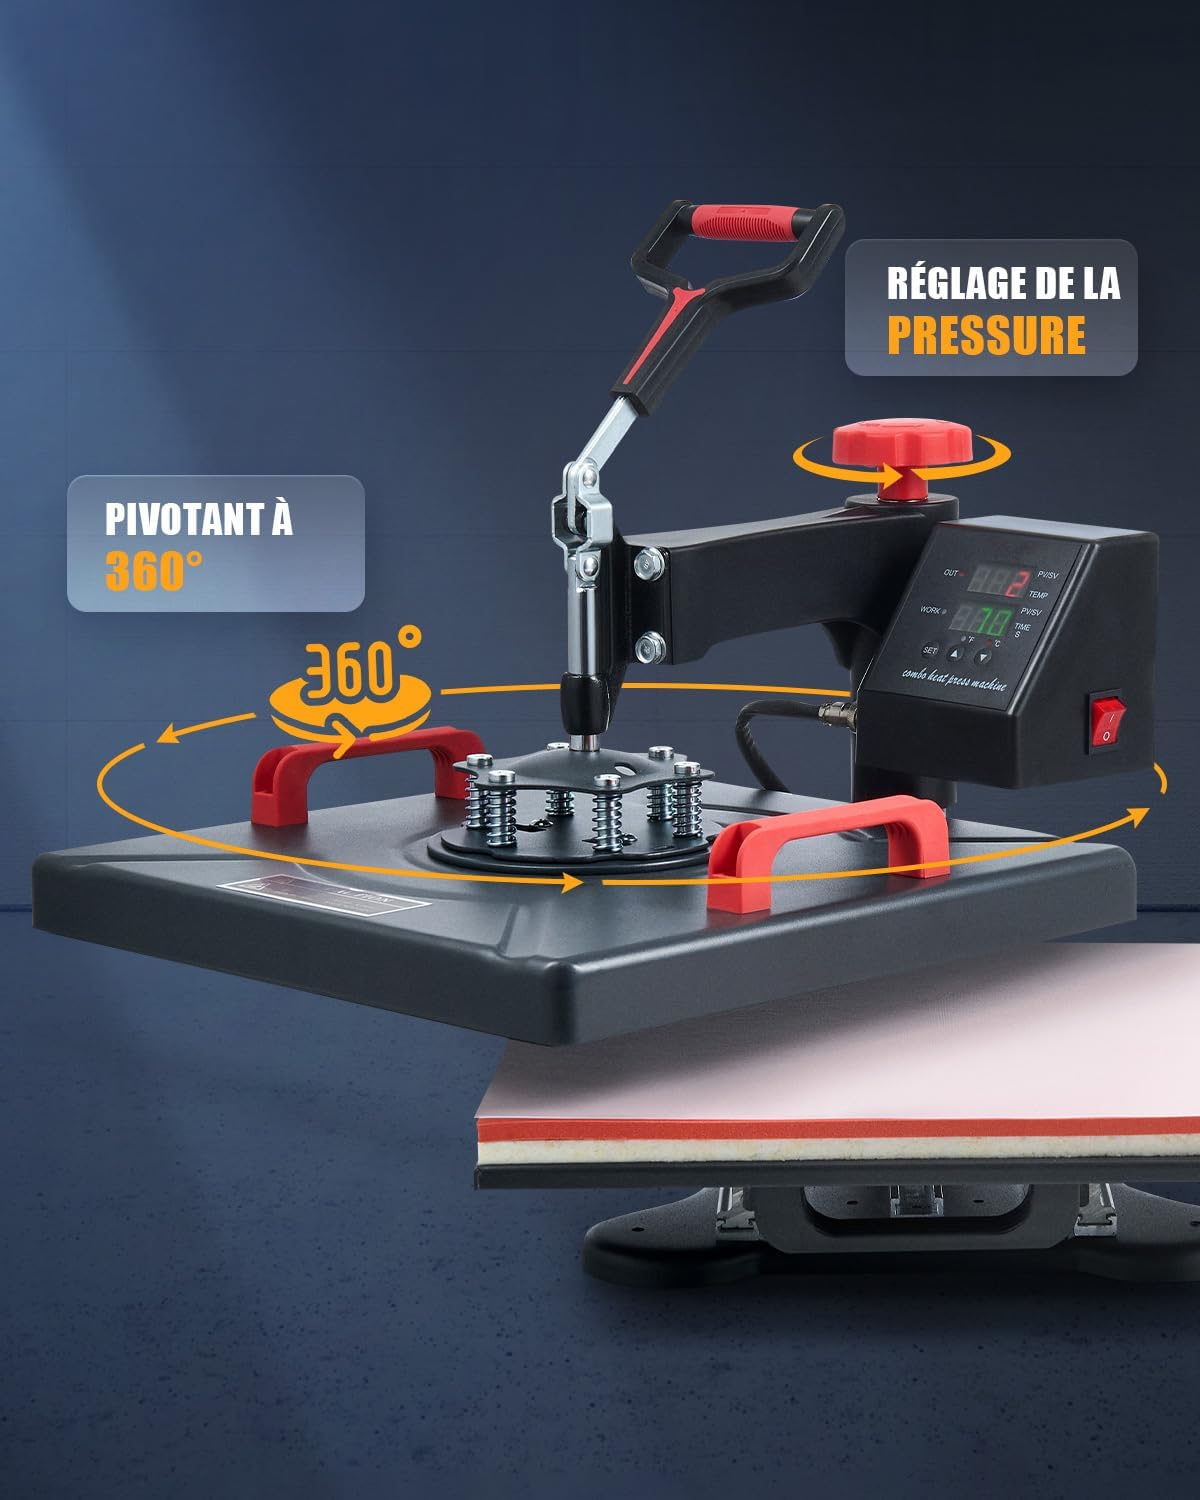
Image 4.1: Labeled diagram of the heat press machine's main parts.
- Top Handle: Used to raise and lower the heating platen.
- Adjustment Knob: Controls the pressure applied by the heating platen.
- Control Panel: Digital display for setting temperature and time.
- Power Switch: Turns the machine on and off.
- Platen Handle: Used to slide the lower platen in and out.
- Platen: The main heating surface (38x38 cm).
- Foam Mat: Provides even pressure and heat distribution.
- Base Plate: Supports the lower platen and attachments.
- Support Foot: Stabilizes the machine.
5. Setup
Follow these steps to set up your heat press machine:
- Unpacking: Carefully remove all components from the packaging. Inspect for any damage during transit.
- Placement: Place the main unit on a sturdy, level, and heat-resistant surface. Ensure adequate space around the machine for ventilation and safe operation.
- Attachment Installation:
- Flat Platen: The main 38x38 cm platen is typically pre-installed.
- Mug Press: Attach the mug press accessory to the designated port on the side of the machine. Secure it firmly.
- Hat Press: Replace the flat platen with the hat press attachment by unscrewing the securing bolts, removing the flat platen, and installing the hat press.
- Plate Press: Similar to the hat press, replace the flat platen with the appropriate plate press attachment (12.5 cm or 15.5 cm).
- Power Connection: Plug the power cord into a grounded electrical outlet. Ensure the power switch is in the 'OFF' position before plugging in.
6. Operating Instructions
6.1 Basic Operation
- Power On: Flip the power switch to the 'ON' position. The control panel will illuminate.
- Setting Temperature:
- Press the 'SET' button once. The 'TEMP' indicator will flash.
- Use the 'UP' and 'DOWN' arrow buttons to adjust the desired temperature (range: 0-250°C).
- Press 'SET' again to confirm.
- Setting Time:
- After setting the temperature, press 'SET' again. The 'TIME' indicator will flash.
- Use the 'UP' and 'DOWN' arrow buttons to adjust the desired time (range: 1-999 seconds).
- Press 'SET' a third time to confirm and exit the setting mode. The machine will begin heating to the set temperature.
- Temperature Unit: The control panel allows switching between Celsius (°C) and Fahrenheit (°F). Refer to the control panel for the specific button to toggle this setting.

Image 6.1: Detailed view of the LED control panel for temperature and time settings. Recommended temperatures for chemical fibers (160°C), cotton garments (170°C), and ceramic cups (200°C) are shown.
6.2 Pressure Adjustment
The pressure adjustment knob (red knob on top) allows you to fine-tune the pressing force. Turn clockwise to increase pressure and counter-clockwise to decrease pressure. Adjust pressure based on the thickness of your material and transfer type. A firm, even pressure is crucial for successful transfers.

Image 6.2: Illustration of the 360° swivel function and the pressure adjustment knob.
6.3 360° Swivel Function
The heating platen is equipped with a 360-degree swivel function. This allows you to rotate the heating element away from the lower platen, providing a safer and more convenient workspace for placing and arranging your materials and designs without direct contact with the hot platen.
6.4 Heat Distribution
The machine features two heating tubes within the platen to ensure even heat distribution across the entire 38x38 cm surface. This uniform heating is essential for consistent and high-quality transfers on various materials like chemical fibers, ceramics, and cotton.

Image 6.3: Diagram illustrating the double heating tube design for uniform heat distribution.
6.5 General Heat Transfer Process
- Prepare Design: Print your design onto appropriate transfer paper.
- Pre-heat: Turn on the machine and set the desired temperature and time according to your transfer material and design specifications. Allow the machine to reach the set temperature.
- Prepare Item: Place the item (T-shirt, mug, hat, plate) onto the appropriate attachment. For flat items, ensure it is centered on the lower platen. For garments, a quick pre-press (5-10 seconds) can remove moisture and wrinkles.
- Position Design: Carefully place your transfer design onto the item, ensuring it is correctly aligned. Secure with heat-resistant tape if necessary.
- Press: Swing the heating platen over the item (if using swivel function) and lower the handle to apply pressure. The timer will start automatically.
- Remove Item: Once the timer sounds, raise the handle and swing the heating platen away. Carefully remove the item using heat-resistant gloves.
- Peel Transfer: Follow the instructions for your specific transfer paper (hot peel, warm peel, or cold peel).
7. Maintenance
- Cleaning: Regularly clean the heating platen and silicone pad with a soft, damp cloth when the machine is cool and unplugged. Do not use abrasive cleaners or solvents.
- Storage: Store the machine in a dry, dust-free environment when not in use.
- Inspection: Periodically check all cables and connections for wear or damage.
8. Troubleshooting
- Machine Not Powering On: Check the power cord connection and ensure the power switch is in the 'ON' position. Verify the electrical outlet is functional.
- Uneven Heat Transfer: Ensure the pressure is evenly distributed across the platen. Check if the silicone pad is flat and free of debris. Allow sufficient pre-heating time.
- Temperature/Time Not Setting: Ensure you are pressing the 'SET' button correctly to cycle through and confirm settings. Refer to section 6.1.
- Transfer Not Sticking/Fading: Verify that the correct temperature, time, and pressure settings are used for your specific transfer material and item. Ensure the item is clean and dry.
9. Specifications
| Feature | Specification |
|---|---|
| Rated Power | 1400W |
| Voltage | 230 Volts |
| Max. Temperature | 250°C (482°F) |
| Timing Range | 1-999 seconds |
| Platen Surface Area | 38 x 38 cm (15 x 15 inches) |
| Cup Accessories Sizes | 275ml, 325ml, 350ml, 500ml |
| Plate Press Dimensions | 12.5 cm (5 inches), 15.5 cm (6 inches) |
| Net Weight | 18.4 kg (40.5 lbs) |
| Material | Metal, Aluminum, Silicone |
10. Warranty and Support
For warranty information, technical support, or service inquiries, please contact CREWORKS customer service through the retailer where the product was purchased or visit the official CREWORKS website. Please have your product model number (38x38CM 8-in-1) and ASIN (B0CTMGZ3RV) available when contacting support.


