1. Introduction
The NETVIP 300Mbps WiFi Repeater is designed to extend the coverage of your existing wireless network, eliminating Wi-Fi dead zones and providing a strong, reliable connection throughout your home or office. This device supports both Repeater Mode for extending an existing Wi-Fi signal and AP (Access Point) Mode for creating a new Wi-Fi network from a wired connection. It is compatible with all standard Wi-Fi routers (IEEE 802.11n/g/b) and features a convenient WPS function for easy setup.

Figure 1.1: NETVIP WiFi Repeater plugged into a wall outlet, showing its compact design and indicator lights.
2. Package Contents
- 1 x NETVIP WiFi Repeater
- 1 x RJ45 Network Cable
- 1 x User Manual
3. Setup
3.1 Physical Installation
Plug the NETVIP WiFi Repeater into a standard electrical outlet in the area where you want to extend your Wi-Fi coverage. Ensure the device is within range of your existing router's Wi-Fi signal for optimal performance in Repeater Mode.

Figure 3.1: The NETVIP WiFi Repeater being plugged into a wall socket, ready for operation.
3.2 WPS One-Touch Setup (Repeater Mode)
The WPS (Wi-Fi Protected Setup) function allows for a quick and easy connection to your existing router without manual configuration.
- Plug the Repeater into a power outlet. Wait for the power indicator light to stabilize.
- Press the WPS button on your host router.
- Within 2 minutes, press the WPS button on the NETVIP WiFi Repeater. The WPS indicator light on the repeater will flash.
- Wait for 1-2 minutes for the connection to establish. The signal strength indicator lights on the repeater will illuminate, indicating a successful connection.

Figure 3.2: Visual guide for WPS one-touch connection, illustrating the steps to connect the repeater to your router.
3.3 Manual Setup via Web Interface
If your router does not support WPS, or for advanced configuration, you can set up the repeater via its web interface.
- Plug the Repeater into a power outlet.
- Connect your computer or mobile device to the repeater's default Wi-Fi network (e.g., "Wireless-N" or "NETVIP_XXXX"). No password is required initially.
- Open a web browser and enter the default IP address (usually 192.168.10.1) or the default web address (check the included manual for specifics, often ap.setup or repeater.setup).
- Log in using the default username and password (usually admin/admin).
- Follow the on-screen wizard to select your desired mode (Repeater or AP).
- For Repeater Mode: Select your existing Wi-Fi network from the list, enter its password, and optionally change the repeater's SSID (network name) and password.
- For AP Mode: Connect an Ethernet cable from your main router to the repeater's RJ45 port. Then, configure a new Wi-Fi network name (SSID) and password for the repeater.
- Save the settings and wait for the repeater to restart. Your devices can now connect to the extended or new Wi-Fi network.
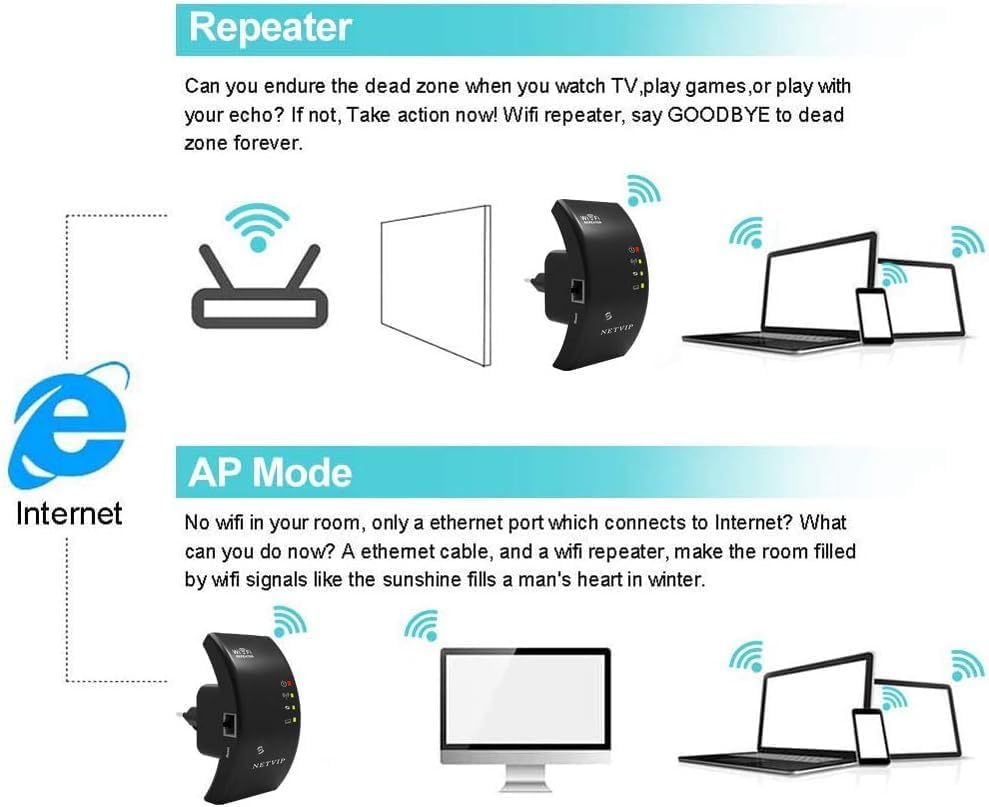
Figure 3.3: Explanation of Repeater Mode (extending existing Wi-Fi) and AP Mode (creating new Wi-Fi from wired connection).
4. Operating the Device
4.1 LED Indicators
The repeater features several LED indicators to show its status:
- Power LED: Indicates if the device is powered on.
- WPS LED: Flashes during WPS setup, solid when WPS connection is active.
- Wi-Fi/Signal LED: Indicates Wi-Fi activity and signal strength. Multiple lights usually mean a stronger signal.
- LAN LED: Indicates activity on the Ethernet port.
4.2 Connecting Devices
Once the repeater is set up, you can connect your wireless devices (smartphones, tablets, laptops, smart TVs, gaming consoles, etc.) to the extended Wi-Fi network. The network name (SSID) will be either the same as your main router (if you chose to keep it) or a new one you configured during setup.

Figure 4.1: The repeater supports connection for up to 20 devices, including phones, pads, laptops, smart bulbs, smart plugs, and smart cameras.
4.3 Optimal Placement
For best performance, place the repeater halfway between your router and the area where you need improved Wi-Fi coverage. Avoid placing it near large metal objects, concrete walls, or other electronic devices that may cause interference.

Figure 4.2: Illustration of how the repeater extends Wi-Fi coverage throughout a multi-story home, showing signal amplification areas.
5. Maintenance
5.1 Cleaning
To maintain optimal performance, periodically clean the exterior of the repeater with a soft, dry cloth. Do not use liquid cleaners or aerosols.
5.2 Resetting the Device
If the device is not functioning correctly or you wish to revert to factory settings, you can perform a factory reset. Locate the small "Reset" button (often recessed) on the device. Use a paperclip or a thin object to press and hold the button for approximately 5-10 seconds until the indicator lights flash, then release. The device will restart with factory default settings.
6. Troubleshooting
| Problem | Possible Cause | Solution |
|---|---|---|
| No power/LEDs off | Device not plugged in or power outlet issue. | Ensure the repeater is securely plugged into a working power outlet. Try a different outlet. |
| Cannot connect to repeater's Wi-Fi | Incorrect Wi-Fi password or repeater not broadcasting. | Verify the Wi-Fi password. Perform a factory reset and reconfigure. |
| Poor signal strength/slow speed | Repeater too far from router or interference. | Relocate the repeater closer to your main router. Avoid obstacles and interference sources. |
| Repeater not extending network | Incorrect configuration or WPS failure. | Re-run the setup process, ensuring correct mode selection (Repeater Mode). Try manual setup if WPS fails. |
| LAN port not working in AP Mode | Faulty Ethernet cable or incorrect mode. | Ensure the Ethernet cable is securely connected and functional. Confirm the repeater is set to AP Mode. |
7. Specifications
- Brand: NETVIP
- Model: B0CTLS6ZBT
- Wireless Communication Standard: 802.11n
- Data Transfer Rate: 300 Megabits per Second
- Frequency Band: 2.4 GHz
- Special Features: WPS, AP Mode, Fast Ethernet Port (RJ45)
- Color: Black
- Item Weight: 170 grams
- Dimensions: Approximately 12.6 x 9.6 x 7.4 cm (Packaging)
8. Warranty and Support
NETVIP products come with a standard manufacturer's warranty. For detailed warranty information, technical support, or service inquiries, please refer to the contact information provided on the product packaging or visit the official NETVIP website. Please retain your proof of purchase for warranty claims.
For further assistance, you may also contact the retailer where the product was purchased.


