VONLUCE 52-inch Ceiling Fan with Light and Remote (Model CFN1318BW) Instruction Manual
Model: CFN1318BW
1. Introduction
Thank you for choosing the VONLUCE 52-inch Ceiling Fan with Light and Remote. This manual provides essential information for the safe installation, operation, and maintenance of your new ceiling fan. Please read these instructions thoroughly before beginning installation and retain them for future reference.
This ceiling fan features a 5-blade design, a 6-speed noiseless reversible DC motor, and integrated 3 CCT (Correlated Color Temperature) LED lighting. It is designed for indoor use in various rooms such as bedrooms, living rooms, and farmhouses, and can also be used in covered outdoor areas like porches or decks, provided it is not directly exposed to rain.
2. Safety Information
- Electrical Safety: Always disconnect power at the main circuit breaker before installation or servicing. All wiring must be in accordance with national and local electrical codes. If you are unsure about wiring, consult a qualified electrician.
- Mounting: The ceiling fan must be mounted to a ceiling joist or a fan-rated outlet box capable of supporting the fan's weight (approximately 13.93 lbs or 6.33 kg). Ensure the mounting structure can hold at least 35 lbs (15.9 kg).
- Blade Clearance: Ensure there is at least 7 feet (2.13 meters) of clearance from the floor to the fan blades and at least 30 inches (76 cm) from the fan blades to any walls or obstructions.
- Safety Cable: Always install the provided safety cable to secure the fan assembly to the building structure, as shown in the installation section.
- Light Source: The integrated LED light source is not user-replaceable. Do not attempt to disassemble the light kit.
- Remote Control: Keep the remote control away from children.
3. Package Contents
Verify that all components are present and undamaged before beginning installation. If any parts are missing or damaged, contact VONLUCE customer support.

Image: All components of the VONLUCE 52-inch Ceiling Fan laid out, including the motor housing, five fan blades, two downrods (5-inch and 10-inch), remote control, and various mounting hardware.
- Motor Housing Assembly
- Fan Blades (5)
- Blade Brackets (5)
- Downrods (5-inch and 10-inch)
- Canopy
- Mounting Bracket
- Remote Control with Wall Holder
- Hardware Pack (screws, washers, wire nuts, safety cable)
- LED Light Kit
- Light Shade
4. Specifications
| Feature | Specification |
|---|---|
| Model Name | CFN1318BW |
| Fan Size | 52 inches |
| Number of Blades | 5 |
| Motor Type | DC Motor |
| Fan Speeds | 6 |
| Air Flow Capacity | 6895 Cubic Feet Per Minute |
| Light Color Temperature | 3000K (Warm White), 4500K (Natural White), 6500K (Cool White) |
| Timer Settings | 1H, 2H, 4H, 8H |
| Noise Level | Less than 35dB |
| Power Source | Corded Electric |
| Product Dimensions | 17.32"D x 13.39"W x 7.87"H (approximate, without blades) |
| Item Weight | 13.93 pounds (6.33 kg) |
| Installation Type | Downrod Mount (5-inch and 10-inch included) |
| Sloped Ceiling Compatibility | Max. 10 degrees |
5. Installation
Before starting, ensure the power is turned off at the circuit breaker. It is recommended to have two people for installation.
5.1 Prepare the Fan Blades
- Attach each fan blade to a blade bracket using the provided screws and washers. Ensure they are securely fastened.
- Attach the assembled blade and bracket units to the motor housing.

Image: The fan blades feature a dual-finished design, allowing you to choose between a dark wood or light wood appearance to match your decor.
5.2 Install the LED Light Kit
- Connect the wires from the LED light kit to the corresponding wires in the motor housing.
- Secure the LED light kit to the motor housing with the provided screws.
5.3 Assemble the Downrod
- Slide the canopy, grommet, and coupling cover onto the chosen downrod (5-inch or 10-inch).
- Feed the fan wires through the downrod.
- Insert the downrod into the motor housing and secure it with the pin and clip.

Image: This diagram illustrates the two downrod options (5-inch and 10-inch) for different ceiling heights (9 feet and over 9 feet) and confirms compatibility with sloped ceilings up to 10 degrees.
5.4 Install the Mounting Bracket
- Secure the mounting bracket to the ceiling outlet box using the screws provided. Ensure it is firmly attached to a structural support.
5.5 Hang the Fan and Make Electrical Connections
- Carefully lift the fan assembly and hang it on the mounting bracket.
- Connect the electrical wires from the fan to the house wiring according to the wiring diagram in the full instruction manual. Use the provided wire nuts.
- Place the remote receiver unit inside the mounting bracket.
- Attach the safety cable from the fan to the building structure.

Image: This diagram highlights the safety cable, demonstrating how it ensures the fan is securely attached during installation and use.
5.6 Secure the Canopy and Light Shade
- Slide the canopy up and secure it to the mounting bracket with screws.
- Install the light shade by twisting it onto the light kit until secure.
5.7 Installation Video
Video: This video provides a step-by-step visual guide on how to install the VONLUCE 52-inch Ceiling Fan, covering blade attachment, downrod assembly, mounting, wiring, and final canopy and light shade installation.
6. Operation
Your VONLUCE ceiling fan is operated using the included remote control.

Image: The remote control for the VONLUCE ceiling fan, showing buttons for fan on/off, reverse fan direction, 6-level fan speeds, 1/2/4/8 hour timer, and light on/off with 3 CCT color temperature adjustment (3000K/4500K/6500K).
6.1 Fan Control
- Power On/Off: Press the fan power button to turn the fan on or off.
- Speed Adjustment: Use the speed buttons (1-6) to select your desired fan speed.
- Reversible DC Motor: Press the 'Reverse Fan Direction' button to change the blade rotation direction. This allows for downward airflow in summer for cooling and upward airflow in winter to circulate warm air.
- Timer Settings: Use the timer buttons (1H, 2H, 4H, 8H) to set the fan to turn off automatically after the selected duration.
- Natural Mode: Hold the natural mode button for 5 seconds to mute the fan.
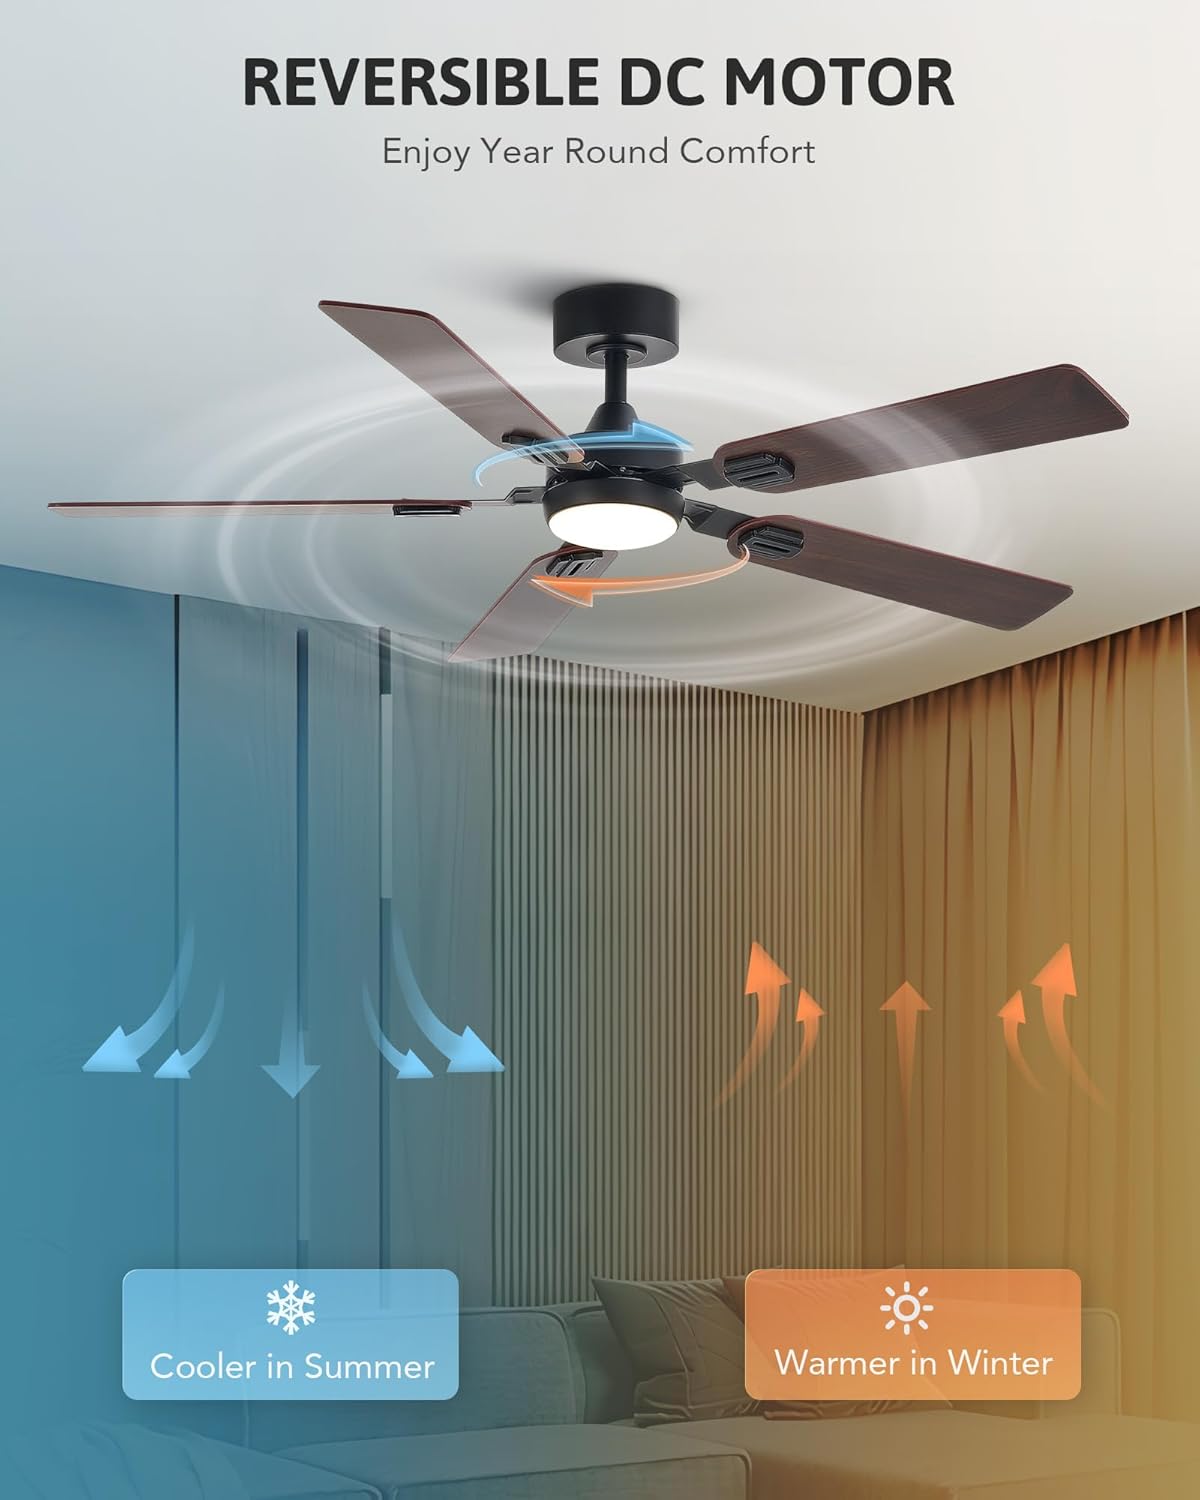
Image: This image visually explains the reversible DC motor, showing downward airflow for cooling in summer and upward airflow for circulating warm air in winter, enhancing year-round comfort.
6.2 Light Control
- Light On/Off: Press the light button to turn the LED light on or off.
- Color Temperature Adjustment: Repeatedly press the light button to cycle through the three color temperature options: 3000K (Warm White), 4500K (Natural White), and 6500K (Cool White).
- Memory Function: The fan will remember the last light setting and wind speed if it runs for more than 10 seconds before being turned off. When turned on again, it will resume the previous settings.
6.3 Product Overview Video
Video: This video provides a general overview of the VONLUCE 5-blade ceiling fan with light, showcasing its features such as adjustable speeds, color temperature options, and quiet operation in various room settings.
7. Maintenance
Regular maintenance helps prolong the life and performance of your ceiling fan.
- Cleaning: To clean the fan, wipe the blades and motor housing with a soft, damp cloth. Do not use abrasive cleaners or solvents, as these can damage the finish.
- Blade Balance: Periodically check the fan blades for any wobbling. If wobbling occurs, ensure all blade screws are tightened. A balancing kit may be used if necessary (not included).
- Tighten Fasteners: Check all screws and fasteners on the fan and mounting bracket annually to ensure they are secure.
8. Troubleshooting
If you experience issues with your fan, refer to the following common problems and solutions:
| Problem | Possible Cause | Solution |
|---|---|---|
| Fan does not start | No power to the fan; Loose wire connections; Remote control battery low. | Check circuit breaker; Ensure all wire connections are secure; Replace remote control battery. |
| Fan wobbles | Loose blade screws; Unbalanced blades; Loose mounting bracket. | Tighten all blade screws; Use a balancing kit (not included) to balance blades; Ensure mounting bracket is securely fastened. |
| Light does not work | Loose wire connection to light kit; Faulty LED light kit. | Check wire connections to the light kit; Contact customer support if the LED light kit is faulty. |
| Remote control not working | Battery low or dead; Remote not paired with receiver. | Replace battery; Refer to the full manual for remote pairing instructions. |
For further assistance, please refer to the complete instruction manual or contact VONLUCE customer support.
9. Warranty and Support
VONLUCE products are designed for quality and durability. For specific warranty information and customer support, please refer to the warranty card included with your product or visit the official VONLUCE website. You can also contact VONLUCE customer service directly for assistance with product inquiries, troubleshooting, or replacement parts.
Contact Information: Please refer to your product packaging or the official VONLUCE website for the most up-to-date contact details.


