This manual provides detailed instructions for the setup, operation, and maintenance of your Genmitsu MD19 Rotary Roller Kit. The MD19 is designed to enhance the capabilities of compatible Genmitsu engraving machines, enabling 360° Y-axis engraving on cylindrical and irregularly shaped objects. Please read this manual thoroughly before using the product to ensure proper function and safety.
Image: The Genmitsu MD19 Rotary Roller Kit set up with a wine glass for engraving, alongside various cylindrical objects demonstrating engraving possibilities.
Key Features
Enhanced Compatibility: Specifically designed for Genmitsu Kiosk, Kortek, L8, and Z6 engraving machines, featuring a 4-pin to 6-pin terminal cable interface.
Adjustable Rolling Block: The base allows for easy height adjustment to accommodate objects of varying shapes and sizes, including extra-long items.
4 Gears Adjustable for 360° Engraving: Offers four adjustable settings for precise 360° whole-angle engraving.
Effortless Setup: Simple plug-and-play connectivity with compatible machines.
Spacious Engraving Area with High Precision: Provides a 130x130mm engraving area with 0.01mm accuracy and speeds up to 10,000mm/min.
Setup Instructions
1. Connecting the MD19 Rotary Roller
The MD19 Rotary Roller Kit connects to your compatible Genmitsu engraving machine via a 4-pin to 6-pin terminal cable. Ensure your machine is powered off before making any connections.
Locate the Y-axis motor port on your Genmitsu engraving machine.
Connect the 4-pin end of the provided cable to the MD19 Rotary Roller.
Connect the 6-pin end of the cable to the Y-axis motor port on your engraving machine.
Power on your engraving machine. The MD19 should be recognized automatically by compatible software like LightBurn or Genmitsu's proprietary software for L8 and Z6.
2. Adjusting the Rolling Block Support
The rolling block supports objects of various heights and lengths. Adjust it to ensure the object is level and stable during engraving.
Image: The adjustable rolling block, designed to support various object heights (36-80mm scope).
To adjust the height, loosen the knob at the base of the rolling block.
Raise or lower the support to match the height of your object.
Tighten the knob to secure the rolling block in place.
For extra-long items, the rolling block can be positioned to provide additional stability.
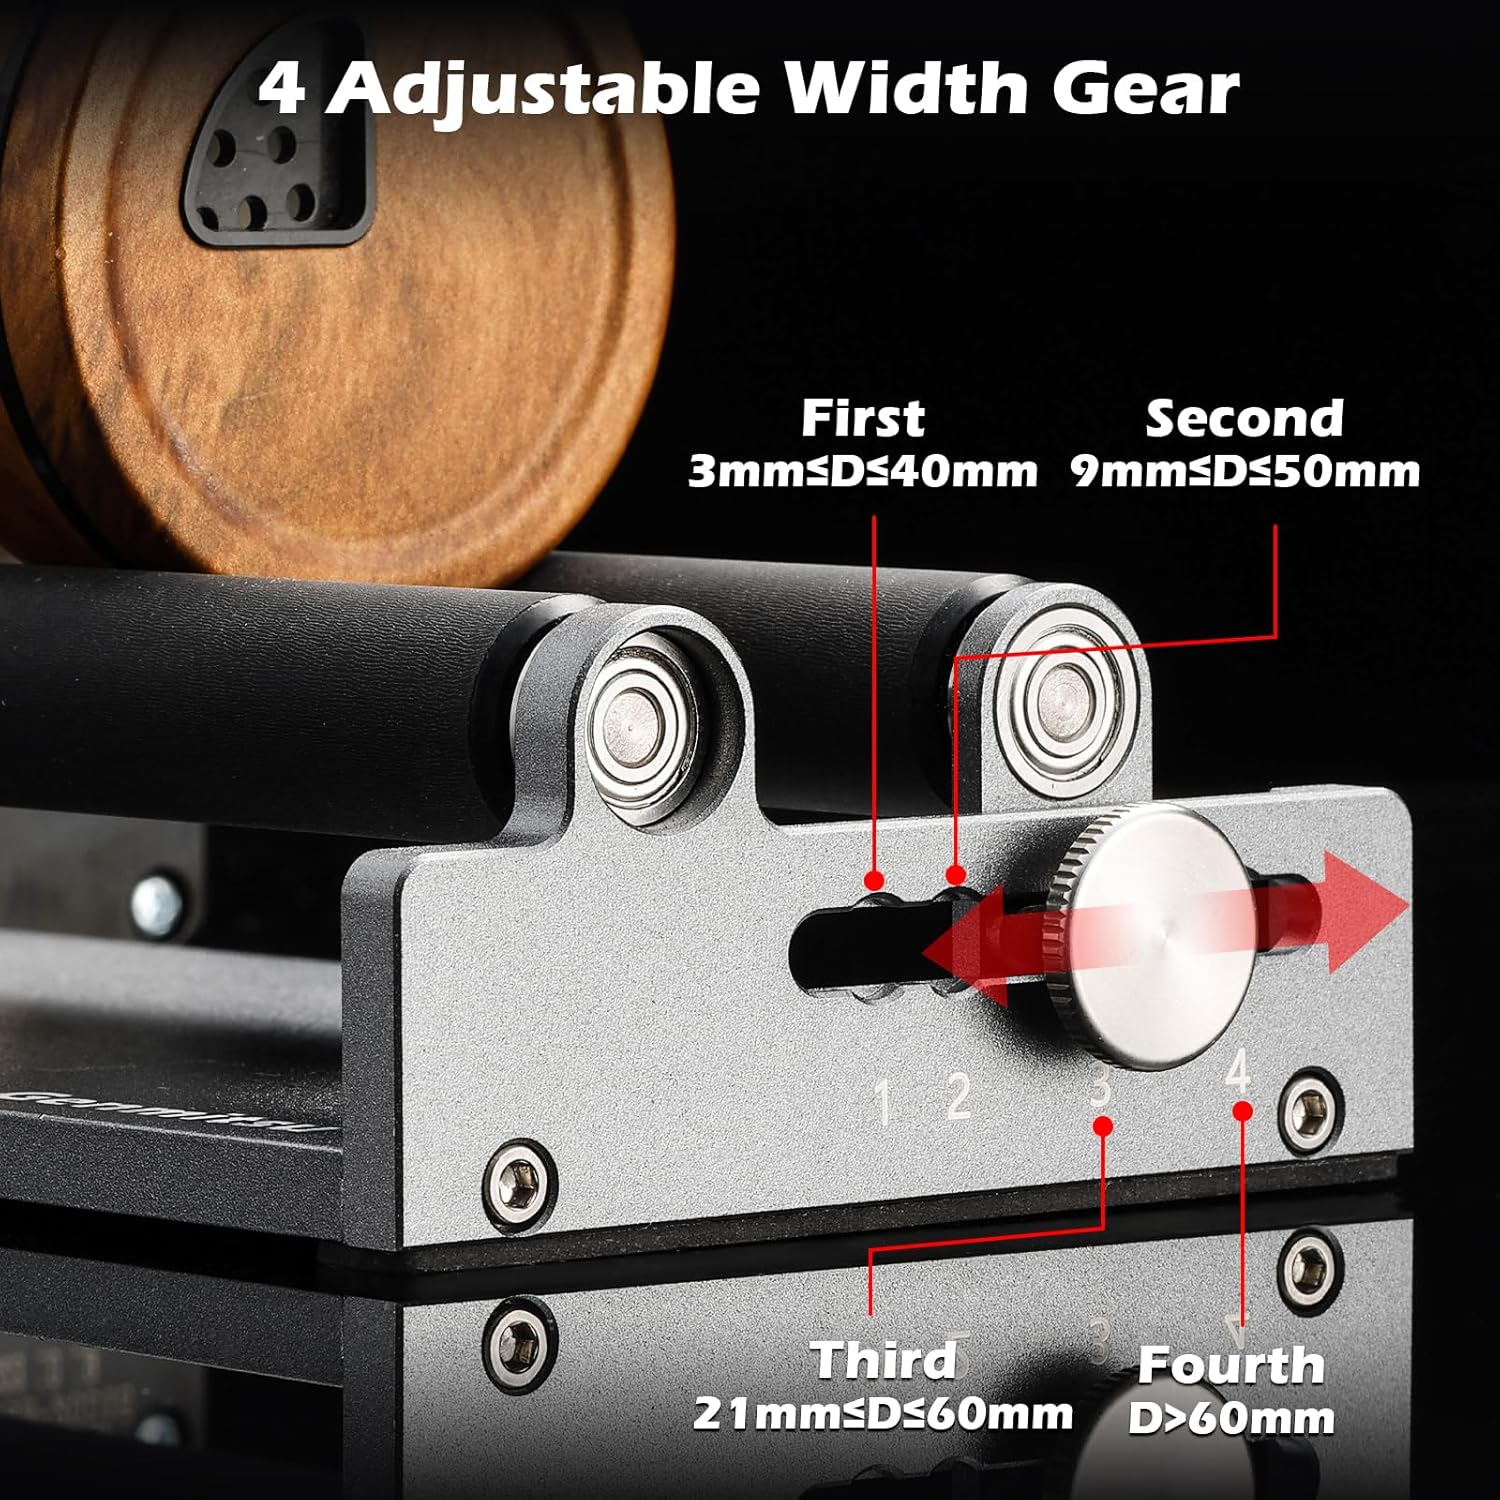
3. Setting the 4 Adjustable Width Gears
The MD19 features four gear settings to accommodate objects of different diameters. Select the appropriate gear for your object to ensure optimal contact and rotation.
Image: The four-gear adjustment mechanism for varying object widths.
Gear 1: For objects with diameter (D) between 3mm and 40mm.
Gear 2: For objects with diameter (D) between 9mm and 50mm.
Gear 3: For objects with diameter (D) between 21mm and 60mm.
Gear 4: For objects with diameter (D) greater than 60mm.
Slide the adjustment knob to select the gear that best fits the diameter of your object.
4. Preparing the Engraving Machine
For some Genmitsu machines, such as the L8, it may be necessary to raise the machine to accommodate the MD19 Rotary Roller and the object being engraved. This allows for sufficient clearance.
Video: Demonstrates how to raise the Genmitsu L8 machine using its built-in Z-axis raise function to create clearance for the rotary roller and objects.
Operation Guide
1. Placing the Object for Engraving
Carefully place the cylindrical object onto the MD19 Rotary Roller, ensuring it rests securely on both the main rollers and the adjustable rolling block support. The object should be centered and stable to prevent movement during engraving.
Image: A tumbler positioned on the MD19 Rotary Roller, illustrating its 360° rotating engraving capability.
2. Software Configuration
The MD19 Rotary Roller is compatible with popular engraving software such as LightBurn, as well as the software provided with Genmitsu L8 and Z6 machines. Refer to your specific software's documentation for detailed instructions on enabling and configuring rotary axis engraving.
Ensure the rotary axis function is enabled in your software settings.
Input the correct diameter of your object for accurate scaling.
Adjust engraving parameters (speed, power, passes) as needed for your material.
3. Starting the Engraving Process
Once the object is secured and software settings are configured, initiate the engraving process through your machine's control interface or software. Monitor the engraving to ensure proper operation.
Image: A wooden cylinder showcasing a detailed engraving, demonstrating the MD19's high accuracy and wide working area.
Maintenance
To ensure the longevity and optimal performance of your Genmitsu MD19 Rotary Roller Kit, regular maintenance is recommended.
Cleaning: Periodically clean the rollers and the base with a soft, dry cloth to remove dust and debris. Avoid using abrasive cleaners or solvents.
Inspection: Regularly inspect the rollers and moving parts for any signs of wear or damage. Ensure all screws and fasteners are tight.
Lubrication: The moving parts are generally self-lubricating. If you notice any stiffness, apply a small amount of light machine oil to the axles of the rollers.
Troubleshooting
Problem
Possible Cause
Solution
Rotary roller not moving.
Incorrect connection; software not configured; power issue.
Check cable connections to both the MD19 and the engraving machine.
Verify rotary axis settings in your engraving software.
Ensure the engraving machine is powered on and functioning correctly.
Engraving is distorted or uneven.
Object not stable; incorrect diameter setting; rollers dirty.
Ensure the object is securely placed and balanced on the rollers.
Double-check the object's diameter input in the software.
Clean the rollers to ensure smooth rotation.
Adjust the gear setting to match the object's diameter.
MD19 not recognized by machine.
Incompatible machine; incorrect port used.
Confirm your engraving machine is listed as compatible (Genmitsu Kiosk, Kortek, L8, Z6).
Ensure the cable is connected to the Y-axis motor port, not a USB port or other auxiliary port.
Specifications
Feature
Detail
Model Number
MD19
Product Dimensions
9.84 x 5.31 x 17.32 inches
Item Weight
2.79 pounds
Engraving Area (Max)
130 x 130 mm
Engraving Accuracy
0.01 mm
Engraving Speed (Max)
10,000 mm/min
Rolling Block Scope
36-80mm
Adjustable Width Gears
4 settings for various object diameters
Compatibility
The Genmitsu MD19 Rotary Roller Kit is designed for seamless integration with the following Genmitsu engraving machines:
Genmitsu L8
Genmitsu Z6
Genmitsu Kiosk
Genmitsu Kortek
Image: The MD19 Rotary Roller Kit and its compatible Genmitsu L8 and Z6 engraving machines.
While the MD19 may be physically compatible with other brands of engraving machines, full functionality and software integration are guaranteed only with the listed Genmitsu models. Please verify compatibility with non-Genmitsu machines before use.
Warranty and Support
For warranty information, technical support, or service inquiries, please refer to the official Genmitsu website or contact Genmitsu customer service directly. Keep your purchase receipt for warranty claims.
Online Resources: Visit the official Genmitsu website for FAQs, software updates, and additional resources.
Related Documents - MD19
Genmitsu FLRR Upgraded Laser Rotary Roller User Manual Comprehensive user manual for the Genmitsu FLRR Upgraded Laser Rotary Roller. This guide provides detailed instructions on product overview, package contents, step-by-step assembly and adjustment, engraving techniques for cylinders and wine glasses, and wiring connections for laser engraving machines. Includes troubleshooting tips and contact information.
Genmitsu Rotary Module Kit User Manual for PROVer XL 4030/6050 This user manual provides detailed instructions for installing and calibrating the Genmitsu Rotary Module Kit with the PROVer XL 4030 and PROVer XL 6050 PLUS CNC routers. Learn about the components, dimensions, and step-by-step installation procedures for 2D and 3D engraving.
Genmitsu PROVerXL 4030 CNC Router User Manual | SainSmart Comprehensive user manual for the Genmitsu PROVerXL 4030 CNC Router by SainSmart. Covers assembly, specifications, software setup, operation, and safety guidelines for this 3-axis CNC milling and engraving machine.
Genmitsu L8 Laser Engraving Machine User Manual Comprehensive user manual for the Genmitsu L8 Laser Engraving Machine, covering setup, safety instructions, product parameters, assembly, functions, software installation for PC and mobile, connection methods, frequently asked questions, and maintenance procedures.
Genmitsu 5.5W Compressed Spot Fixed Focus Laser Module User Manual User manual for the Genmitsu 5.5W Compressed Spot Fixed Focus Laser Module, detailing its features, compatibility with Jinsoku and Genmitsu CNC machines, installation, software setup with LaserGRBL, and focusing instructions.