Introduction
This manual provides comprehensive instructions for the assembly, operation, and maintenance of your Outsunny 10' x 8' Retractable Awning. Please read this manual thoroughly before installation and use to ensure proper function and safety. Keep this manual for future reference.
Safety Information
Always adhere to the following safety guidelines:
- Ensure all mounting hardware is securely fastened to a stable and appropriate surface (balcony brick walls, concrete, doors, windows).
- Do not operate the awning during strong winds, heavy rain, or snow. Retract the awning immediately in adverse weather conditions to prevent damage.
- Keep children and pets away from the awning during operation.
- Do not hang objects from the awning frame or fabric.
- Regularly inspect the awning for any signs of wear, damage, or loose components. Address any issues promptly.
- Use caution when adjusting the awning's angle or length to avoid pinching or injury.
Important: Use caution during large storms. Regularly clean the awning to prevent dust buildup. Always follow assembly and operation instructions for safe use.
Parts List
Verify that all components are present before beginning assembly:
- Awning Fabric Assembly (280gsm PU-coated polyester)
- Aluminum Frame Components (including arms and roller tube)
- Powder-Coated Steel Tubes
- Crank Handle (59" L)
- Mounting Brackets
- Mounting Hardware (screws, anchors, etc.)
- Instruction Manual
Setup and Installation
Follow these steps for proper assembly and installation of your retractable awning. Fully assemble required.
1. Site Selection and Preparation
Choose a suitable location on a sturdy wall. The wall must measure at least 8.2-11.5 feet (2.5-3.5m) in height to fit the awning. If mounting above a door or window, an additional 11.75 inches (30cm) clearance is needed above the opening.

Figure 1: Recommended installation height and reserved distance for the awning.

Figure 2: Visual guide for installation height and clearance.
2. Awning Assembly
Assemble the frame components according to the provided diagrams. Ensure all connections are secure.

Figure 3: Basic assembly steps for the awning frame.
3. Mounting the Awning
Mount the awning to the prepared wall using the included mounting hardware. Ensure the brackets are firmly attached to a solid structure. The awning can be installed on balcony brick walls, concrete, doors, and windows.

Figure 4: Detail of the solid metal brackets for secure mounting.
Operating Instructions
Your Outsunny Retractable Awning is designed for manual operation using the crank handle.
1. Extending the Awning
Insert the crank handle into the designated loop on the awning mechanism. Turn the crank handle clockwise to extend the awning. Continue turning until the desired length is reached. The awning can be extended up to 97.25 inches (247 cm).

Figure 5: Manual operation using the hand crank.

Figure 6: Smooth and quiet manual operation.

Figure 7: Adjusting the awning to a customized length.
2. Retracting the Awning
Turn the crank handle counter-clockwise to retract the awning. Continue turning until the awning is fully retracted against the wall.
3. Adjusting the Angle
The awning's tilt can be adjusted from 45 to 85 degrees to adapt to different sun exposures throughout the day. Adjust the angle as needed for optimal shade.
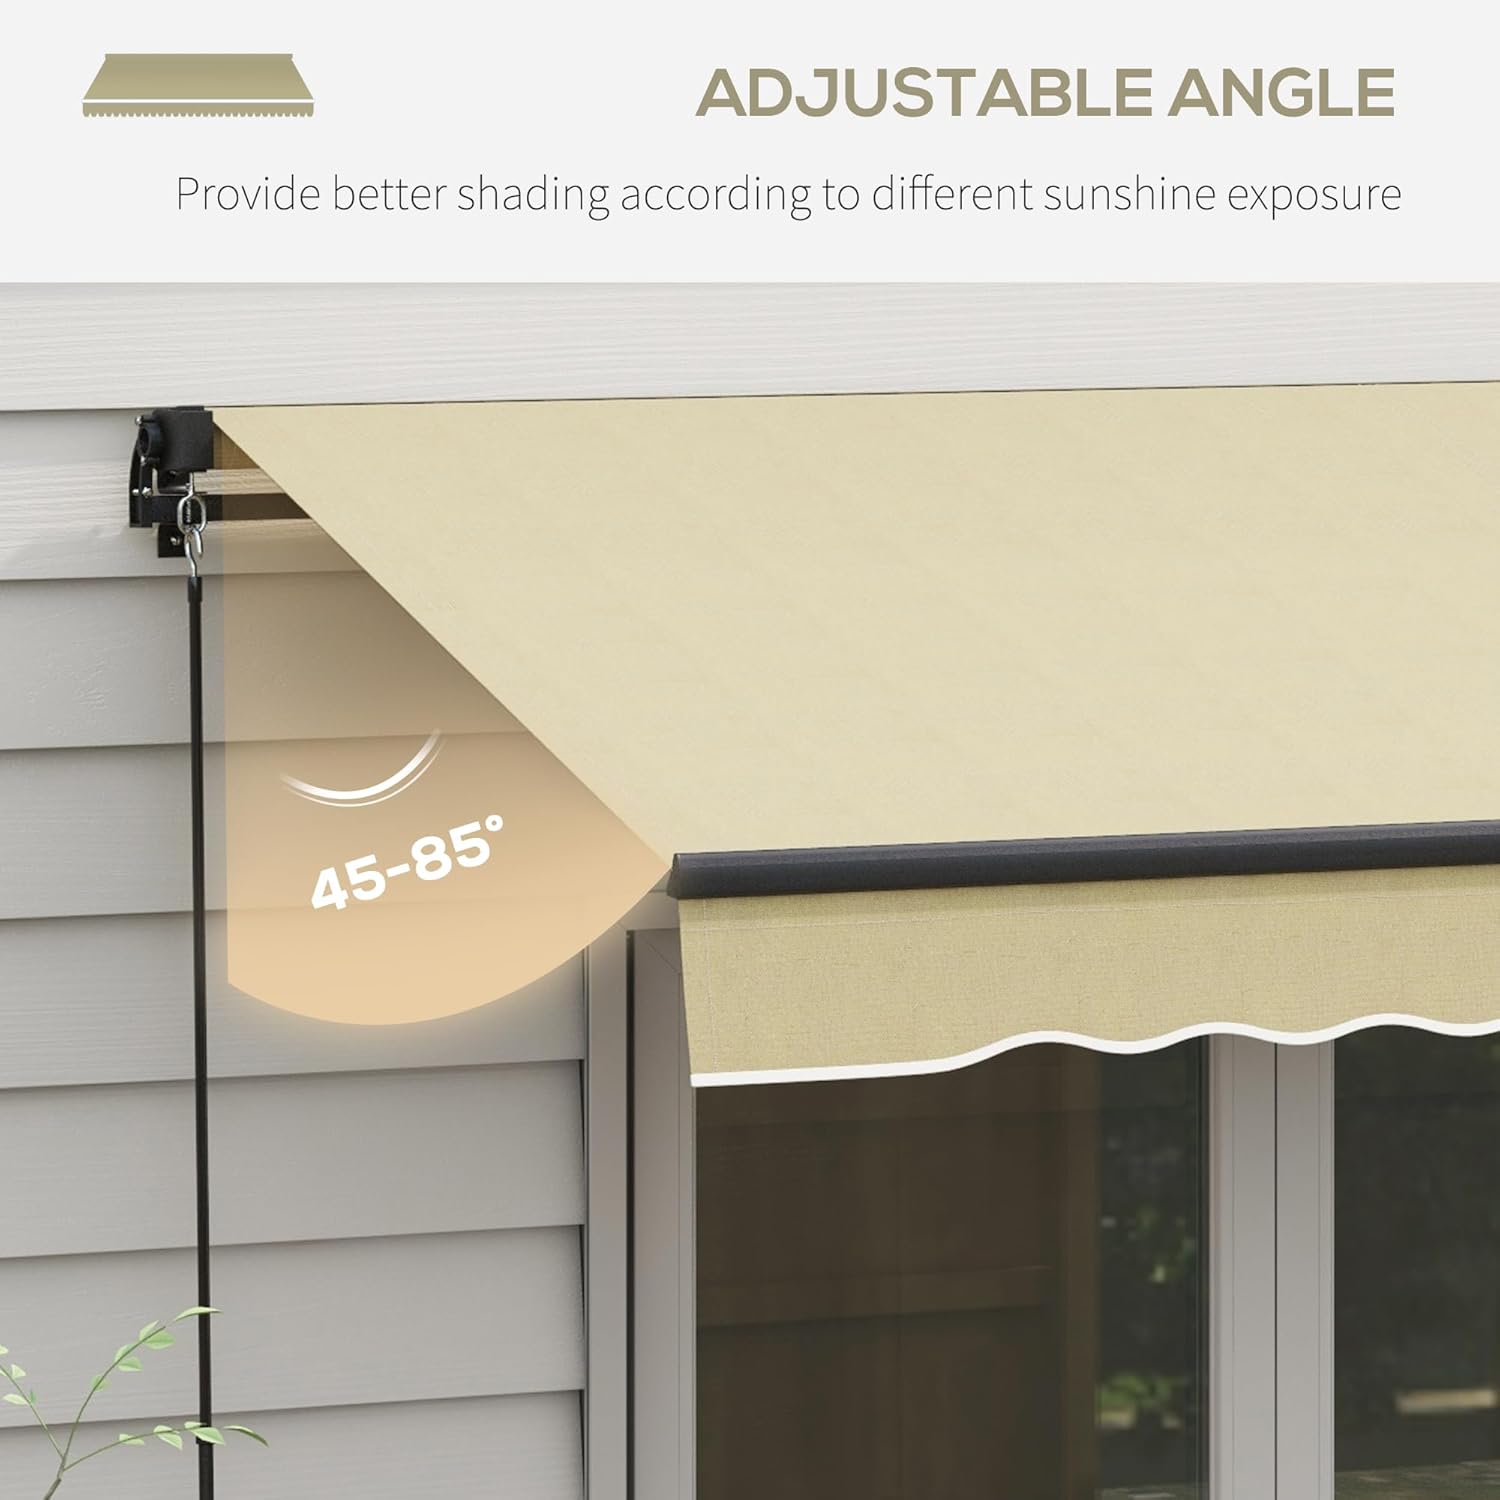
Figure 8: Adjusting the awning angle for better shading.

Figure 9: Customizing the awning angle to suit sun exposure.
Video 1: Demonstration of the Outsunny 840-264V02BG Sunshade Awning in operation, showcasing its retractable feature and ease of use.
Maintenance
Proper maintenance will extend the life of your awning:
- Cleaning the Fabric: Clean the awning fabric regularly with mild soap and water. Do not use harsh chemicals or abrasive cleaners, as they can damage the polyurethane coating. Rinse thoroughly and allow to air dry completely before retracting.
- Frame Inspection: Periodically check the aluminum and steel frame components for any signs of rust, corrosion, or damage. Clean and touch up any chipped paint to prevent further deterioration.
- Hardware Check: Ensure all bolts, screws, and mounting hardware remain tight and secure. Re-tighten if necessary.
- Lubrication: Lightly lubricate moving parts of the mechanism, such as the arms and crank system, with a silicone-based spray lubricant annually.
- Winter Storage: In areas with harsh winters, it is recommended to keep the awning retracted and covered, or remove it for indoor storage, to protect it from heavy snow and ice accumulation.

Figure 10: The durable 280gsm PU-coated fabric is splash-proof and UV resistant.
Troubleshooting
Here are some common issues and their potential solutions:
| Problem | Possible Cause | Solution |
|---|---|---|
| Awning does not extend/retract smoothly. | Mechanism is dry or obstructed. | Lubricate moving parts with silicone spray. Check for debris in the mechanism. |
| Awning sags in the middle. | Arms are not fully extended or fabric is stretched. | Ensure awning is fully extended. Check for proper tensioning. |
| Awning fabric is discolored or faded. | Prolonged exposure to sun/elements. | This is normal wear over time. Ensure awning is retracted when not in use to minimize exposure. |
| Awning makes loud noises during operation. | Loose bolts or dry components. | Check and tighten all mounting bolts and frame connections. Lubricate moving parts. |
Specifications
| Feature | Detail |
|---|---|
| Model Number | 840-264V02BG |
| Dimensions (Shaded Area) | 116.25" W x 97.25" D (approx. 10' W x 8' D) |
| Product Dimensions | 97.25"D x 116.25"W x 59"H |
| Crank Handle Length | 59" L |
| Material | Aluminum (frame), Steel (tubes), Polyester (fabric) |
| Fabric Type | 280gsm PU Coated Fabric |
| UV Protection | UV30+ |
| Adjustable Tilt Angle | 45-85 degrees |
| Operation Mode | Manual |
| Item Weight | 41.8 Pounds |
| Assembly Required | Yes |
| Minimum Wall Clearance | 11.75 Inches (above door/window) |

Figure 11: Key dimensions of the Outsunny Retractable Awning.
Warranty and Support
For warranty information and customer support, please refer to the documentation included with your product packaging or contact Outsunny customer service directly. Keep your purchase receipt for warranty claims.


