
Vente-unique ZILGA
User Manual for Vente-unique ZILGA Wall-Mounted Vanity Unit
Model: ZILGA
1. Introduction
This manual provides essential information for the safe and efficient installation, operation, and maintenance of your Vente-unique ZILGA Wall-Mounted Vanity Unit. Please read these instructions thoroughly before assembly and use, and retain this manual for future reference.

Figure 1: Front view of the ZILGA Wall-Mounted Vanity Unit.
2. Safety Information
WARNING: Failure to follow these safety instructions may result in injury or damage to the product.
- Read all instructions carefully before installation.
- Use appropriate tools for wall mounting. Ensure the wall structure can support the weight of the unit and its contents.
- Pay attention to moving parts during assembly to avoid injury.
- Wear appropriate personal protective equipment (PPE) during installation, such as gloves and eye protection.
- Do not overload the unit's shelves.
- Keep small parts and packaging materials away from children.
3. Product Specifications
| Feature | Detail |
|---|---|
| Model | ZILGA |
| Color | Black |
| Material | MDF (Medium-Density Fibreboard) |
| Finish | Matte, Grooved (Striated) |
| Dimensions (L x D x H) | 80 cm x 44 cm x 60 cm |
| Weight | 24 kg |
| Number of Doors | 2 |
| Door Mechanism | Soft Close Hinges |
| Internal Storage | 1 Shelf |
| Installation Type | Wall-mounted (Suspended) |
| Handles | Black metal handles |
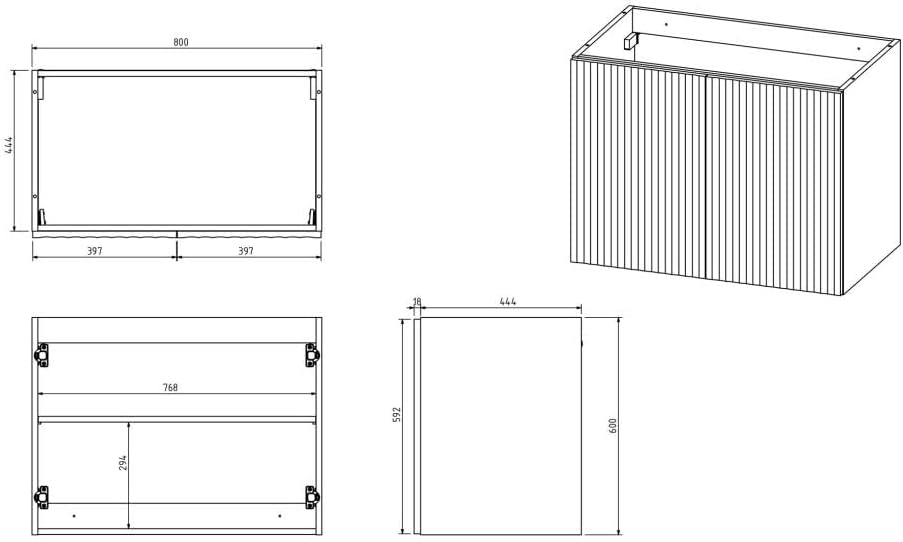
Figure 2: Detailed dimensions of the ZILGA Wall-Mounted Vanity Unit.
4. Setup and Assembly
The ZILGA vanity unit requires self-assembly and wall mounting. Follow these general steps. Refer to the included assembly instructions for detailed diagrams and hardware lists.
4.1 Unpacking
- Carefully open the packaging and remove all components.
- Verify all parts are present against the parts list provided in the separate assembly guide.
- Inspect all components for any damage. Contact customer support immediately if any parts are damaged or missing.
- Keep packaging materials until assembly is complete in case of returns or missing parts.
4.2 Tools Required (Not Included)
- Phillips head screwdriver
- Drill with appropriate drill bits for wall type
- Level
- Measuring tape
- Pencil
- Safety glasses and gloves
4.3 Assembly Steps
- Assemble the main cabinet structure according to the provided diagrams. Ensure all connections are secure.
- Attach the soft-close hinges to the doors and the cabinet frame.
- Install the black metal handles onto the doors.
- Insert the internal shelf into the designated slots.

Figure 3: Interior view showing the shelf and soft-close hinges.
4.4 Wall Mounting
Important: Wall mounting hardware is typically not included as it depends on your wall type (e.g., drywall, concrete, tile). Consult a professional if unsure about proper mounting techniques or hardware.
- Determine the desired height for your vanity unit. Mark the mounting points on the wall using a pencil and a level.
- Drill pilot holes at the marked locations, ensuring they are appropriate for your chosen wall anchors/screws.
- Install the wall anchors (if required) into the drilled holes.
- Carefully lift the vanity unit and align its mounting brackets with the wall anchors/screws.
- Secure the unit to the wall using appropriate screws. Ensure it is level and firmly attached before placing any items inside.

Figure 4: ZILGA vanity unit installed in a bathroom.
5. Operation
The ZILGA vanity unit is designed for storage in a bathroom environment. Its operation is straightforward:
- Doors: The unit features two hinged doors with a soft-close mechanism. Gently push the doors to close them; they will slowly and quietly close on their own. Avoid forcing the doors shut.
- Storage: Utilize the internal shelf and cabinet space for organizing bathroom essentials. Distribute weight evenly to maintain stability.
- Compatibility: This unit is designed to be placed under a single basin (vasque). Ensure the basin dimensions are compatible with the unit's top opening.
6. Care and Maintenance
Proper care will ensure the longevity and appearance of your vanity unit.
- Cleaning: Wipe surfaces with a soft, damp cloth. For stubborn marks, use a mild, non-abrasive cleaner specifically designed for furniture. Avoid harsh chemicals, abrasive pads, or solvents, as these can damage the finish.
- Spills: Immediately wipe up any water spills or moisture to prevent damage to the MDF material.
- Humidity: While designed for bathroom use, excessive humidity should be avoided. Ensure proper ventilation in your bathroom.
- Hinges: The soft-close hinges are designed for durability. If they become stiff or noisy, a small amount of silicone spray lubricant can be applied, but avoid over-lubricating. Do not attempt to disassemble the hinges unless necessary for replacement.
- Inspection: Periodically check all screws and connections to ensure they remain tight, especially the wall mounting hardware. Retighten if necessary.
7. Troubleshooting
This section addresses common issues you might encounter.
| Problem | Possible Cause | Solution |
|---|---|---|
| Doors do not close properly or are misaligned. | Hinges are loose or out of adjustment. | Adjust the screws on the hinges to align the doors. Refer to the hinge manufacturer's instructions if available, or gently tighten the mounting screws. |
| Soft-close mechanism is not working. | Mechanism is jammed or damaged. | Check for any obstructions. If damaged, contact customer support for replacement hinges. |
| Unit feels wobbly after wall mounting. | Insufficient or improper wall anchors/screws; unit not securely fastened. | Ensure appropriate wall anchors are used for your wall type. Retighten all mounting screws. If the problem persists, consult a professional for secure installation. |
| Scratches or marks on the surface. | Abrasion from objects or improper cleaning. | Use a furniture repair pen or touch-up paint matching the black finish for minor scratches. For deeper damage, professional repair may be needed. Always use soft cloths for cleaning. |
8. Warranty and Support
For information regarding product warranty, returns, or technical support, please refer to the purchase documentation or contact Vente-unique customer service directly.
Vente-unique Customer Service: Please visit the official Vente-unique website or your point of purchase for contact details.
Note: Availability of spare parts is currently unavailable as per product information. Please contact customer service for any specific part inquiries.
Ask a question about this manual
Ask about setup, troubleshooting, compatibility, parts, safety, or missing instructions. Manuals+ will review the question and use this page’s manual context to help answer it.