1. Introduction
This manual provides detailed instructions for the installation, operation, and maintenance of your FITCAMX 4K Dash Cam, model HD2-6272. Please read this manual thoroughly before using the product to ensure proper function and safety.
2. Product Overview
2.1 Key Features
- OEM Style Integration: Designed to blend seamlessly with your vehicle's interior, appearing as a factory-installed component.
- UHD 2160P Video Quality: Records in Ultra High Definition 4K (2160P) at 30 frames per second for clear and detailed footage.
- Advanced Optics: Equipped with an f/1.6 large aperture lens and premium CMOS Sensor for superior image capture, including clear night vision with WDR technology.
- WiFi & Mobile App Connectivity: Easily view, play, manage, and download videos directly to your smartphone via the FITCAMX app.
- Loop Recording: Automatically overwrites the oldest unlocked footage when the memory card is full, ensuring continuous recording.
- G-Sensor: Detects sudden impacts or collisions and automatically locks the current video footage to prevent it from being overwritten.
- Plug & Play Installation: Designed for straightforward installation without complex wiring.
2.2 Package Contents
Verify that all items are present in your package:
- FITCAMX Front Camera (HD2-6272)
- 64GB MicroSD Card
- Y-Cable (Power Cable)
- Card Reader
- Pry Tool
- User Manual

Image: Contents of the FITCAMX dash cam package, showing the camera unit, 64GB SD card, Y-cable, card reader, pry tool, and user manual.
3. Installation
The FITCAMX dash cam is designed for an integrated, OEM-style installation. Ensure your vehicle is turned off before beginning the installation process.
3.1 Vehicle Compatibility Check
This dash cam (HD2-6272) is suitable for GMC Sierra 1500, 2500HD, and 3500HD models from 2020-2026. It is crucial to verify the original rearview mirror cover design to ensure compatibility. The HD2-6272 model is identified by 3 vent slots on the rearview mirror cover.
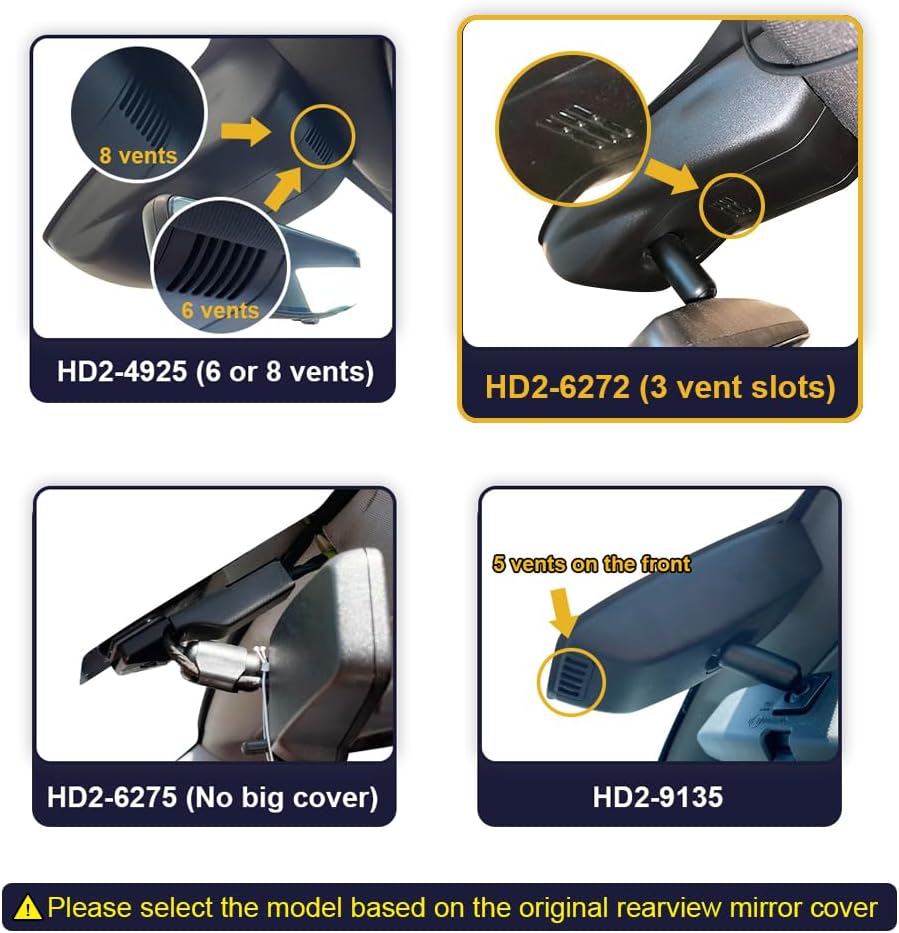
Image: Visual guide for distinguishing FITCAMX dash cam models based on the number of vents on the original rearview mirror cover. Model HD2-6272 features 3 vent slots.
3.2 Step-by-Step Installation Guide
Follow these steps to install your FITCAMX dash cam:
- Remove the Original Plastic Cover: Carefully use the provided pry tool to detach the original plastic cover around your rearview mirror.
- Connect the Y-Cable: Locate the auto-dimming rearview mirror connector. Disconnect the original cable and connect the provided Y-cable in between, ensuring a secure fit.
- Mount the Camera: Align the FITCAMX camera unit with the exposed area and gently press it into place. Ensure all cables are tucked neatly.
- Mount the Back Cover: Reattach the new back cover provided with the dash cam, ensuring it snaps securely into place.

Image: Visual representation of the four main installation steps: 1. Removing the original plastic cover, 2. Connecting the Y-cable to the auto-dimming rearview mirror connector, 3. Mounting the camera unit, and 4. Mounting the new back cover.
3.3 Installation Video
For a visual guide, please refer to the official installation video:
Video: Official installation guide for the FITCAMX dash cam, demonstrating the process of connecting to the auto-dimming mirror power source.
4. Operation
4.1 Automatic Recording
The dash cam will automatically power on and begin recording when your vehicle engine starts. It will also automatically power off when the engine is turned off.
4.2 WiFi and Mobile App
The FITCAMX app allows you to connect to your dash cam via Wi-Fi for real-time viewing, video playback, and managing recorded footage. You can download the app from the App Store (iOS) or Google Play Store (Android).
- Connecting to WiFi: Connect your smartphone to the dash cam's Wi-Fi network (SSID and password typically found on the camera or in the quick start guide).
- Viewing Footage: Once connected, open the FITCAMX app to view live footage, browse recorded videos, and adjust settings.
- Downloading Videos: Select desired videos within the app to download them to your phone.
Important Note: The camera's Wi-Fi is for local connection only and does not support remote viewing when the car is off. The dash cam records automatically, so you do not need to keep your phone connected to its Wi-Fi constantly. Using CarPlay or Bluetooth will not interfere with the dash cam's recording function.

Image: The FITCAMX mobile application interface on a smartphone, showing live video feed from the dash cam and options for camera file and settings.
4.3 Loop Recording and G-Sensor
- Loop Recording: The dash cam continuously records video in short segments. When the MicroSD card reaches its capacity, the oldest unlocked video files are automatically overwritten by new recordings.
- G-Sensor: In the event of a sudden impact, collision, or abrupt braking, the built-in G-Sensor detects the event and automatically locks the current video file. This prevents the locked footage from being overwritten by loop recording, preserving critical evidence.

Image: Explanations of Loop Recording, which automatically overwrites old files, and G-Sensor, which locks video during collisions to prevent overwriting.
4.4 Parking Monitoring (Optional)
To enable parking monitoring functionality, an additional fuse box cable (ASIN: B09PQ9KDYX) is required. This accessory allows the dash cam to record events while the vehicle is parked.

Image: Optional cables for upgrading to parking mode, showing connections for fuse box and On-Board Diagnostics, enabling different recording durations.
5. Maintenance and Troubleshooting
5.1 General Care
- Keep the camera lens clean for optimal video quality.
- Operate the dash cam within the specified temperature range of -20°C to 85°C (-4°F to 185°F).
- Regularly format the MicroSD card (e.g., monthly) to maintain performance and prevent data corruption.
5.2 Troubleshooting FAQs
- Q: Do I need to connect the camera's WiFi every time I drive?
- A: No. The dash cam will automatically turn on and off with your car engine, recording continuously without requiring a Wi-Fi connection.
- Q: Can I view video after turning off the car or remotely?
- A: No, remote viewing is not supported. You can only view footage that has been downloaded to your phone in advance. All video is automatically saved to the MicroSD card, not your phone, unless manually downloaded.
- Q: Can I use CarPlay/Bluetooth when driving?
- A: Yes. Your phone can be connected to CarPlay and the dash cam's Wi-Fi simultaneously, but it's not necessary to maintain the Wi-Fi connection for the camera to record. The camera records automatically once the car starts.
6. Specifications
| Model Name | FITCAMX 4K Dash Cam |
| Model Number | HD2-6272 |
| Video Capture Resolution | Front 2160P (4K) Only |
| Field of View | 170 Degrees |
| Lens Aperture | f/1.6 |
| Special Features | FITCAMX App, OEM Style, WDR, G-Sensor, Loop Recording |
| Connectivity Technology | Powerline, Wireless (Wi-Fi) |
| Operating Temperature | -20°C to 85°C (-4°F to 185°F) |
| Product Dimensions | 12 x 9 x 4 inches |
| Item Weight | 1.7 pounds |
| Batteries | 1 Lithium Metal battery (included) |
7. Warranty and Support
FITCAMX offers prompt technical support and lifetime after-sales service for this product. For any questions or assistance, please contact FITCAMX customer service.
The product is made of high-density ABS+PC material, ensuring durability within the specified operating temperature range.


