Introduction
This manual provides detailed instructions for the installation, operation, and maintenance of your REDTIGER F7NP Dash Cam. Please read this manual thoroughly before using the product to ensure proper functionality and to maximize your driving safety and recording experience.
Package Contents
Verify that all items listed below are included in your package:
- REDTIGER F7NP Front Dash Camera
- Rear Camera
- OBD Hardwire Kit
- 128GB Memory Card (pre-installed or included separately)
- Mounting Bracket (Suction Cup or Adhesive)
- Power Cable
- Rear Camera Cable
- User Manual (this document)

Image: Overview of the REDTIGER F7NP Dash Cam and its included accessories, such as the main camera unit, rear camera, OBD hardwire kit, and a 128GB memory card.
Product Overview
The REDTIGER F7NP is a high-performance dual dash camera system designed to record your journeys in exceptional detail. Key features include:
- Front Camera: Records in 4K resolution with a 170° wide-angle lens, featuring the advanced STARVIS 2 sensor for superior image quality.
- Rear Camera: Records in 1080P resolution with a 140° wide-angle lens, providing comprehensive coverage of the vehicle's rear.
- Built-in GPS: Accurately records vehicle speed, location, and driving route.
- Built-in 5.8GHz WiFi: Enables fast connection to the companion mobile application for video management.
- WDR & HDR Technology: Enhances video clarity in varying light conditions, especially at night.
- G-Sensor: Detects sudden impacts and automatically locks important video files.
- Loop Recording: Ensures continuous recording by overwriting the oldest files when the memory card is full.
- Parking Monitor: Provides 24/7 surveillance when parked (requires OBD Hardwire Kit).

Image: Illustration of the dual recording capability of the F7NP Dash Cam, capturing 4K video from the front and 1080P from the rear simultaneously.

Image: Visual representation of the dash cam's superior night vision performance, highlighting the STARVIS 2 sensor, 6-layer optical lens, and WDR/HDR technology for clear low-light recording.
Setup and Installation
1. Memory Card Insertion
- Ensure the dash cam is powered off.
- Locate the memory card slot on the dash cam.
- Insert the provided 128GB memory card with the contacts facing the correct direction until it clicks into place.
- It is recommended to format the memory card within the dash cam settings upon first use.

Image: Depiction of the included 128GB memory card and the concept of loop recording, where older files are overwritten to ensure continuous recording.
2. Front Camera Installation
- Clean the chosen area on your windshield, typically behind the rearview mirror, to ensure a strong adhesion for the mounting bracket.
- Attach the mounting bracket (suction cup or adhesive) to the windshield.
- Slide the front dash cam onto the mounting bracket until it locks securely.
- Adjust the camera angle to ensure a clear view of the road ahead, avoiding obstruction from wipers or other vehicle components.
3. Rear Camera Installation
- Mount the rear camera on the rear windshield, ensuring a clear view.
- Route the rear camera cable neatly along the vehicle's headliner and A-pillars to the front dash cam.
- Connect the rear camera cable to the designated port on the front dash cam.
4. Power Connection (OBD Hardwire Kit)
The included OBD Hardwire Kit is required for enabling the 24/7 Parking Monitor feature.
- Locate your vehicle's OBD-II port, usually found under the dashboard on the driver's side.
- Connect the OBD plug of the hardwire kit to the vehicle's OBD-II port.
- Route the Type-C USB cable from the hardwire kit to the front dash cam and connect it to the power input port.
- Ensure the cables are tucked away safely and do not interfere with driving controls.

Image: Detailed view of the OBD Hardwire Kit, showing its OBD plug, integrated switch, and Type-C USB connector for powering the dash cam.
Operating Instructions
1. Powering On/Off
The dash cam will automatically power on and begin recording when your vehicle's ignition is turned on (if connected via hardwire kit or cigarette lighter adapter). It will power off automatically when the ignition is turned off.
2. Loop Recording
The F7NP dash cam continuously records video in short segments (e.g., 1, 3, or 5 minutes). When the memory card is full, the oldest unlocked files are automatically overwritten by new recordings. This ensures uninterrupted recording without manual intervention.
3. G-Sensor (Emergency Recording)
The built-in G-sensor detects sudden impacts or collisions. When triggered, it automatically locks the current video segment, preventing it from being overwritten by loop recording. These locked files are stored in a separate folder on the memory card.
4. 24/7 Parking Monitor
With the OBD Hardwire Kit installed, the dash cam can monitor your vehicle even when parked. There are two modes:
- G-Sensor Mode: The camera remains in standby and starts recording if an impact is detected.
- Time-lapse Mode: The camera continuously records at a low frame rate, compressing hours of footage into minutes, providing comprehensive surveillance while minimizing storage usage.
Note: The 24/7 Parking Monitor feature requires the included OBD Hardwire Kit for continuous power supply.

Image: Illustration of the 24-hour parking monitoring feature, showing how G-sensor mode detects impacts and time-lapse mode provides continuous surveillance.
5. Built-in GPS Tracking
The integrated GPS module records your vehicle's precise location, speed, and driving route. This data can be viewed during video playback using the Redtiger Cam app or dedicated PC viewer software.

Image: Example of GPS tracking data displayed on a map, indicating the vehicle's route, speed, and coordinates, accessible via the companion app or PC software.
6. WiFi Connectivity & Redtiger Cam App
The F7NP features 5.8GHz WiFi for fast connection to your smartphone via the "Redtiger Cam" application. This allows you to:
- Preview live video feed from both cameras.
- Download recorded videos to your phone at speeds up to 20MB/s.
- Replay recorded footage.
- Check GPS data (route, speed, location).
- Adjust dash cam settings.
- Download the "Redtiger Cam" app from your smartphone's app store.
- Turn on the dash cam's WiFi (refer to on-screen menu or manual for specific steps).
- Connect your smartphone to the dash cam's WiFi network (SSID and password usually displayed on the dash cam screen).
- Open the Redtiger Cam app to access features.
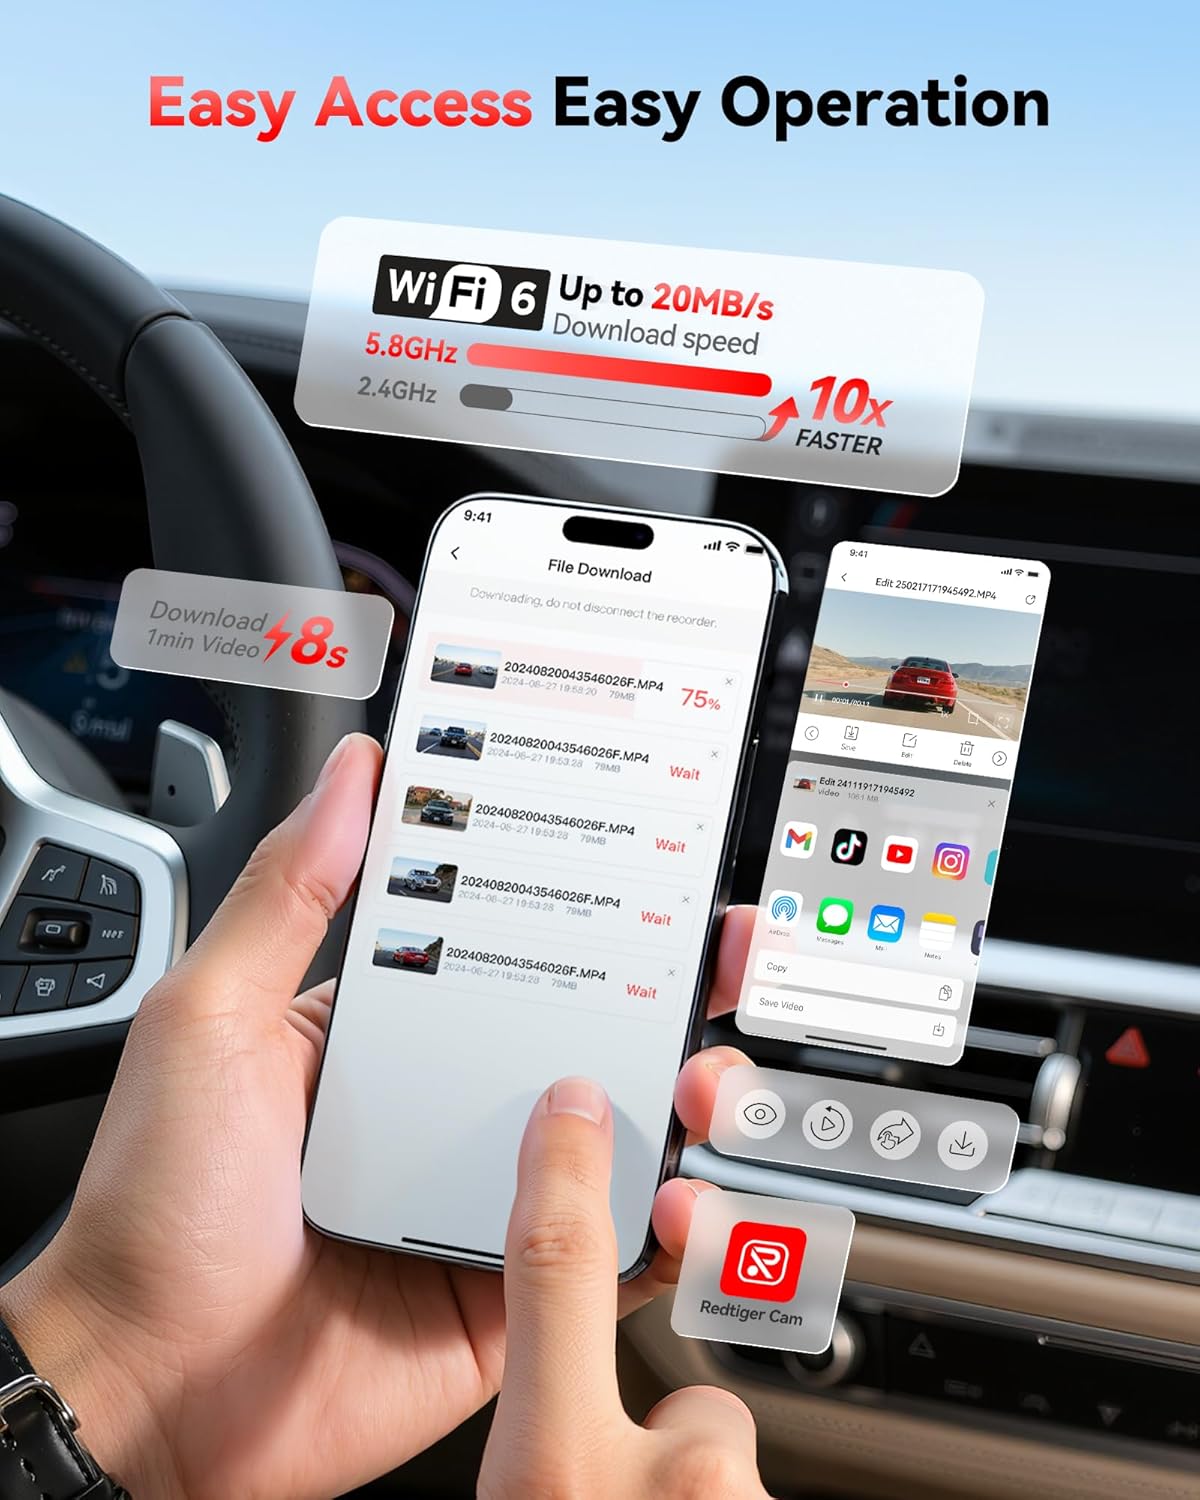
Image: Screenshot of the Redtiger Cam mobile application interface, demonstrating the fast download speeds of recorded videos via 5.8GHz WiFi.
Maintenance
1. Memory Card Management
- Formatting: It is recommended to format the memory card every 2-4 weeks to maintain optimal performance and prevent data corruption. This can usually be done through the dash cam's settings menu or the Redtiger Cam app.
- Replacement: Memory cards have a limited lifespan. If you experience frequent recording errors or corrupted files, consider replacing the memory card with a new, high-endurance card.
2. Cleaning
- Lenses: Gently wipe the front and rear camera lenses with a soft, lint-free cloth to ensure clear video quality. Avoid abrasive materials or harsh chemicals.
- Screen: Clean the dash cam screen with a soft, dry cloth.
- Body: Wipe the dash cam body with a slightly damp cloth if necessary. Ensure no moisture enters the ports.
Troubleshooting
| Problem | Possible Cause | Solution |
|---|---|---|
| Dash cam does not power on. | No power supply; faulty cable; loose connection. | Check power cable connection to the dash cam and power source (OBD port or cigarette lighter). Ensure vehicle ignition is on. Test with a different power source if possible. |
| Recording stops or files are corrupted. | Memory card full; memory card error; low-quality memory card. | Format the memory card regularly. Use a high-endurance U3 (or higher) microSD card. Replace the memory card if issues persist. |
| WiFi connection issues with app. | Incorrect WiFi password; app not updated; interference. | Ensure correct WiFi password. Restart dash cam and phone. Update "Redtiger Cam" app to the latest version. Try connecting in a different location to rule out interference. |
| GPS data not showing or inaccurate. | Poor GPS signal; dash cam not receiving satellite signals. | Ensure the dash cam has a clear view of the sky. Avoid mounting near metallic objects that could block the signal. Allow a few minutes for GPS lock after powering on. |
| Mounting bracket detaches from windshield. | Improper cleaning; extreme temperature changes; worn suction cup. | Clean the windshield thoroughly before mounting. Ensure the suction cup is clean. If using adhesive, ensure it's a fresh pad. Consider alternative mounting solutions if issues persist due to temperature fluctuations. |
Specifications
| Feature | Detail |
|---|---|
| Model Name | F7NP |
| Brand | REDTIGER |
| Front Camera Resolution | 4K (2160p) |
| Rear Camera Resolution | 1080p |
| Sensor | STARVIS 2 |
| Aperture | F1.5 |
| Lens | 6-layer optical lens |
| Front Viewing Angle | 170° |
| Rear Viewing Angle | 140° |
| Connectivity | Built-in 5.8GHz Wi-Fi |
| Special Features | GPS, Parking Monitor (G-Sensor, Time-lapse), WDR, HDR, Loop Recording |
| Included Components | Hardwire Kit, 128GB Memory Card |
| Mounting Type | Rearview Mirror Mount or Windshield Mount |
| Control Method | App |
Warranty and Support
REDTIGER products are designed for reliability and performance. For specific warranty details, please refer to the warranty card included with your product or visit the official REDTIGER website. For technical support, troubleshooting assistance, or further inquiries, please contact REDTIGER customer service through their official channels or visit the REDTIGER Store on Amazon.


