1. Introduction
This manual provides detailed instructions for the safe and efficient use of your 4 LEAF 8 Outlets Dual Side USB C Recessed Power Strip. This product is designed to provide convenient power access and charging capabilities for various electronic devices, integrating seamlessly into furniture such as desks, cabinets, tables, and conference setups. Please read this manual thoroughly before installation and operation, and retain it for future reference.

Figure 1.1: Overview of the 4 LEAF Recessed Power Strip, highlighting its dual-sided design and flat plug.
2. Safety Information
WARNING: To reduce the risk of electric shock, fire, or injury, always follow these basic safety precautions:
- Do not exceed the maximum load capacity of 12A (125V).
- This product is designed for indoor use only. Do not expose to moisture or wet conditions.
- Ensure the power strip is properly installed and secured before use.
- Do not disassemble or modify the power strip. Refer all servicing to qualified personnel.
- Keep children and pets away from the power strip during operation.
- Unplug the power strip from the main outlet when not in use or before cleaning.
- The power strip is constructed with fire-resistant material, capable of withstanding temperatures up to 1382°F (750°C). However, avoid placing it near heat sources.

Figure 2.1: Illustration of the power strip's fire-resistant material for enhanced safety.
3. Package Contents
Verify that all items are present and in good condition:
- 1 x 4 LEAF 8 Outlets Dual Side USB C Recessed Power Strip
- Mounting Screws (pre-installed or included separately)
- Instruction Manual (this document)
4. Product Features
- Dual-Side Design: Features 8 AC outlets distributed on two sides, providing convenient power access for multiple devices, ideal for shared workspaces or furniture.
- Recessed Integration: Designed for flush mounting under desks, cabinets, or nightstands, offering a clean and organized appearance while saving space.
- Fast Charging USB Ports: Includes one PD3.0 20W USB-C Port and one QC3.0 18W Max USB-A Port (5V/3A, 9V/2V, 12V/1.5A), alongside standard USB-A ports (5V/2A), for rapid device charging.
- Flat Plug with 6ft Heavy Duty Cord: A low-profile flat plug allows for placement in tight spaces, and the 6ft SJT-3 16# heavy-duty extension cord ensures durability and high current carrying capacity.
- Multi-Protection: Built with fire-proof material and multiple protection features including overload, short-circuit, and high-temperature protection, complying with US (UL/ETL) and Canada (CSA) Standards.
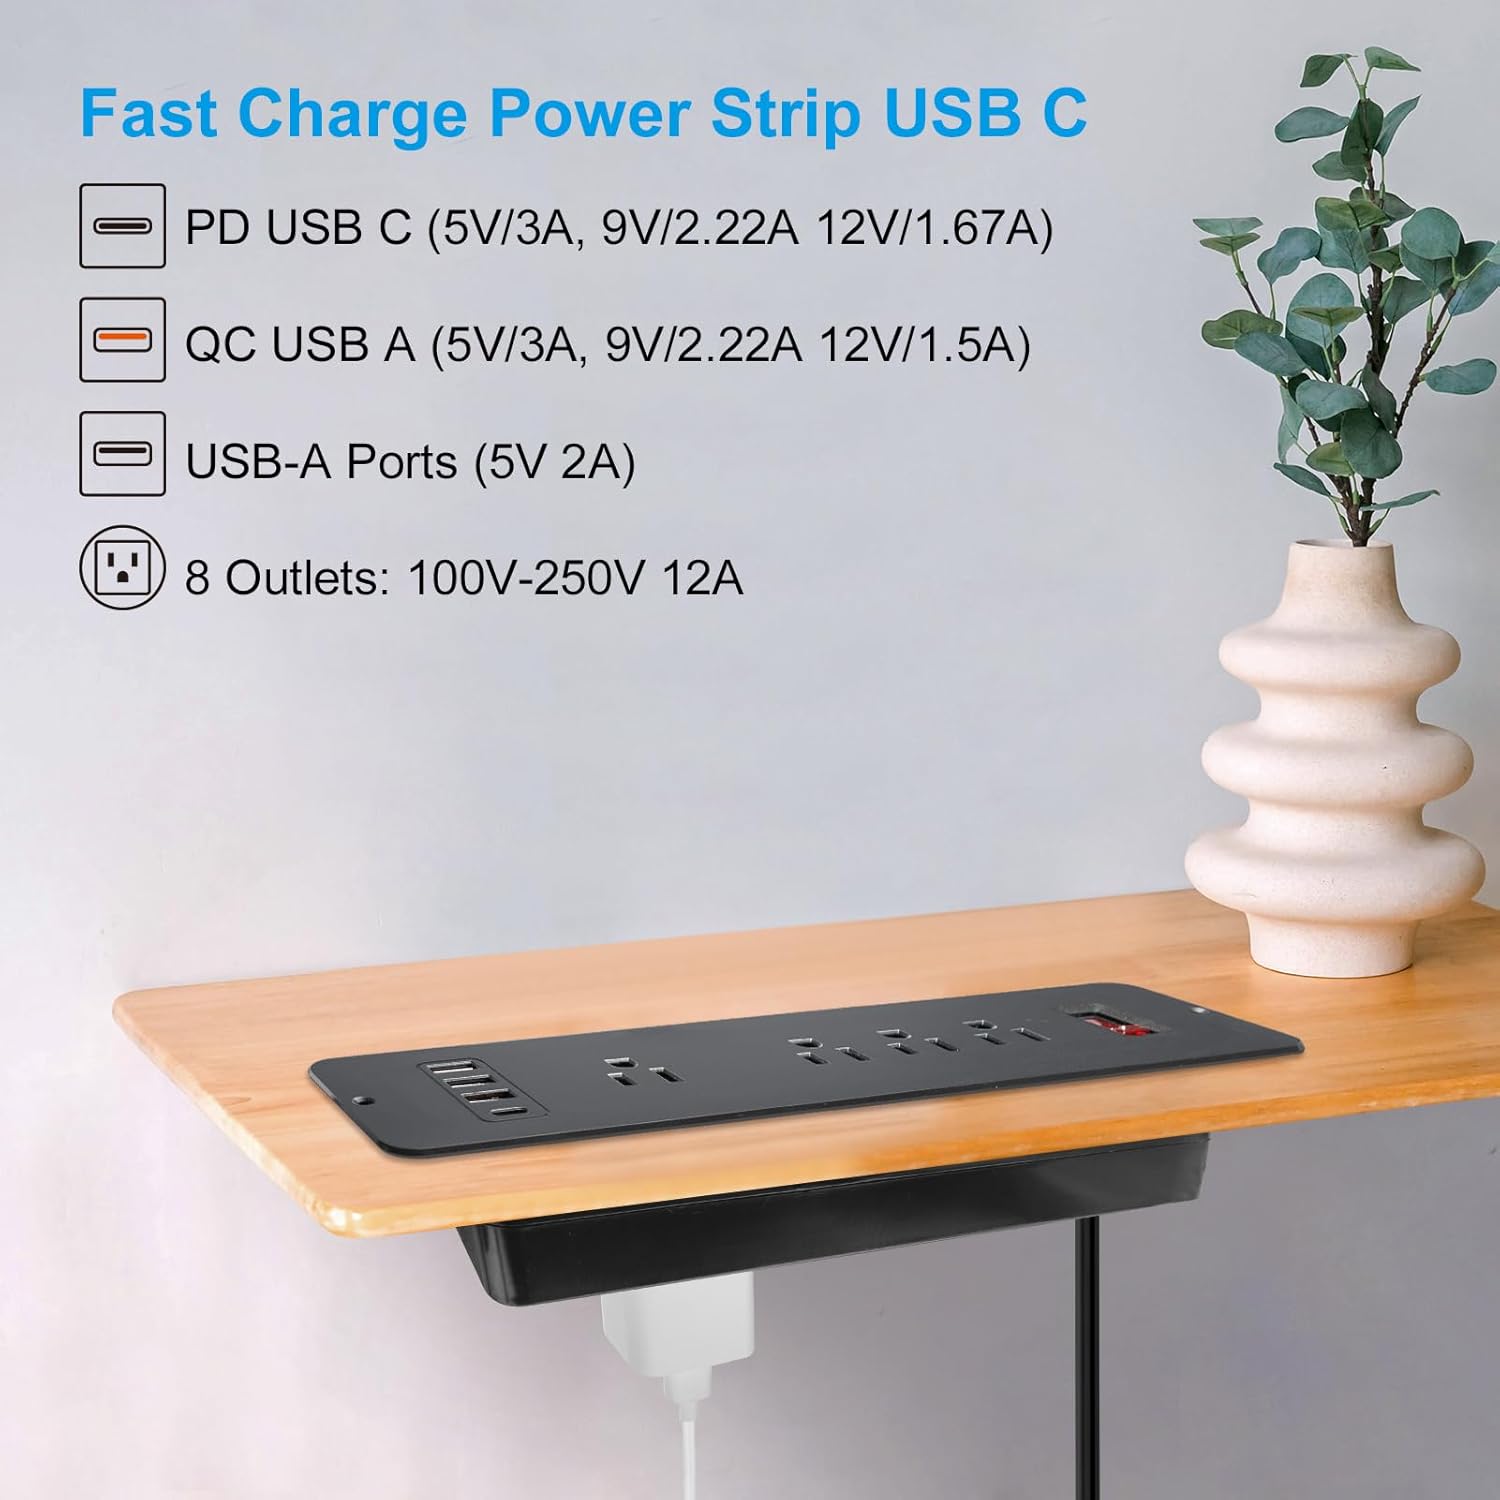
Figure 4.1: Detailed view of the fast charging USB ports and AC outlets.

Figure 4.2: The flat plug design, allowing for use in confined spaces.
5. Setup and Installation
This power strip is designed for recessed installation. Careful measurement and cutting are required.
- Determine Installation Location: Choose a suitable location on your desk, cabinet, or furniture where you want to install the power strip. Ensure there is enough clearance underneath for the power strip body and connected cables.
- Measure and Mark: The required cutting hole size is approximately 9.65 inches (length) x 2.2 inches (width). Carefully measure and mark the cutting area on your furniture surface. It is recommended to create a template first to ensure accuracy.
- Cut the Opening: Using appropriate tools (e.g., jigsaw, router), carefully cut the marked opening. Ensure the edges are smooth and clean.
- Insert the Power Strip: Gently insert the power strip into the cut opening. The flange of the power strip should rest flush with the surface of your furniture.
- Secure the Power Strip: Use the provided mounting screws to secure the power strip to the furniture through the pre-drilled holes on the flange. Tighten the screws firmly but do not overtighten.
- Connect to Power: Plug the power strip's flat plug into a grounded wall outlet.

Figure 5.1: Installation dimensions and product measurements.
Video 5.1: Demonstration of the recessed power strip's features and how it integrates into a desk setup.
6. Operating Instructions
- Power On/Off: Locate the red power switch on the top surface of the power strip. Press the switch to turn the power strip on or off. The switch will illuminate when the power is on.
- Using AC Outlets: Plug your devices into any of the 8 available AC outlets. The dual-sided design allows for flexible placement of plugs, including one wide-spaced outlet for larger adapters.
- Using USB Ports: Connect your USB-C compatible devices to the PD USB-C port for fast charging. Use the orange QC USB-A port for Quick Charge compatible devices, and the standard USB-A ports for other USB-powered devices.

Figure 6.1: The power strip in use, showing devices connected to both top and bottom outlets.

Figure 6.2: Example of using the wide-spaced outlet for larger power adapters.
7. Maintenance
- Cleaning: Disconnect the power strip from the main power source before cleaning. Use a soft, dry cloth to wipe the surface. Do not use liquid cleaners or abrasive materials.
- Inspection: Periodically inspect the power cord and the power strip for any signs of damage, such as frayed wires, cracks, or loose connections. If damage is found, discontinue use immediately and contact customer support.
8. Troubleshooting
| Problem | Possible Cause | Solution |
|---|---|---|
| No power to outlets/USB ports. | Power switch is off. Power strip is not plugged in. Overload protection tripped. |
Ensure the power switch is in the 'ON' position. Verify the power strip is securely plugged into a live wall outlet. Unplug some devices, then reset the power switch. Reduce the total load. |
| Devices not charging via USB. | Incorrect USB port used. Device charging cable is faulty. Device is not compatible with fast charging. |
Ensure the correct USB port (PD USB-C, QC USB-A) is used for your device's charging standard. Try a different USB cable. Some devices may not support fast charging protocols; they will charge at standard speeds. |
| Power strip feels warm. | Normal operation under load. Overload. |
A slight warmth is normal during operation. If excessively hot, unplug devices immediately. Reduce the number of connected devices to prevent overload. |
9. Specifications
- Model Number: PT-0083
- Product Dimensions: 11.8 x 1.57 x 0.1 inches (Top Plate)
- Item Weight: 1.32 pounds
- Total Power Outlets: 8 AC Outlets
- USB Ports: 1 x PD USB-C (20W), 1 x QC USB-A (18W Max), 2 x Standard USB-A (5V/2A)
- Voltage: 125 Volts
- Current Rating: 12A Max
- Cord Length: 6 feet (SJT-3 16# Heavy Duty)
- Special Features: Mountable, On/Off Switch, PD USB C, USB Slot, Wide Spaced Outlet
- Manufacturer: 4 LEAF
10. Warranty and Support
4 LEAF products are designed for quality and reliability. For warranty information, technical support, or customer service inquiries, please refer to the contact information provided with your purchase or visit the official 4 LEAF website. Please have your model number (PT-0083) and purchase details ready when contacting support.


