1. Introduction
The Mars Gaming MC-iPRO is a professional semi-tower ATX PC case designed for optimal performance and aesthetics. It features a robust structure, efficient cooling capabilities, and a clear tempered glass side panel to showcase your components. This manual provides essential information for the proper installation, operation, and maintenance of your MC-iPRO PC case.
Key features include:
- Tempered Glass Side Panel: Offers a clear view of internal components.
- Three-Dimensional Mesh Front Grille: Designed for superior airflow and a distinctive appearance.
- Optimized Internal Capacity: Supports ATX, MicroATX, and Mini-ITX motherboards, with ample space for storage drives and expansion cards.
- Advanced Cooling Support: Accommodates liquid cooling systems and multiple fans for efficient thermal management.
- Total Connectivity: Conveniently located front panel ports for easy access.

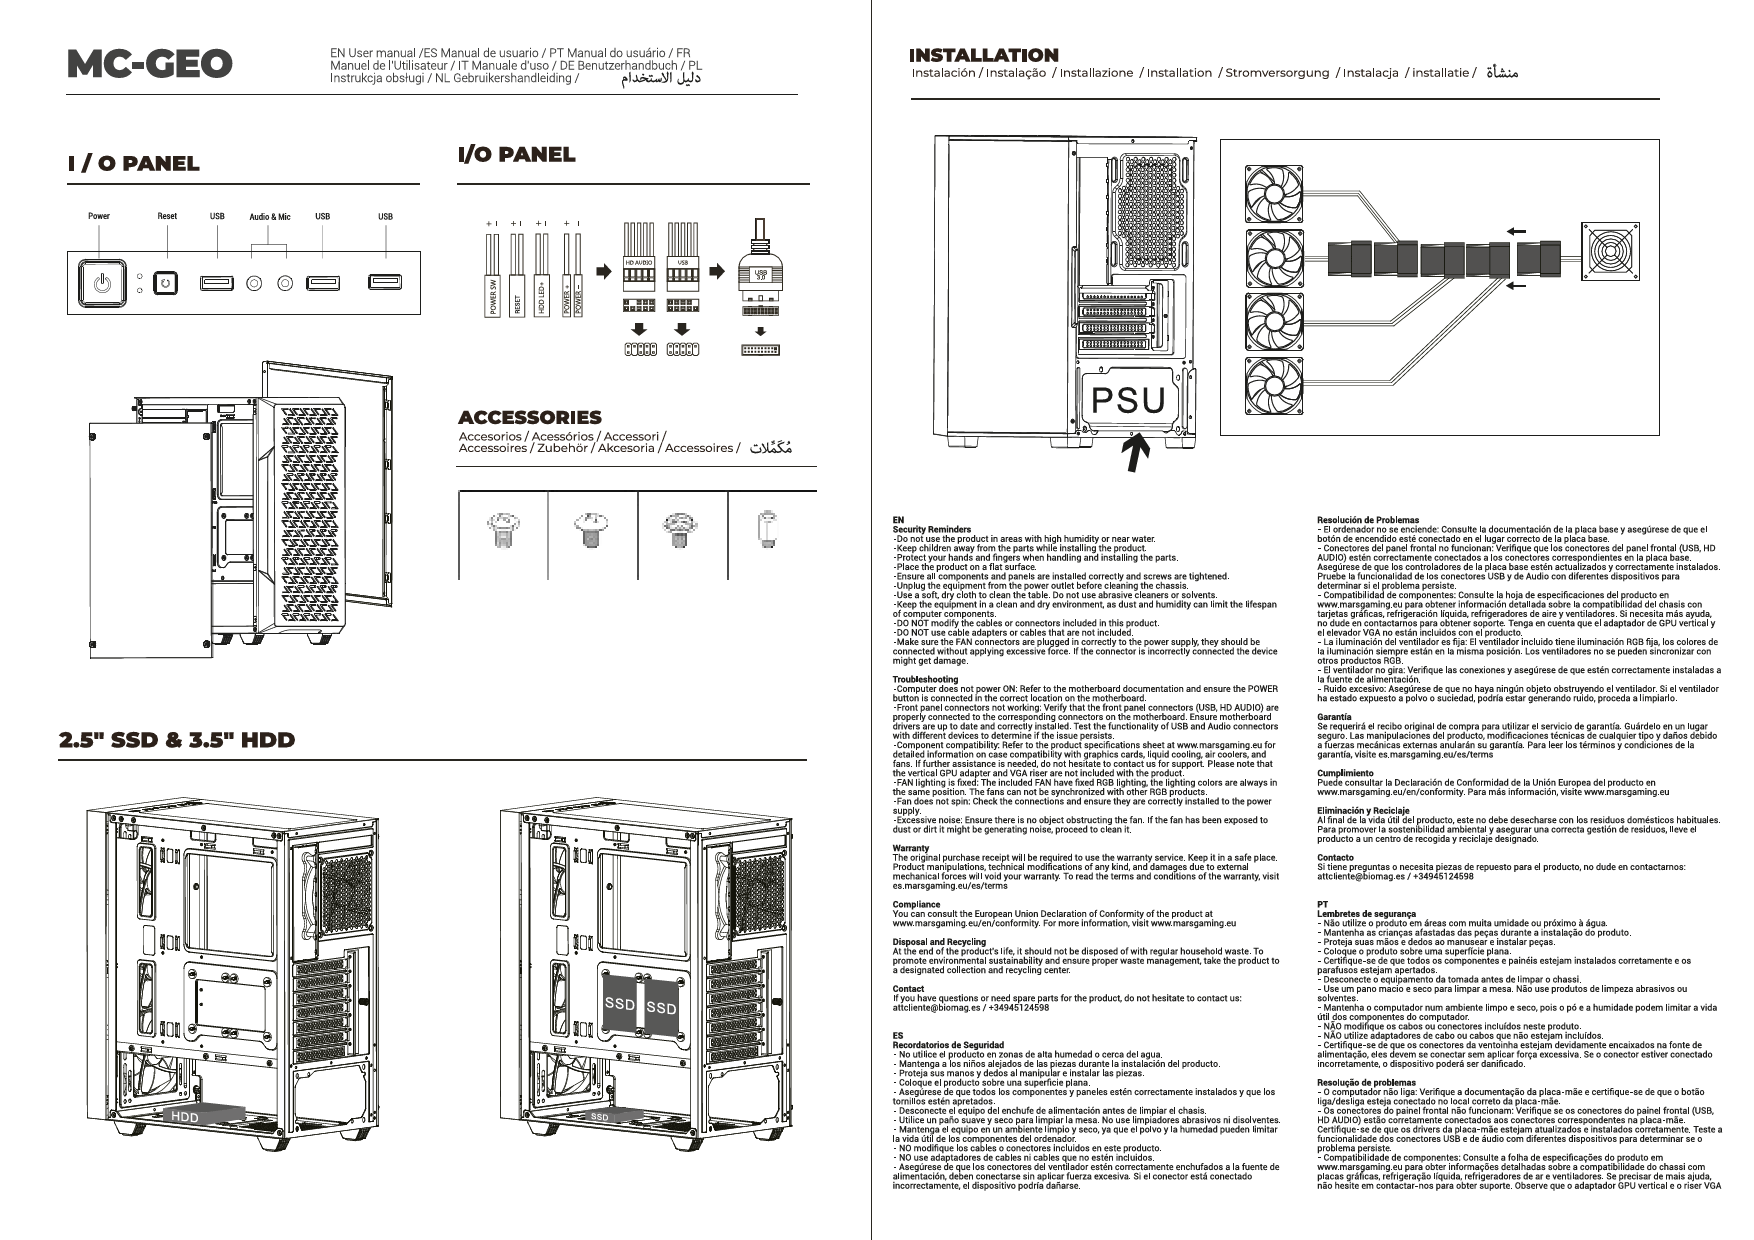
Figure 1.1: Mars Gaming MC-iPRO PC Case, showcasing its overall design with the mesh front and tempered glass side panel.
2. Component Overview
Familiarize yourself with the main components and features of your MC-iPRO case.

Figure 2.1: The tempered glass side window provides a clear view of the internal components, allowing for aesthetic display of your build.

Figure 2.2: The three-dimensional front mesh grille is designed to maximize airflow into the case, contributing to efficient cooling.

Figure 2.3: An ultra-quiet 120mm FDB (Fluid Dynamic Bearing) fan is included, typically pre-installed at the rear for exhaust, ensuring quiet operation.

Figure 2.4: The case provides ample space and mounting points for various liquid cooling solutions, including radiators at the top, front, and rear.
3. Setup and Installation
This section guides you through the process of installing your PC components into the Mars Gaming MC-iPRO case.
3.1 Preparing the Case
- Place the case on a stable, flat surface.
- Carefully remove the tempered glass side panel by unscrewing the thumb screws. Set it aside in a safe place to prevent damage.
- Remove the rear side panel to access the cable management area.
3.2 Motherboard Installation
The MC-iPRO supports ATX, MicroATX, and Mini-ITX motherboards.
- Install the I/O shield into the designated opening at the rear of the case.
- Align your motherboard with the standoffs inside the case. Ensure all standoffs match the screw holes on your motherboard.
- Secure the motherboard with the appropriate screws.
3.3 Storage Drive Installation
The case offers capacity for 2 x 3.5" HDDs and up to 4 x 2.5" SSDs.
- 3.5" HDDs: Locate the drive cage, typically near the power supply shroud. Slide the HDDs into the bays and secure them with screws or tool-less mechanisms if available.
- 2.5" SSDs: Mount SSDs to the designated trays or mounting points, often found behind the motherboard tray or on the power supply shroud. Secure with screws.
3.4 Power Supply Installation
- Position your ATX power supply unit (PSU) in the dedicated compartment at the bottom rear of the case.
- Secure the PSU with screws from the rear of the case.
3.5 Expansion Card (GPU, etc.) Installation
The case provides 7 expansion slots.
- Remove the necessary slot covers from the rear of the case.
- Insert your expansion card (e.g., graphics card) into the appropriate PCIe slot on your motherboard.
- Secure the card with screws.
3.6 Cooling System Installation
The MC-iPRO supports various cooling configurations:
- Fans: Up to 8 x 120mm fans can be installed. Refer to Figure 3.1 for fan placement options.
- Liquid Cooling: Radiators can be mounted at the top (up to 240mm/120mm), front (up to 240mm/120mm), and rear (120mm).
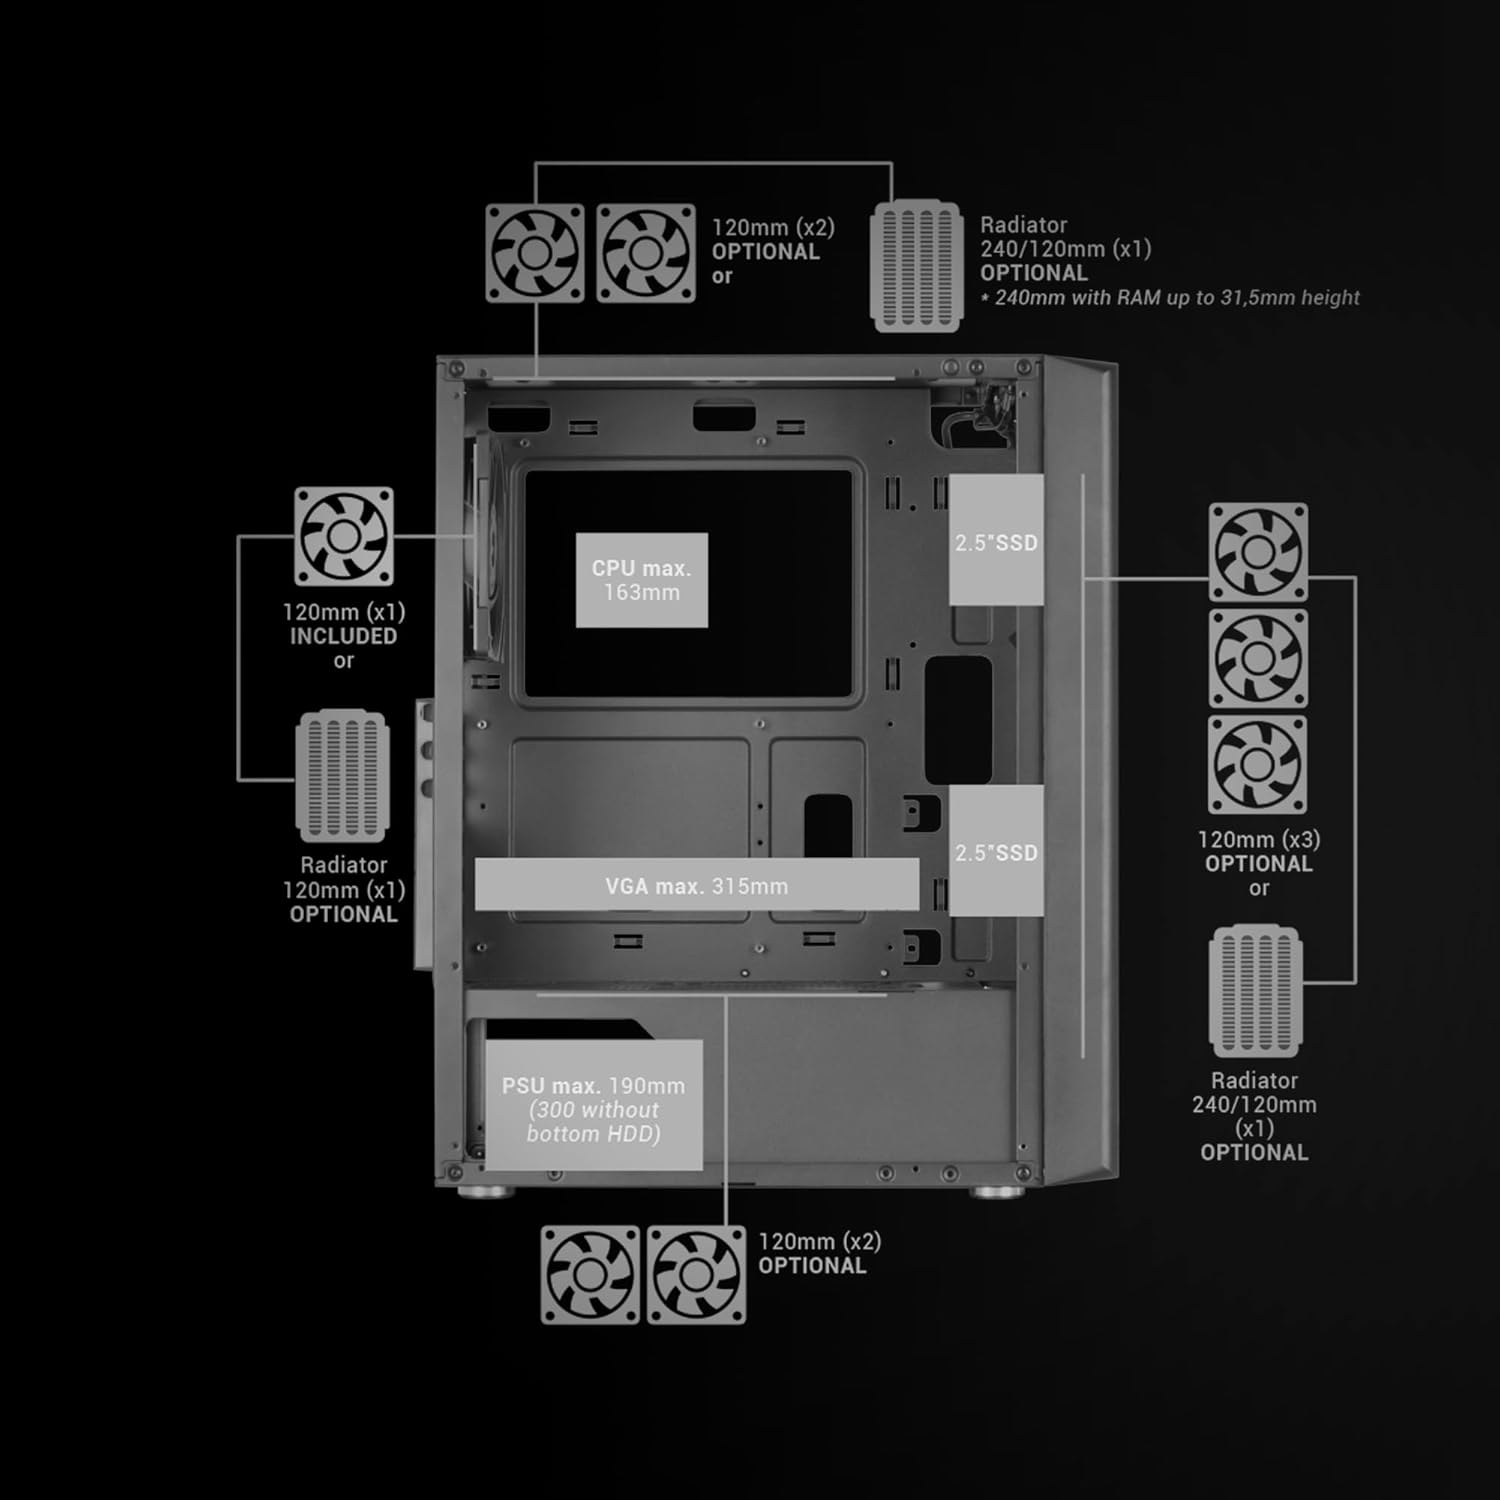
Figure 3.1: Internal layout diagram illustrating component clearances and optional fan/radiator placements. CPU cooler height max 163mm, VGA length max 315mm, PSU length max 190mm (300mm without bottom HDD).
3.7 Cable Management
Utilize the cable routing cutouts and tie-down points behind the motherboard tray to organize cables. This improves airflow and aesthetics.
3.8 Front Panel Connections
Connect the front panel cables (USB 3.0, USB 2.0, HD Audio, Power, Reset, LED indicators) to the corresponding headers on your motherboard. The top panel features one USB 3.0 port, two USB 2.0 ports, and HD audio/microphone inputs.
4. Operating Instructions
Once all components are installed and secured, and all cables are connected:
- Reattach the tempered glass side panel and the rear side panel.
- Connect your monitor, keyboard, mouse, and power cable to the PC.
- Press the power button on the top panel of the case to start your system.
Ensure the case is placed in a location with adequate ventilation to allow for proper airflow through the front mesh grille and exhaust points.
5. Maintenance
Regular maintenance helps ensure optimal performance and longevity of your PC components.
- Dust Cleaning: Periodically clean the dust filters (if present) and the interior of the case using compressed air or a soft brush. Pay special attention to the front mesh grille and fan areas.
- Exterior Cleaning: Wipe the exterior surfaces with a soft, damp cloth. Avoid abrasive cleaners. For the tempered glass, use a glass cleaner and a microfiber cloth.
- Fan Inspection: Check fans for dust buildup and ensure they are spinning freely.
6. Troubleshooting
If you encounter issues during or after installation, consider the following common troubleshooting steps:
- System Not Powering On:
- Ensure the power supply is switched on and properly connected to the wall outlet.
- Verify all power cables (24-pin ATX, CPU, GPU, SATA) are securely connected to the motherboard and components.
- Check the front panel power button connection to the motherboard.
- No Display Output:
- Confirm the monitor is connected to the graphics card (not the motherboard's integrated graphics, unless intended).
- Reseat the graphics card in its PCIe slot.
- Check all power connections to the graphics card.
- Overheating Issues:
- Ensure all case fans are installed correctly and spinning.
- Verify proper airflow direction (intake from front/bottom, exhaust from rear/top).
- Clean any dust buildup on fans, radiators, and filters.
- Ensure CPU cooler and GPU coolers are properly seated and functioning.
- Component Fit Issues:
- Refer to Figure 3.1 for maximum component dimensions (CPU cooler height, VGA length, PSU length).
- Ensure cables are managed efficiently to avoid obstructing component installation or airflow.
7. Specifications
| Feature | Detail |
|---|---|
| Brand | Mars Gaming |
| Model Name | MCIPRO |
| Case Type | Mid Tower |
| Motherboard Compatibility | ATX, MicroATX, Mini-ITX |
| Material | Metal, Tempered Glass |
| Color | Black |
| Dimensions (LxWxH) | 19.29 x 9.65 x 16.54 inches (490 x 245 x 420 mm) |
| Item Weight | 9.35 pounds (4.24 kg) |
| Expansion Slots | 7 |
| Drive Bays | 2 x 3.5" HDD, up to 4 x 2.5" SSD |
| Front I/O Ports | 1 x USB 3.0, 2 x USB 2.0, HD Audio, Microphone |
| Cooling Method | Air, Liquid Cooling Support |
| Included Fan | 1 x 120mm FDB Fan (rear) |
| Max CPU Cooler Height | 163mm |
| Max VGA Length | 315mm |
| Max PSU Length | 190mm (300mm without bottom HDD) |
8. Warranty and Support
Mars Gaming products are designed for reliability and performance. For warranty information, please refer to the specific warranty terms provided at the time of purchase or visit the official Mars Gaming website.
If you require technical assistance or have questions regarding your MC-iPRO PC case, please contact Mars Gaming customer support through their official channels. When contacting support, please have your product model (MCIPRO) and purchase details ready.
For the latest drivers, software, and product information, please visit the official Mars Gaming website.